Hours of Operation
Hours of Operation are the standard, defined hours your company is open for business. They include exceptions for when your company is closed due to statutory holidays or company holidays.
The Hours of Operation feature within Symbee Connect allows you to build custom schedules for any channel or department including specifying standard operational hours as well as configuring company observed holidays.
Hours of Operation schedules can be used with both Symbee Connect delivered channels as well as Amazon Connect delivered channels.
Run CloudFormation
If this is the first Symbee Connect CloudFormation you have run, you will need to run the Integrations CloudFormation first. For step by step instructions and further information about CloudFormations click here.
Download and Run Hours of Operation CloudFormation
Before you can proceed, you need to run the Hours of Operation CloudFormation in your aws account.
- Log Into your AWS Management Console.
-
Make sure you are in the correct AWS region for where you want to deploy (this can be found on the top right of the Navigation bar).
-
Click on Services at the top, and under Management and Governance, choose CloudFormation.
-
From the CloudFormations console, select Stacks in the left-hand navigation bar, and select Create Stack (with new resources (standard)).
-
You will be presented the Create Stack view for creating/deploying a new CloudFormation script (known as a stack):
-
Under the Prepare Template section, select Template is Ready
- Under Specify Template, select Upload a template file
- Under Upload a template file, click Choose File
- In the resulting file selector, find and upload the file you saved from Step 3 above.
- Click Next at the bottom
-
In the Specify Stack Details screen, complete the fields as follows:
-
Stack Name: Enter a name appropriately. We suggest using your Symbee Connect Environment (e.g. dev, prod, etc.) in the name for better organization, in case you have CloudFormations for multiple Symbee Connect Environments being deployed into the same AWS Account. For example:
companyalias-environment-hoursofoperation**- LambdaDistroBucket: This is the Symbee Connect Lambda S3 bucket where the Voicemail and Direct Dialing Lambdas will be uploaded from. Select the bucket name from the drop-down that matches the AWS region you are running the CloudFormation in.
- LambdaSourceFile: Select from the dropdown, there will be only 1 value to pick from.
- SecretsManagerRegion: Enter the name of the AWS region where the initial Symbee Connect Integration CloudFormation was run in.
For Example:
us-east-1, us-west-2, eu-central-1, etc. - Click the orange Next button in the bottom right hand corner
- On the Options page, just scroll down and click the orange Next button (no updates needed on this page)
- On the Review page, scroll down to the Capabilities section, check mark “I acknowledge that AWS CloudFormation might create IAM resources with custom names”. Click the orange Create Stack button in the bottom right hand corner.
- Confirm that the process completed successfully.
Symbee Connect Configuration
Creating a Schedule
Adding Hours of Operation
- Click on the Function menu on the top navigation bar, then select Hours of Operation under Contact Center Configuration.
- Click on the Add New Hours Schedule button.
- Create a Name for the schedule. This name will represent the hours listed.
- Add a Description. This will help describe the Schedule.
- Select which Operating Time Zone the group using this schedule, adheres to.
- Under the Operating Schedule – Standard Hours section you will build your schedule by clicking Add, next to days you need to add to the scheduled.
- You can modify hours listed by adjusting the times under the Start and End times as well.
- Click Save.
Modifying Hours of Operation
- Click on the Function menu on the top navigation bar, then select Hours of Operation under Contact Center Configuration.
- Click the checkbox next to the schedule you want to modify.
- Click on the Modify button.
- You can modify the Start (Open Time), the End (Close Time), Delete the day all together or Add a day.
- Click Save.
Deleting Hours of Operation
- Click on the Function menu on the top navigation bar, then select Hours of Operation under Contact Center Configuration.
- Click the checkbox next to the schedule you want to modify.
- Click on the Delete button.
- Click on the red Delete button to confirm you want to delete the selected schedule.
- The Hours of Operation will be removed from the entry table.
Exception Dates
Observed holidays and special days of operation can be configured in the Exception Dates section under the Operation Schedule – Exception Dates. Here, the exception can be defined as a Closed day, or you can specify the hours you will be open on a specific day.
Adding an Exception to Hours of Operation
- Click on the Function menu on the top navigation bar, then select Hours of Operation under Contact Center Configuration.
- Click the checkbox next to the schedule you want to modify.
- Click on the Modify button.
- Scroll to the bottom and add the Exception in the Operating Schedule – Exceptions Dates section. Mark this with specific open hours or mark as closed for this day.
- Each Exception Date entry has a Description, and an optional Additional Info field that can be populated. The values in both of these fields can be returned to the Contact Flow when the GetOperatingPeriodStatusV2 operation is used, to allow you to branch and provide a different caller experience based on the Exception Date entry.
- Click Save.
Removing an Exception
- Click on the Function menu on the top navigation bar, then select Hours of Operation under Contact Center Configuration.
- Click the checkbox next to the schedule you want to modify.
- Click on the Modify button.
- Scroll to the bottom Operating Schedule – Exceptions Dates section.
- Click the delete button on the Exception you want to remove.
- Click Save.
Adding Operations Schedule – Exception Dates only
If you are a 24x7 call center and only close down for specific holidays, you can use the Operating Hours Scheduled just for Exception Dates.
- Click on the Function menu on the top navigation bar, then select Hours of Operation under Contact Center Configuration.
- Click on the Add New Hours Schedule button.
- Create a Name for the schedule. This name will represent the hours listed.
- Add a Description. This will help describe the Schedule.
- Select which Operating Time Zone the group using this schedule, adheres to.
- Under the Operating Schedule – Standard Hours section you will delete all week and weekend days from the schedule.
- Once you have removed all week and weekend days, go to the Operating Schedule – Exceptions Dates section and add the holidays observed. Each entry has a Description and an optional Additional Info setting. Both of these values can be returned to the Contact Flow when the GetOperatingPeriodStatusV2 operation is used, to allow you to branch and provide a different caller experience based on the Exception Date entry.
- Click Save.
AWS Configuration
In order to use a Symbee Connect Hours of Operation Schedule with an Amazon Connect channel, please complete the following steps:
Allow Amazon Connect instance to use Lambda
-
From the AWS Console, go to Amazon Connect.
-
Select the right Region.
-
Click on the correct Instance Alias to use the Hours of Operation Lambda.
-
Select Contact Flows on the left-hand side.
-
Scroll down to AWS Lambda and select the correct Lambda function with the Hours of Operation name in it
-
This will correspond with the Lambda you just downloaded in the CloudFormation steps above.
-
Select and add Lambda Function.
Using the Lambda in a Contact Flow
Adding a Invoke AWS Lambda function box:
-
From the AWS Console, go to Amazon Connect.
-
Select the right Region.
-
Click on the correct Instance Alias to use the Hours of Operation Lambda
-
Navigate to Contact Flows.
-
Select the flow where you want to check hours of operation.
-
Insert an Invoke AWS Lambda function box in your flow.
-
Select the box so you can edit it's contents.
-
Click the drop down under Select a function and find the HOO Lambda name.
-
Add 2 parameters as follows:
- Add the Operation parameter (parameter is optional, if not supplied, the operation defaults to a value of GetOperatingPeriodStatus). Valid values are GetOperatingPeriodStatus or GetOperatingPeriodStatusV2.
- Set the Destination key to: Operation
- Select Use text
- Set Value to either: GetOperatingPeriodStatus or GetOperatingPeriodStatusV2
- Add the ScheduleName parameter (parameter is required).
- Set the Destination key to: ScheduleName
- Select Use text
- Set Value to: Whatever the name is of the Hours of Operation schedule you want to use. Set the value here to the Name of the Operating Hours Schedule configured in your Symbee Connect Administration Portal.
- Add the Operation parameter (parameter is optional, if not supplied, the operation defaults to a value of GetOperatingPeriodStatus). Valid values are GetOperatingPeriodStatus or GetOperatingPeriodStatusV2.
-
Change your Timeout to 8 sec.
-
Click Save.
Adding a Check contact attributes box to check the Operating Status returned from the Lambda
The return values from the Lambda differ depending on whether you set the Operation parameter (see above) to GetOperatingPeriodStatus (the default, if Operation is not set) or GetOperatingPeriodStatusV2. Both operations return the OperatingStatus external, with an appropriate value of Open or Closed. Therefore the steps provided below will suffice for both. However the V2 operation returns additional information containing the Open/Closed reason, allowing you to customize the Contact Flow for example, to take different paths if the reason for Close is due to standard hours, versus due to a configured Exception Date (e.g. Holiday messaging).
The GetOperatingPeriodStatus Operation returns the following External values:
- OperatingStatus - A value of either Open, Closed, or Error
The GetOperatingPeriodStatusV2 Operation returns the following External values:
- OperatingStatus - A value of either Open, Closed, or Error (same as above)
- StatusReason - One of the following values: OpenStandardHours, OpenExceptionEntry, ClosedStandardHours, or ClosedExceptionEntry
- ExceptionEntryDescription - If StatusReason above returns ClosedExceptionEntry, the Description value set on the Exception Date entry in your Operating Hours Schedule
- ExceptionEntryInfo - If StatusReason above returns ClosedExceptionEntry, the Additional Info value set on the Exception Date entry in your Operating Hours Schedule if one is populated
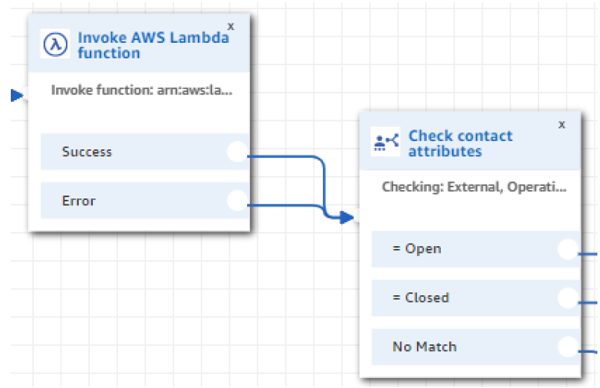
Configure the Check contact attributes in your Contact Flow with a minimum of the below - enhance this as needed based on the above information if you choose to use the V2 operation, based on your caller experience needs.
-
Insert a Check contact attributes box after the Invoke AWS Lambda function box.
-
Select the box so you can edit its contents.
-
Set the Type to External.
-
Attribute will be OperatingStatus.
-
Click Add another condition.
-
Make it x Equals Open.
-
Add another condition.
-
Make it x Equals Closed.
-
Save
-
Set your paths for Open and Closed and then Publish and Save your contact flow.
Assigning Hours of Operation
Once the Hours of Operation schedules have been created, they can be assigned via Skill Queues. Refer to the Queues and Skills section of the Administration Guide for more information.