Webchat Developers Reference
Overview
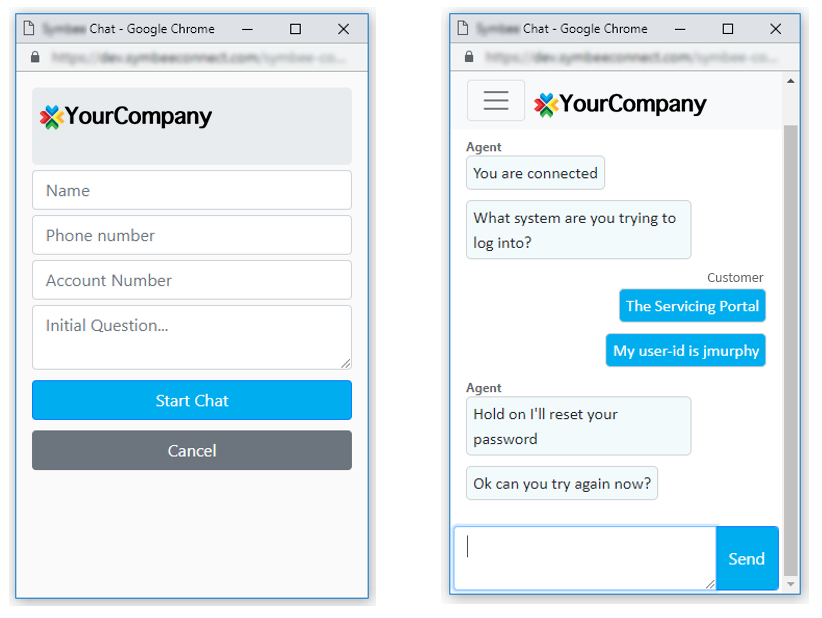
Symbee Connect Webchat provides a quick and easy way of enabling the Webchat channel within your Contact Center. Webchat endpoints, or “Instances” can be configured within the Symbee Connect Administration Portal that provide a configurable (and 100% customizable if needed) customer-facing Webchat front-end for use in your website.
Symbee Connect customer-facing Webchat endpoints can be used with either Amazon Connect Chat or Symbee Connect Chat. Initially they were developed to run over the Symbee Connect Webchat engine (prior to Amazon Connect offering a chat engine). Once the Amazon Connect Chat engine became available, Symbee Connect Webchat endpoints were also integrated into Amazon Connect Chat, and therefore can be configured to run over either engine (Symbee Connect delivered, or Amazon delivered), and are 100% compatible with both.
Each configured customer-facing Webchat endpoint is a logical container made up of:
-
A unique URL used to launch the Webchat endpoint
-
An association to either a Skill Queue or Contact Flow for routing of incoming webchats, and other associated behavior configuration
- A custom Logo that can be uploaded
- A complete set of configurable strings representing all the textual literals used in the customer-facing UI, so they can be customized for your company/experience, and/or translated to a foreign language
- A configurable pre-conversation form with a set of customizable input fields to collect additional details from the customer/user prior to starting the chat (e.g., user identifier, product being enquired on, etc.). This information gets associated with the conversation and is visible when the chat is delivered to the agent
This document provides reference details for Administrators and/or Developers configuring your customer-facing Webchat endpoints and integrating them into your customer or user facing website(s).
Configuring a new customer-facing Webchat Endpoint
Within your Symbee Connect account you can configure multiple Environments if you have multiple Amazon Connect instances. Customer-facing Webchat endpoints are configured on a per-environment basis.
-
Log into the Symbee Connect Administration Portal.
-
From the home page after login, ensure you have selected the appropriate Environment in the top navigation bar.
-
From the Function Menu, select WebChat Administration from the Channel Configuration section.
-
From the resulting WebChat Instances page, click the Add Webchat Instance button.
-
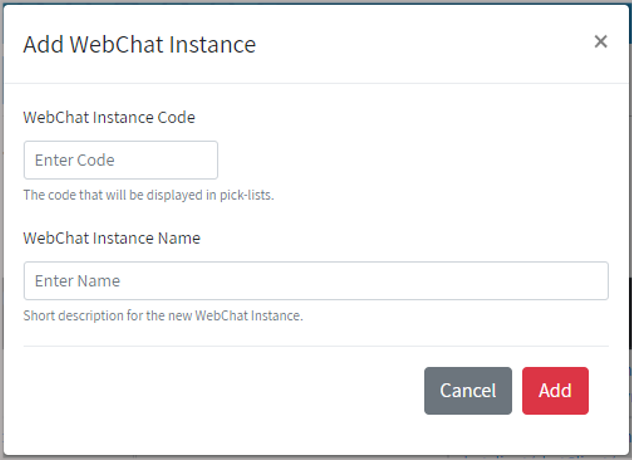
Complete the Add WebChat Instance dialog, supplying a new Instance Code and descriptive name for your new Webchat endpoint, and click Add… (note: the value you enter for your Instance Code becomes part or the unique WebChat URL)
- Once the basic new WebChat Instance is created, and it appears in your list of WebChat Instances, click the new instance to progress to the Maintain Webchat Instance Settings page to configure the details of your new Webchat endpoint. See Configuring the setting of your customer facing Webchat Endpoint for details.
Configuring the setting of your customer facing Webchat Endpoint
All the settings discussed in this section are located on the *Maintain Webchat Instance Settings* page within the Symbee Connect Administration Portal. Refer to the previous section for how to access this page.
Most settings in the WebChat Instance Settings view have self-explanatory descriptions. This section of the document covers some of the general concepts, and common questions.
WebChat Routing
Use the Deliver Provider, Default Queue List, and/or Amazon Chat Flow settings in the Integration Settings section to control how incoming webchats get handled and routed.
If the Deliver Provider is set to Symbee Connect, the value of the Default Queue List determines which Symbee Connect Skill Queue incoming webchat conversations will be queued into. Multiple Webchat Instances can be configured to use the same Skill Queue, or different Skill Queues can be configured for each Webchat Instance.
If the Deliver Provider is set to Amazon, use the Amazon Chat Flow setting to select which Amazon Connect Contact Flow new incoming webchat conversations will first be handled by. In this case, what queue the webchat ultimately gets routed to is a product of the Contact Flow (or Flows) and is therefore not selected in Symbee Connect.
For more information on choosing the Delivery Provider, refer to: Selecting the Chat Delivery Provider
General UI Setup
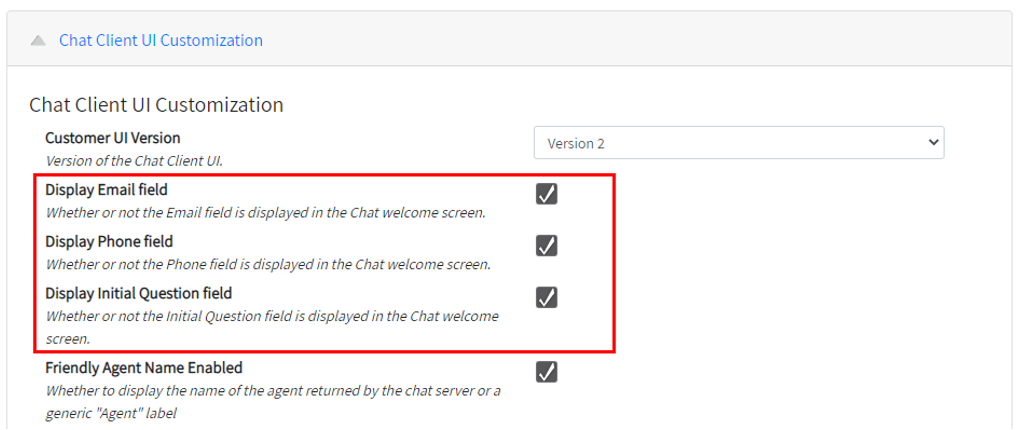
Under the Chat Client UI Customization section, always select Customer UI Version: Version 2.

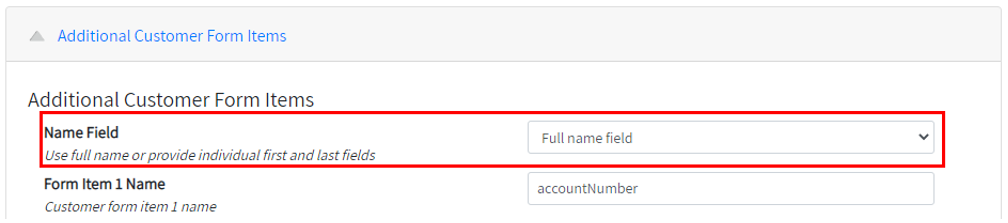
In the same section are checkboxes for optionally enabling the most common fields often used in the Pre-Chat Questionnaire – Email, Phone, and Initial Question. The user or customers Name is mandatory and therefore no checkbox is provided for this, however you can use the Name Field setting under the Additional Customer Form Items section to control whether the name is prompted for using a single Full Name field, or separate First and Last name fields.
Localization and Language
All the textual labels used within the Webchat customer-facing UI are configurable, including menu labels, and text on the menu-driven action forms. The Canned Messages and localization section lists each of these strings with default values you can update as needed.
If you need to provide a Webchat endpoint for multiple different languages, configure a separate Webchat Instance for each language, and translate each of the strings in the Canned Messages and localization section to the target language required.
Customizing the Logo
The customizable logo is displayed in the header on the top of the Pre-Chat Questionnaire Form, and also at the top of other action dialogs (such as the End Chat, and Download Transcript dialogs). When uploading your logo (via the Logo field in the Chat Client UI Customization section), please note that the maximum file size is 64kb when using this method to customize the Logo. For best results your logo should have the following characteristics:
-
The image type needs to be either PNG or JPEG (JPG)
-
Have a Transparent background
-
Must be a size or 64KB or less.
A note about Logo image size: The size expected in the default CSS to avoid scaling is: 36 pixels in height, with a width not greater than 200 pixels. However, the size and proportions of each Company or Associations Logo vary widely.
To have your Logo presented exactly how you want it (or to use a Logo larger than 64KB), you will need to override the default CSS settings for how the Logo is displayed. This is expected. Refer to Adjusting Layout, Fonts, Colors and Sizing and Example CSS Override File for further details on how to do this.
Adjusting Layout, Fonts, Colors and Sizing
You can choose to customize the look of your customer-facing WebChat experience as much or as little as you wish. Within the Chat Client UI Customization section, the Custom CSS file location setting allows you to provide an overriding CSS file to customize the display to meet your requirements (for example, use your corporate colors, fonts, and a layout that is in-line with the wider website your chat will be embedded in).

Specifying a custom CSS file is optional. If supplied, the specified CSS link is included last in the WebChat HTML document, meaning you can override anything in the UI you need.
You can also configure the same custom CSS file to be used by multiple/many WebChat Instances, so all your different WebChat endpoints have a similar look and layout.
Notes about hosting your custom CSS File: The value entered for the CSS file location needs to be a well-formed URL (and should be HTTPS) – this URL is used in the HTML document to fetch your custom CSS on page load. Therefore, you need to host your custom CSS file on a webserver of some sort (i.e. it needs to be accessible via HTTP protocol).
-
If you are embedding the WebChat endpoint in a wider website, hosting your custom CSS file on the same webservers, or hosted website infrastructure as your wider website is one option
-
Another very simple option is to host your custom CSS file in a small AWS S3 Bucket. You can configure the S3 bucket to be public read-only (so anyone can retrieve it but not update it), and AWS S3 comes out-the-box with HTTPS access. For steps on how to set this up, see Setting up an S3 at the end of this page.
-
If you are using a custom Font, you can refer to the font-files location in your provided custom CSS file. A simple option is to locate your font files in the same directory as your custom CSS file (e.g., in the same S3 bucket) and refer to the font-files using a relative path in your customer CSS file
Refer to Example CSS Override File at the end of this page for example starter CSS file contents.
Configuring the Pre-Chat Questionnaire Form - Standard Fields
On the Pre-Chat Questionnaire Form, there a four standard fields that can be optionally enabled or configured using settings under the Chat Client UI Customization section:
And the Additional Customer Form Items group:
When enabled, the fields displayed in the form are as follows (these field names can be used to pre-populate values – see the Pre-populating the Pre-Chat Questionnaire Form Fields section further below).
| FIELD | DESCRIPTION |
|---|---|
| firstName | If the Name Field setting is set to “First and Last fields”, this field contains the customer’s first name. |
| lastName | If the Name Field setting is set to “First and Last fields”, this field contains the customer’s last name. |
| fullName | If the Name Field setting is set to “Full name field”, this field contains the customer’s name. |
| mainEmail | If Display Email Field is checked, this field contains the customer’s email address. |
| mainPhone | If Display Phone Field is checked, this field contains the customer’s phone number. |
| initialQuestion | If Display Initial Question Field is checked, this field contains the customer’s reason for initiating the webchat. |
Configuring the Pre-Chat Questionnaire Form - Custom Fields
Up to five optional custom Pre-Chat Questionnaire Form items may be configured in the Additional Customer Form Items group.
Each custom item is controlled with at least four settings: Name, Visual Label, Value Type, and Required.
Additional settings are also enabled for each custom form item based on the Value Type chosen for the form item.
The following table describes the settings for each of the 5 custom form items:
| Form Item Setting (1-5) | Description |
|---|---|
| Name | The internal name for the custom form item. This is the name that will be passed to the agent in the Pre-Chat Survey bubble. (This name can also be used for pre-populating the form - see the Pre-populating the Pre-Chat Questionnaire Form Fields section further below). The Name may contain letters and numbers; however, all other special characters should be avoided. |
| Visual Label | A visual label for the custom form item. The label displayed to the customer next to the entry for the form item on the pre-chat questionnaire form. |
| Value Type | The type of value expected to be collected in the field. The following available values are currently supported: String, Picklist, Number, Phone, Email, and Hidden. The selected type will be used to validate the customer’s entry of the field, and depending on the type selected enables additional configuration settings for the form item. |
| Minimum value length | If a Value Type of String is selected, the minimum number of characters required for input. If the form item is not marked as Required (see below), the input value can also be left blank. But if a value is provided, this setting determines the minimum number of characters that are required. |
| Maximum value length | If a Value Type of String is selected, the maximum number of characters required for input (up to 1000). |
| Picklist options | If a Value Type of Picklist is selected, use this setting to configure the list of allowed values to offer in the picklist. Separate each value with a pipe (|) character. For example: "Red|Green|Blue". |
| Required | Whether a value is required to be provided by the customer for the form item before the chat conversation can be started. |
Integrating a Webchat Endpoint into your website
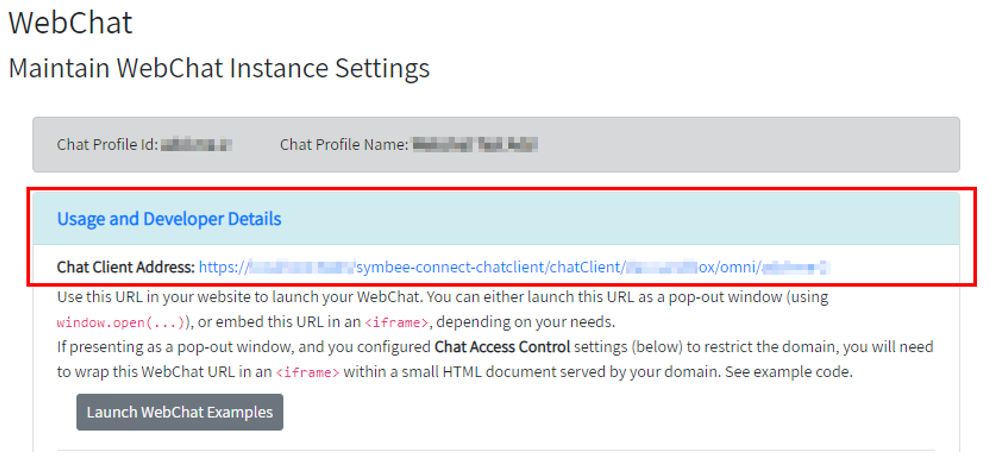
Webchat Endpoint Access URL
Each Webchat endpoint has a unique URL used to launch it. This URL can be found on the Maintain WebChat Instance Settings page under Usage and Developer Details and is titled Chat Client Address.
Presenting the Customer-facing Webchat to users
Should you present your Webchat as a Pop-out or should it be embedded?
How you present the WebChat experience to your users is up to you, but fundamentally takes one of two approaches. Both approaches usually start with some sort of new “Chat With Us” type button you add to your website. When the new Chat button is clicked, you then usually do one of the following – each has their positives and negatives:
-
Present the Webchat window as a new “Pop Out” window.
This is done by you performing some variant of a JavaScriptwindow.open(<*Webchat access URL*>)command.
The positives of this approach are it is very quick and simple to implement (usually 1 or 2 lines), and the window is “external” for the user so they can navigate around your website separate to the chat window. It also provides a more natural “separate window” experience on mobile devices (phones and tablets).
The challenges are, more recent web-standards have limited your ability to “keep a window on top” so depending on the window location it may get hidden from the user in the background when they click on something else; and you may need to add additional messaging to your website to let the user know a pop-out window is expected, and to turn off or allow it in pop-up blockers.To address the 'window on top' issue when running chat as a pop out
If you set the target attribute on the window.open(...) JavaScript request, to a static text literal - for example
<company-name>-webchatrather than to "_blank", and then allow your "Chat with Us" button on your website to be clickable even when a chat is already in progress, the end result is the repeated window.open(...) request on a subsequent click of your "Chat with Us" button will cause a refresh of the existing chat window (which is supported - it simply repaints the conversation in progress), but notably will also bring the pop-out window back into focus, and therefore "to the front" again. -
Embed the Webchat window in-line in your website page.
This is done by you creating an<iframe>with its “src” being the Webchat access URL.
The positives of this approach are you can control the slide-in/slide-out style presentation of the chat, and you have 100% control of the chat being “visible” on your site.
You may however need to provide an alternative presentation when your website is being used on a mobile device to be more natural. Additionally, you need to consider how your website is structured – is it a single page app (SPA) where you can home the<iframe>at the top level so it remains present when the user navigates from one place on your website to another? Or is it a multi-page website, where the user may start the chat on one-page, then continue the chat after navigating to another page? (ultimately a page and JavaScript context reload).
The Symbee Connect Webchat frame 100% supports this type of deployment (if the frame is refreshed quickly from one page to another, it will preserve the conversation on its own), however you will need to consider, as the website developer, appropriate placement of the chat<iframe>on each page as a new page loads to keep the experience natural (e.g., knowing when to display the frame already visible on a subsequent page, versus just a Chat button, depending on if a conversation is already running).Make sure NOT to declare a hidden
<iframe>statically in your pageIf you are taking the iframe approach, make sure to not declare the
<iframe>in your main website HTML on page load (for example, hidden, "in preparation") - or if you do, at least don't set the src= attribute on the iframe element. As if you do, it causes an actual fetch of the webchat window/frame, which can cause a chat conversation to be started inadvertently on every visit of your web page/site even if the user hasn't clicked your chat button. Instead, dynamically add the<iframe>into the DOM (or set the src= attribute) only once the user genuinely clicks your "Chat with Us" button, as depending on how you configured your webchat, the conversation may start immediately.
Example JavaScript to create Pop-Out window
If following approach 1 above, the following is an example HTML and JavaScript snippet that could be used in your website to launch the chat window (substitute the URL below with your Webchat endpoint instance URL):
<div id=”chatButton”
    onclick=”window.open(‘https://Symbee Connectconnect.com/Symbee Connect-connect-chatclient/chatClient/my-org/my-env/my-chat?fullName=John%20Black’,
        ‘_blank’, ‘width=340,height=550’)”>
Chat with Us
</div>
See considerations for pop-up blockers in the next section.
Note: the link above also pre-populates the Full Name field (see Configuring the Pre-Chat Questionnaire Form - Standard Fields). For more information on pre-populating standard and custom fields see Pre-populating the Pre-Chat Questionnaire Form Fields.
Note: the height value of 550 pixels above is meant to work well when all Pre-Chat Questionnaire Standard Fields are enabled. If you are configuring custom fields the form may require additional vertical space. If there is not enough room provided for the full form, the page is configured to show a vertical scrollbar.
Pop-up Blocker Constraints
If you are presenting your Webchat by launching a new window from a website page (see Approach 1 in Presenting the Customer-facing Webchat to users), you will need to consider and handle the pop-up blocker scenario.
There are many ways to detect in JavaScript if a window is being blocked within your page by adding more logic to the snippet within above (or break it out into its own JavaScript function) and then display an alert to the user that the chat is being blocked by their pop-up blocker. Web-developers are familiar with this. Some consideration needs to be taken to handle different browsers also (Chrome, Firefox, Safari, Edge, etc.) if this approach is taken.
An alternative simple, low-tech but reliable approach can also be to add a little line of text in small font below or above the web-chat link that reads something like:
(if the chat window doesn’t appear when clicking above, check your pop-up blocker to allow pop-ups from this site)
Pre-populating the Pre-Chat Questionnaire Form Fields
The Pre-Chat Questionnaire Form of the WebChat can be pre-populated by modifying your Webchat endpoint URL (see above).
Fields can be pre-populated by adding the item name and default value as part of the chat page URL query-string. Multiple fields can be populated. For example, adding the following to your Webchat endpoint URL will pre-populate the first and last name fields with Jane Doe:
?firstName=Jane&lastName=Doe
See Configuring the Pre-chat-questionnaire-Form - Standard Fields for the names of Standard Fields, and Configuring the Pre-Chat Questionnaire Form - Custom Fields for determining the names of Custom Fields.
Proactively Determining if Chat is Open or Closed
The Symbee Connect Webchat Channel also exposes a simple HTTPS service endpoint that can be called internally from your website to proactively determine if a chat queue is open or closed. The response is a JSON string describing the current state of the requested queues. The intent of this service endpoint is to allow a web site integrating chat to optionally hide a “Chat With Us” button if the backing contact center Webchat queue is not open.
The endpoint URL can be found on the Maintain WebChat Instance Settings page under Usage and Developer Details and is titled Queue Status Endpoint.

An example queue status URL, asking for the current state of the support-chat queue:

Note that queue status URL endpoints only support POST requests, they do not support GET requests. This is for security purposes and is intentional.
Queue Checker Response Handling
First, verify the HTTP Status Code of the response (200 OK indicating success, anything else indicating failure).
If 200 OK, a JSON object is returned.
Queue Checker Response Example
Example successful JSON response returning requested queue statuses:
{
    "queueCode" : "my-chat",
    "queueName" : "support-chat",
    "queueStatus" : "Forced Open",
    "isOpen" : true,
    "statusDateTime" : "2019-04-01T16:59:58.355Z"
}
Queue Checker Notes regarding CORS (Cross Site Scripting / Cross Origin Resource Sharing)
Please consider web browser CORS (Cross Origin Resource Sharing) implementations and rules if you intend to make requests to the Queue Checker endpoint directly from JavaScript.
CORS related reference notes for the Queue Status endpoint:
-
The Queue Status endpoint only supports POST and OPTIONS methods. GET requests are not supported
-
POST requests must contain the Content-Type header on the request. Simply set to “text/plain”
content-type: text/plain
- With a request meeting the above, the endpoint will return an appropriate Access-Control-Allow-Origin header on the response to satisfy browser CORS rules
Webchat Endpoint Access Point
The following settings within the Maintain WebChat Instance Settings page can be used to restrict where and how your Webchat Endpoint can be presented:
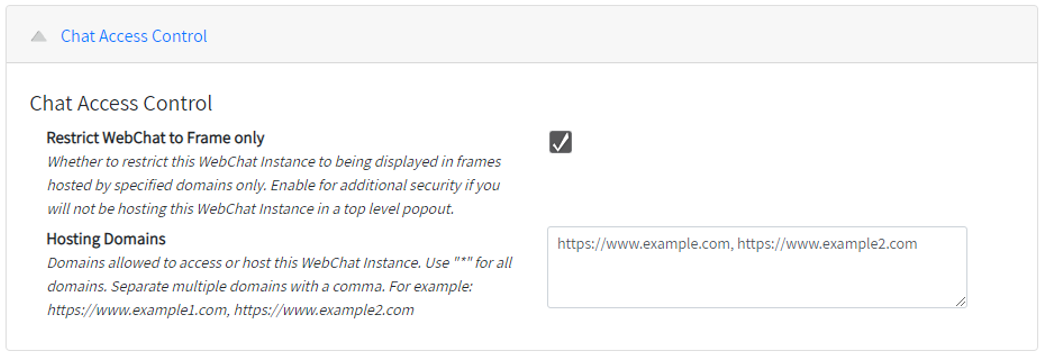
Restrict to Frame Only
Enabling this setting stops your Webchat Instance access URL from being able to be generically opened as a top-level window in a browser. This means the URL cannot be simply copied and opened from anywhere and forces the usage of your Webchat endpoint to be as an embedded <iframe>. If you attempt to access the endpoint URL directly with this setting enabled, you will get Access Denied.
Restrict Hosting Domains
Forcing your Webchat endpoint to only be displayed within an <iframe> (see Restrict to Frame Only) inherently means it must be hosted in another web page.
You can then additionally use the Hosting Domains setting to further limit which domains the web page encapsulating the <iframe> can be served from.
For example, enabling Restrict WebChat to Frame only, and setting Hosting Domains to:
https://www.abccompany.com
restricts your Webchat endpoint to only allow, when running in an <iframe> embedded in an html document served from the www.abccompany.com domain.
Restrict to Frame Only, but still present Webchat as a Pop-Out window
If you want to restrict access to a limited set of named domains, you will need to enable Restrict to Frame Only. However, doing this stops your Webchat endpoint being displayed as a top-level pop-out window.
If you still want to present your Webchat as a pop-out window, the solution is to create a very minimal HTML document, that simply encapsulates an<iframe>, expands the <iframe> to fill the complete window, and then host this minimal HTML document (web page) within the same webserver / domain as the outer website you are using your Webchat endpoint with.
Example:
You configure a new Symbee Connect Webchat endpoint, named “example-webchat”, in your-company, prod environment. The Webchat access URL is:

You have a website hosted either on your own servers, or through a hosting platform. Your website is served as the domain www.example.com. Your home URL might be https://www.example.com/index.html
You then create a new minimal HTML document, located at: https://www.example.com/chat.html
The chat.html document contains the following:
<!DOCTYPE html>
<html>
<head>
    <title>Example Chat</title>
    <style> html { height: 100%; } body { height: 100%; margin: 0; }</style>
</head>
<body>
    <iframe src="https://Symbee Connectconnect.com/Symbee Connect-connect-chatclient/chatClient/your-company/prod/example-webchat"
            style="width: 100%; height: 100%; border: none; overflow: hidden;"></iframe>
</body>
</html>
You add a “Chat with Us” <button> to you web site, and upon click, perform a JavaScript something like:
window.open(“https://www.example.com/chat.html”)
Then in your Symbee Connect WebChat Instance configuration, you set:
-
Restrict WebChat to Frame Only: checked/enabled
-
Hosting Domains: https://www.example.com
Example CSS Override File
For a quick starter file, paste the contents of the below into a text file with a name ending in .css, host the file, and refer to its URL in the Custom CSS file location setting of the Chat Client UI Customization section. Refer to Adjusting Layout, Fonts, Colors and Sizing for further detail.
The contents below provide some common examples, with related comments.
/***** Symbee Connect - WEBCHAT CUSTOMIZATION EXAMPLE *****/

/***** General body overrides *****/
body {
    /* Override font here if you need.
       Upload custom font files into the same S3 and use relative file reference */

    /* font-family: Arial; */
}

/***** Overrides for Pre-Chat Questionnaire form *****/

/* The overall background of the pre-chat window */
.form-overlay {
    background-color: white;
}
/* The block encompassing the Logo, Header Bar, Welcome Title, and Heading Text */
.jumbotron {
    background-color: white;
}
/* Logo - update size and position as required */
#logo {
    background-size: contain !important;
    height: 50px;
    width: 50px;
}
/* Chat Header Bar Text - update size and position as required */
#preChatForm h4 {
    position: absolute;
    top: 25px;
    left: 75px;
    font-weight: bold;
}
/* Chat Title Text, if used */
#preChatForm .chat-header {
    text-align: center;
    font-size: 24px;
    margin-top: 20px;
    margin-bottom: 0;
}
/* The additional "Heading Text" help text, if used */
#preChatForm .form-help-text {
}
/* The additional "Form Trailing" text, if used */
#preChatForm .form-footer-text {
}

/* The form area with all the fields, and Start and Cancel buttons */
#preChatForm .questionaire {
}

/* The main Start Chat button */
#submitForm {
    background-color: #dd3826;
    border-color: #dd3826;
}

/***** Overrides for Conversation Window *****/

/* Text bubbles - Agent side (i.e. far end). */
#chatHistory .text-balloon.agent {
    background-color: #fcf2f2;
}
/* Text bubbles - Customer side (i.e. near end). */
#chatHistory .text-balloon.customer {
    background-color: #dd3826;
}
/* The Chat "Send" button */
#send {
    background-color: #dd3826;
    border-color: #c43121;
}

/***** Style Overrides for Menu Action Forms *****/

/* Override logo styling on the Menu Action forms */
.file-transfer-overlay #logo {
    margin-left: 5px;
}
/* Header area on Menu action forms */
.file-transfer-overlay .jumbotron {
    margin-bottom: 0;
}
/* Menu action form header text */
.file-transfer-overlay h4 {
    margin-top: 25px;
}
/* Menu action form buttons - all */
.file-transfer-overlay button {
}
/* Menu action form buttons - primary */
.file-transfer-overlay button.btn-primary {
    background-color: #dd3826;
    border-color: #dd3826;
}

/***** Disable unwanted menu options *****/

/* Disabling the "Speak with Agent" menu option */

#topNavBar [data-content-id="callAgent"] {
    /* display: none; */
}

/* Disabling the "Transfer File" menu option */
#topNavBar [data-content-id="transferFile"] {
    display: none;
}

/***** User Alternate Closer 'X' button instead of Actions Nav menu *****/

/* Below, when uncommented:
   Hides the default nav-bar drop-down, shows the alternate closer, and overrides
   the topNavBar height (suggest 30 minimum) and background-color (set values to suite your theme)
*/
/*
#topNavBar {  height: 30px;  background-color: white !important; }
#topNavBar .navbar-toggler { display: none; }
#topNavBar .alternate-closer { display: block; }
*/