Business Intelligence - Installation and Setup
The following sections cover initial installation (downloading and running a CloudFormation), some one-time post-install Amazon QuickSight setup steps, deployment of predefined "managed" Dashboards (the out the box reports) into your Amazon QuickSight account from the Symbee Connect Administration Portal, as well as other key topics directly related to the initial setup (like Amazon QuickSight identity regions, preferred time zones, and optional migration of historical data). Please review and follow the sub-sections in order.
Prior to continuing please make sure the pre-requisites have been followed, as some of the Business Intelligence CloudFormation input parameters are needed from those steps, and the CloudFormation expects and requires Amazon QuickSight enrolment in your AWS Account to already be complete (covered in the pre-requisites).
Understanding Amazon QuickSight Identity Regions
When running the main Business Intelligence CloudFormation, the very first parameter asked for is your Amazon QuickSight Primary/Identity AWS Region. We also ask for this in the Symbee Connect Administration Portal configuration, related to displaying embedded real-time dashboards.
This is because in Amazon QuickSight, certain ARN values and administration functions (for example, managing Amazon QuickSight User Groups) are only allowed to be performed in Amazon QuickSight via the original AWS Region you nominated as your "Home" region when you first enabled/signed-up for Amazon QuickSight in your AWS Account (the Home region cannot be changed after initial sign-up).
If you are just starting to use Amazon QuickSight in your AWS account as part of this deployment, your Amazon QuickSight Primary/Identity Region is simply the AWS Region you nominate as your "Home" region during the Amazon QuickSight signup screens (usually, the same AWS Region where all other related Contact Center services are deployed).
If you are already using Amazon QuickSight prior to this install or have resources deployed in multiple AWS Regions in your AWS Account, and you are not sure what your Amazon QuickSight home/default identity region is, determine your Identity region by doing the following:
- Log into your Amazon QuickSight Console as an administrator
- In the very top-right click the small user icon - on the drop down menu it will show your current region (your current region can also be seen in the very beginning of the URL bar on your web browser).
- From the drop down menu, click Manage QuickSight
- Within Manage QuickSight, click on any one of the following sections in the left-hand navigation bar:
- Manage groups
- Account settings
- Security & permissions
When clicking on the above options, if your current region is not your home/identity region, you will get a screen indicating this, and telling you what your home/identity AWS region is. For example:

If you do not get the above screen when accessing any of the above 3 options, then your current region is your Home/Identity region.
Understanding Preferred Time Zones in an Install
Before continuing please read the Preferred Time Zones section for more detail and context on this.
To cater for items discussed in the above link, one of the initial input parameter's when running the main Business Intelligence CloudFormation asks for your Preferred Time Zone. See the Time Zone related CloudFormation input parameters here for reference.
There are also 2 other time zone related CloudFormation parameters - Is this an additional stack deployed for an alternate Time Zone?, and Additional Time Zone stack suffix. See Preferred Time Zones - Multiple Tone Zones for context on these.
With the appropriate preferred time zone set during install, any dates/times on the SCBI managed/pre-defined Amazon QuickSight dashboards will be automatically displayed to your business in your preferred time zone rather than UTC, and any date/time window ranges selected will be assumed to be in your business's preferred time zone.
Migration of Historical Data
As part of the installation, Business Intelligence supports optionally migrating your historical Amazon Connect and Symbee Connect data into the solution if you have this data saved in S3 buckets in the original JSON/Firehose format, so you can immediately analyze and report on this activity.
If you have this historical data and want it migrated, before continuing please read the Historical Data Migration section for context and guidance.
Download and Run the Business Intelligence CloudFormation
After reviewing the previous 3 sub-sections (as they provide context for some of the CloudFormation input parameters), follow step-by-step guide below to deploy your Symbee Connect Business Intelligence CloudFormation stack. Once your CloudFormation stack deployment is complete, return here to complete the additional post-deployment Symbee Connect Administration Portal and Amazon QuickSight configuration steps.
Business Intelligence CloudFormation install Step by Step Guide.
Post-CloudFormation Amazon QuickSight Configuration Steps
After your Symbee Connect Business Intelligence (SCBI) CloudFormation stack deployment is complete, there are some one-time manual steps that are needed to configure your Amazon QuickSight environment with access to the new Athena/Glue database created by the Symbee Connect Business Intelligence CloudFormation, and to grant yourself access to the Amazon QuickSight User Groups that share permissions to the managed/pre-defined reports (Dashboards and Datasets).
Follow the one-time steps in this Step-by-Step guide to complete these tasks: Post-CloudFormation Amazon QuickSight Configuration Steps
Update Business Intelligence settings in your Symbee Connect Administration Portal
After your Business Intelligence CloudFormation stack deployment is complete, follow the steps below to configure Symbee Connect to be aware of your Amazon QuickSight instance:
-
Log into your *Symbee Connect Administration Portal as an administrator
-
If you have more than one Environment configured within your Company in Symbee Connect, on the top Navigation bar, ensure you select the appropriate Environment you wish to configure for Business Intelligence
-
Then click on the main Function Menu in the top navigation bar, and click on Symbee Connect Integration in the Company Environment Configuration section of the displayed menu
-
On the resulting Symbee Connect Integration view, expand the Business Intelligence section, and configure the settings as follows:
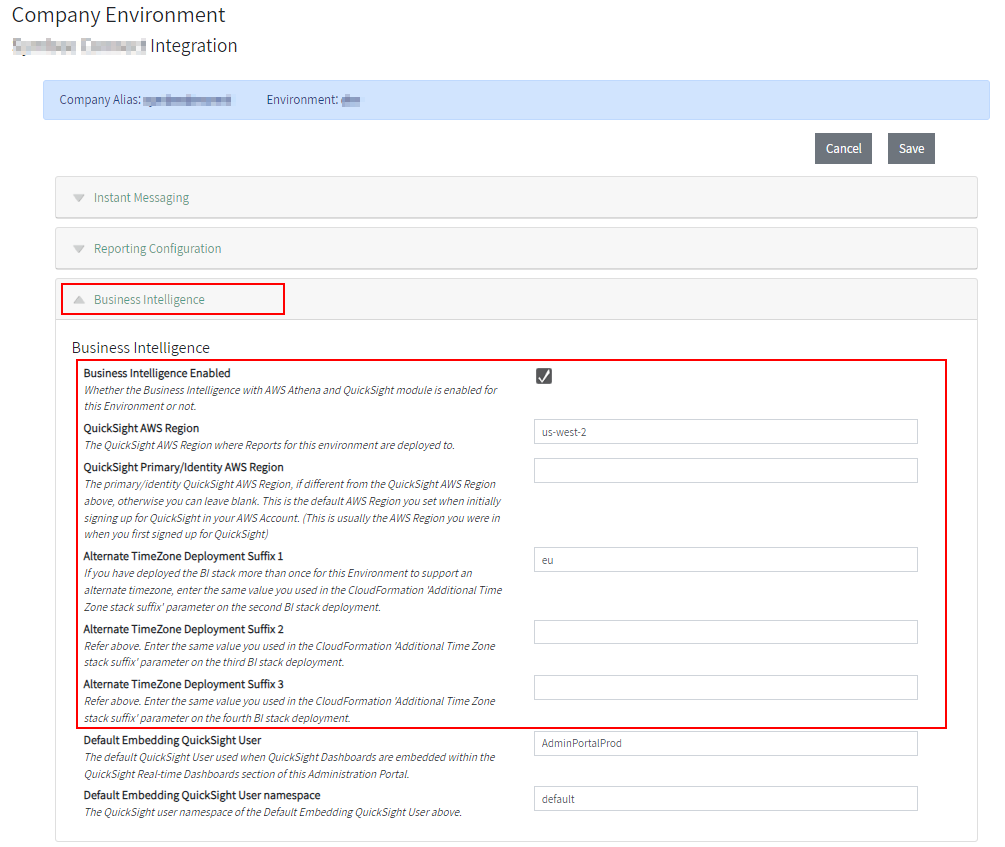
- Enable the Business Intelligence Enabled checkbox
- Set QuickSight AWS Region to the AWS Region you deployed your Business Intelligence CloudFormation stack into
- For QuickSight Primary/Identity Region, if you have a multi-region Amazon QuickSight environment in your AWS account and the above QuickSight AWS Region is different to your Amazon QuickSight Identity/Home region (see here for more details), configure your QuickSight Identity AWS Region name in this field, otherwise leave blank.
- For Alternate TimeZone Deployment Suffix 1, 2, and 3, If you deployed the Business Intelligence CloudFormation stack multiple times for the same Environment (to support multiple preferred time zones - see here for more details), enter the same values here as you did in the Additional Time Zone stack suffix CloudFormation input parameter (see here), otherwise leave these fields blank.
- Click Save in the top right to save the configuration updates.
Starting Historical Data Migration and Monitoring progress
If you enabled and deployed the Historical Migration components during the CloudFormation install, the CloudFormation will have installed and configured all the required components to perform your migration, however the CloudFormation (intentionally) does not start the migration automatically.
Follow these steps to start migration of your historical data: Starting Migration
Deploy the Managed/Predefined Amazon QuickSight Dashboards
Your main installation is essentially complete at this point (your historical migration may still be running in the background).
You can now deploy the Symbee Connect Business Intelligence (SCBI) managed/predefined Dashboards (reports) into your Amazon QuickSight instance from the Symbee Connect Administration Portal.
Refer here for steps to do this: Deploying and Updating SCBI Predefined Dashboards
Set up Nightly Refresh Schedules on your Spice Datasets
After you have deployed some or all of the SCBI predefined dashboards (previous step), you need to set up a Refresh Schedule for each Spice-based dataset so its data gets refreshed nightly.
Refer here for the steps to do this: Spice Dataset Refresh Schedules
Configure Embedded Realtime QuickSight Dashboards in the Symbee Connect Administration Portal
One limitation of Amazon QuickSight is it does not provide a native way through the Amazon QuickSight console to auto-refresh a dashboard (report) automatically on a predefined interval (for example, update every minute).
To address this, an embedded real-time dashboard tool is provided within the Symbee Connect Administration Portal to allow you to view any of your Amazon QuickSight dashboards with an optional automated refresh timer suited for displaying real-time views if needed.
Refer here for steps to set up this functionality: Auto-Refreshing Real-time QuickSight Dashboards