Setting up your Sunshine Conversations Integration
Overview
The Symbee Connect Social Messaging integration allows you to fully service 2-way social conversations fronted by your Sunshine Conversations Account within your Omnichannel Symbee Connect enabled Amazon Connect instance. The following functionality is provided:
- Route inbound Social messages into your Symbee Connect instance and queue them to the next available, appropriately skilled agent for servicing in a 2-way Social conversation:
- The first new SMS message received from a customer’s phone number begins a Social Conversation within Symbee Connect. After the conversation is delivered to an agent, all subsequent SMS messages sent between the agent and customer are part of that Conversation, with the conversation concluding when the agent ends the dialogue and wraps the associated interaction.
- Inbound Social Messages (conversations) can be optionally configured within Symbee Connect to be first routed via Amazon Connect Chat, therefore starting in an Amazon Connect Contact Flow for self service and Lex Bot integration, then subsequently queued to a Symbee Connect Agent for further servicing as needed.
- All the same chat-based Symbee Connect functionality like Auto-Text libraries, and Work Codes/Dispositions, and Audible Chat Notifications are available for use in the Social Conversations, just like any other Chat conversation serviced with Symbee Connect.
Configure Sunshine Conversations with Zendesk
The steps in this section walk you through the setup of a new Sunshine Conversations App within your Zendesk Account and creating a new Social Messaging Service within that App.
Note: If you already have an existing Zendesk Account, App, and Social Integrations setup, many of the steps in this section will be redundant. If this is the case, the key steps for integration with your Symbee Connect environment are to:
- Have a Messaging Service configured for Chat Bot/Interactive 2-Way with your required Phone Numbers assigned to the service, with its Web Hook configured below.
- Obtain your Sunshine Conversations App ID, API Key ID and API Key Secret codes from the App Dashboard for input into your Symbee Connect environment’s Social Configuration
Create or Access your Sunshine Conversations Account and App
-
Log into your Sunshine Conversations Sunshine Conversations at https://app.smooch.io/login
If you don’t already have an Account, click the Don’t have an account yet? Sign-up button on the login page to register for your new Account. Create your new account and then sign in. -
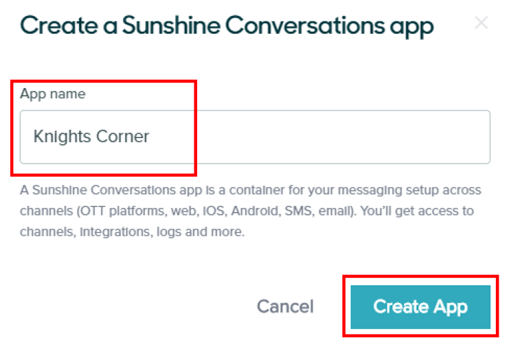
In your Sunshine Conversations Account, if you already have an existing App you wish to use, you can skip this step. Click the Create New App button on the right side, middle of the page.
Notes:
- If this is your first time logging in, you will have the option of setting up a Sandbox or Production account.
- Any New Account will begin as a Trial. Once created, there are options you can use to Upgrade the account as needed.
- Provide a Name for your new App, and click Create App.
Obtaining App and API Key Information
This section will walk you through gathering the App ID, and API Key information. Make sure to copy these items to a notepad for use during a later configuration step.
-
From the App Overview page, click on the Settings menu on the top menu bar.
-
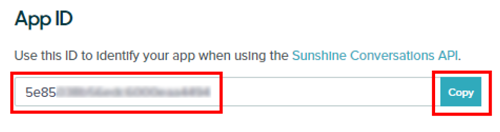
Once in the Settings menu, scroll down to the App ID section. Click the Copy button and paste this value into your notepad file to use later on in this document.
-
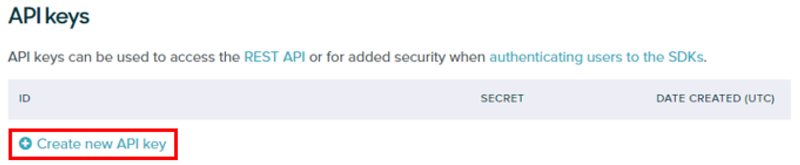
Next, scroll down to the API keys section and click the Create new API key button.
-
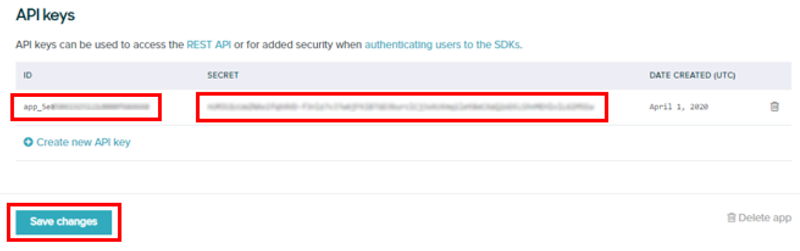
You should now see your App ID, App Secret and today’s data in the Date Created column. Copy the ID and the Secret values and paste them in your notepad to use later in this document. Click Save Changes.
Add and Configure Webhooks Integration
This step is required in order to Integrate with any of the Social Channels. However, only one Webhook integration is required per App, no matter how many channels you have configured inside of that App.
-
From the Settings page, click on the Integrations menu on the top menu bar.
-
Scroll down to the API & Webhooks section and click on the Webhooks Integration option.
-
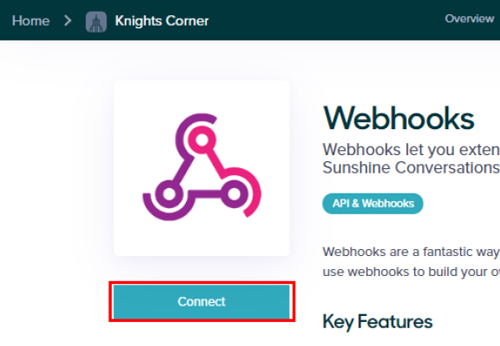
Click the Connect button to get started.
-
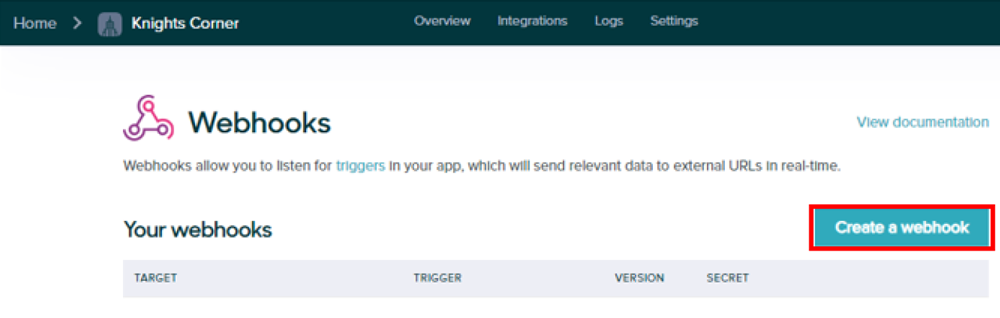
Click the Create a webhook button.
-
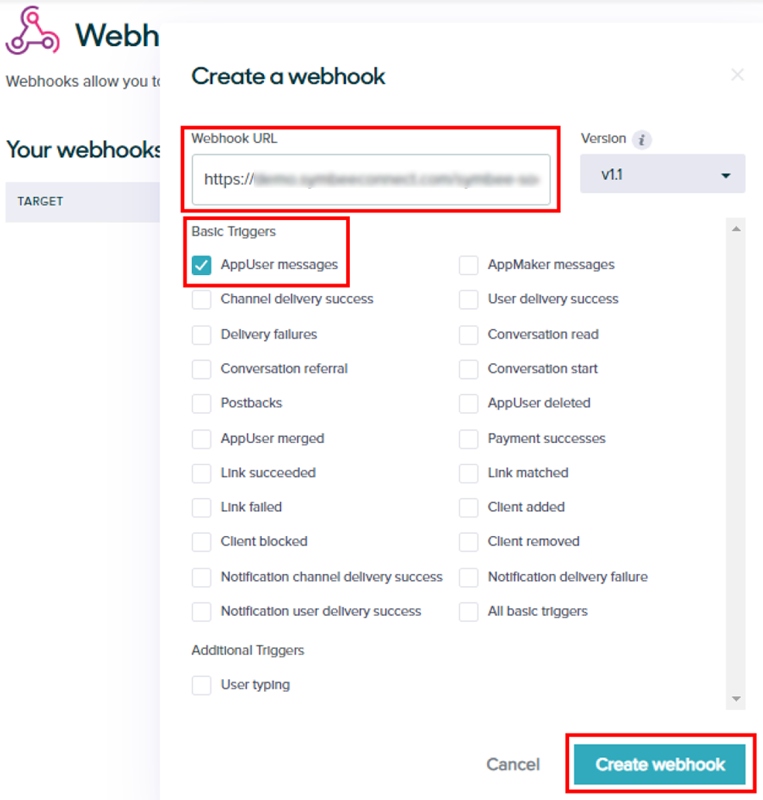
In the Webhook URL field, copy in your Symbee Connect Web Hook URL that can be obtained from the Symbee Connect Administration Console (refer to Sunshine Conversation APP Webhook URL for this Web Hook URL value).
-
Select the checkbox for AppUser messages and click Create webhook.
Add and Configure Social Integration Channels
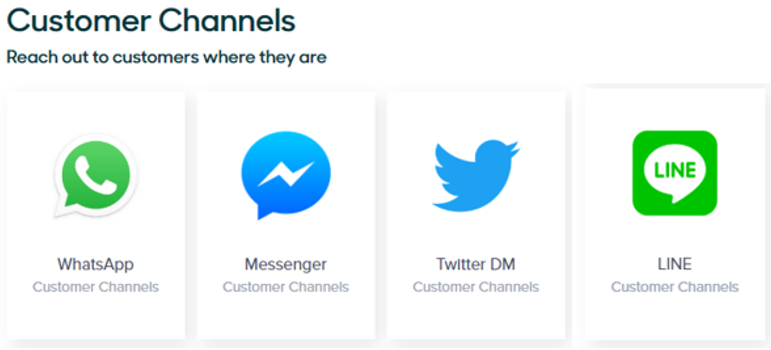
Sunshine Conversations offers Integrations with many popular conversation applications. Symbee Connect currently supports WhatsApp, Messenger, Twitter DM and Line but will be adding additional channels in the future. The example we will walk through is for WhatsApp but the configuration steps in this section will be the same no matter which Social Channel you are configuring.
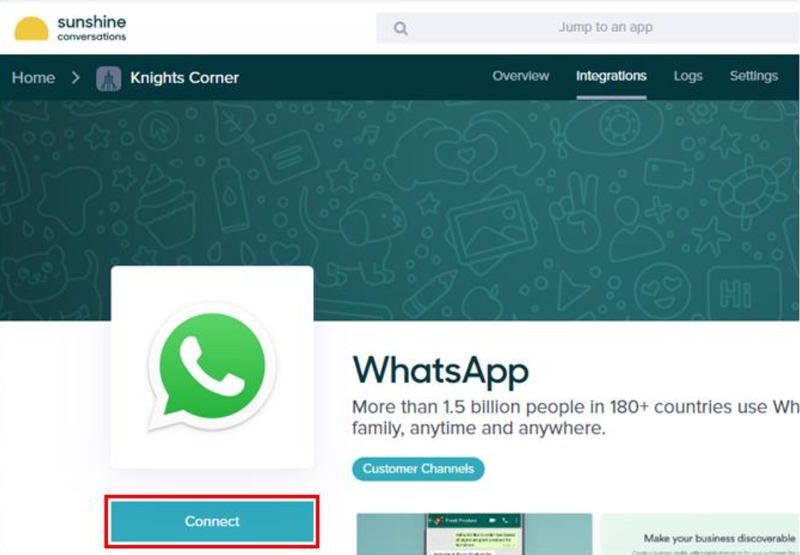
- From the Settings page, click on the Integrations menu on the top menu bar.
- Click on the Social Channel you are planning to integration into Symbee Connect.
- Click the Connect button to get started.
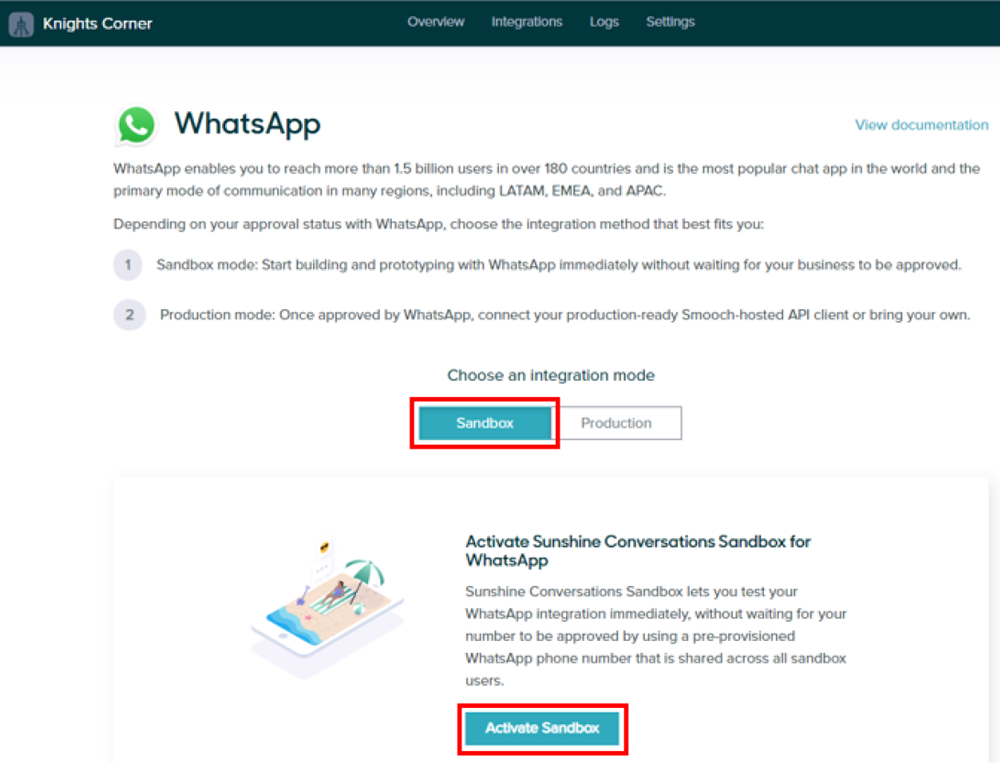
- If your account is new or you haven’t already gone through the authorization for Production mode, you will be presented with the option of setting up a Sandbox or Production environment. For the purpose of this guide, we will be setting up a Sandbox environment. For a Production WhatsApp connection, please contact Zendesk and Facebook to establish a WhatsApp Business Account.
- Click on the Sandbox integration mode and then click Activate Sandbox.
- You should get a message stating You have connected your number to WhatsApp, in a green status bar.

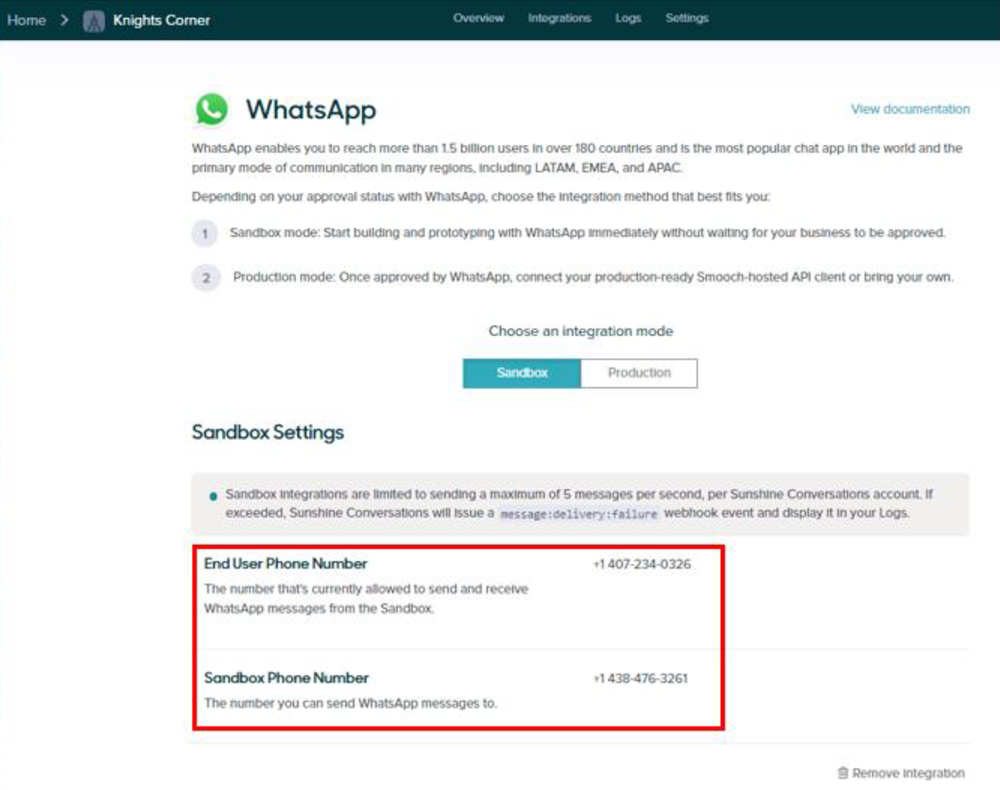
- Scroll down to the Sandbox Settings and look for the phrase that Zendesk want you to send and the phone number to send it to. This must be sent throught the WhatsApp App on your device.
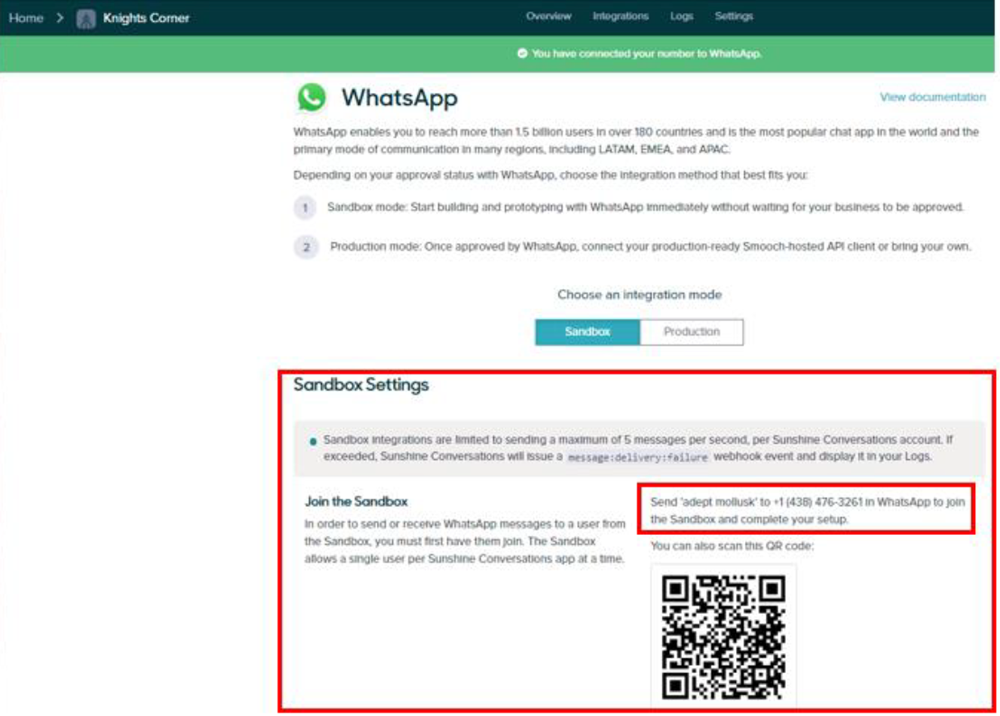
- Once you send your message, you’ll get a response back in WhatsApp with some important information and will see your WhatsApp config screen change as well. You will now see the End User Phone Number equal to that of the phone you setup WhatsApp from and the Sandbox Phone Number.
Configuring the Sunshine Conversations in Symbee Connect
The following step by step guides you through setting up a Sunshine Conversations integration. The instructions differ depending on the Delivery Provider you are going to use for your Sunshine Conversations. See Selecting the Chat Delivery Provider for further details on this.
Setting up Sunshine Conversations using Delivery Provider: Amazon
Important Note: The following steps are only required if you are going to be using Amazon as your Delivery Provider.
Prerequisites
Confirm CCP-V2 is being used
In order to receive Amazon Connect Chats (chat/SMS), you need to be running CCP v2.
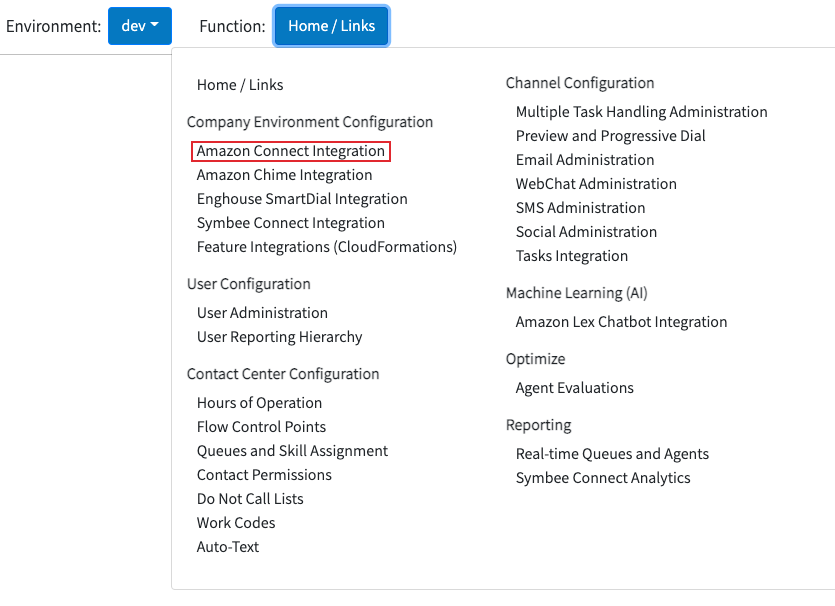
- Log into the Symbee Connect Administration Portal.
- Click the on the main Function menu in the top navigation bar and then click on Amazon Connect Integration under Company Environment Configuration
-
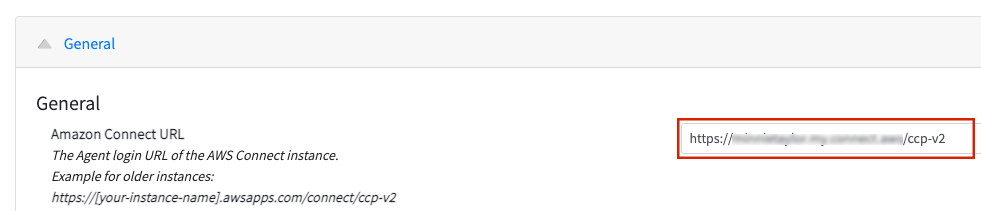
Confirm your Amazon Connect URL ends with /ccp-v2.
-
If it doesn’t, modify your URL to end with /ccp-v2 - this is required to receive Amazon Connect Chats (Chat/SMS).
Download the Amazon Connect Chat Integration CloudFormation
Note that this step only needs to be performed before setting up your first new Amazon Delivered Chat channel for a Symbee Connect Environment.
If this is the first Symbee Connect CloudFormation you have run, you will need to run the Integrations CloudFormation first. For step by step instructions and further information about CloudFormations click here.
- Log into the Symbee Connect Administration Portal.
- If you have more than one Environment configured within your Company in Symbee Connect, make sure you have the appropriate one selected. This can be found on the Navigation bar to the left of the Function menu.
- Then click on the main Function menu in the top navigation bar, and click on Feature Integrations (CloudFormations) in the Company Environment Configuration section.
- From the Feature Integrations (AWS CloudFormations) page, scroll down and locate the Amazon Connect Chat Integration CloudFormation, and click the download link to download and save the CloudFormation script.
- You will be prompted with a Save As dialog screen. Save the file locally to your PC for use in the following steps.
Run Amazon Connect Chat Integration CloudFormation in your AWS Account
- Log Into your AWS Management Console.
- Make sure you are in the correct AWS region for where you want to deploy (top right of the Navigation bar) – the same region as your Amazon Connect instance.
- Navigate to the CloudFormation console (under Management and Governance, on the Services menu).
-
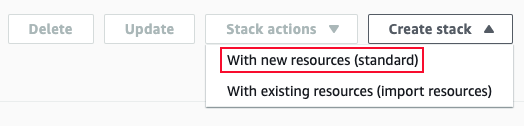
From the CloudFormations console, select Stacks in the left-hand navigation bar, and select Create Stack and select With new resources (standard) from the dropdown box.
-
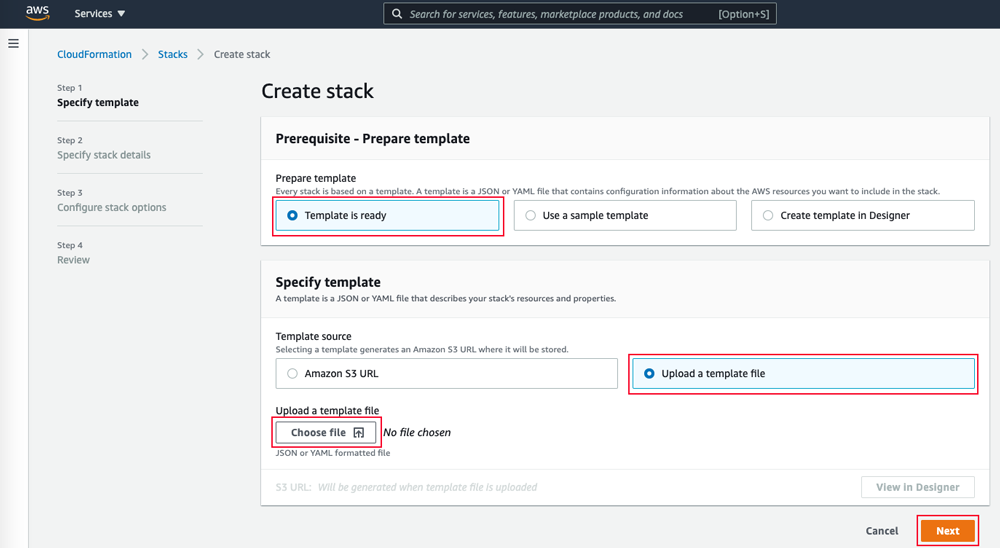
You will be presented the “Create Stack” view for creating/deploying a new CloudFormation script (known as a stack):
-
Under the Prepare Template section, select Template is Ready
-
Under Specify Template, select Upload a template file
-
Under Upload a template file, click Choose File
-
In the resulting file selector, find and upload the file you saved from above.
-
Click Next at the bottom
- In the Specify Stack Details screen, complete the fields as follows:
- Stack Name: Enter a name appropriately. We suggest using your Symbee Connect Environment (e.g. dev, prod, etc.) in the name for better organization, in case you have CloudFormations for multiple Symbee Connect Environments Connect being deployed into the same AWS Account.
For example:
companyalias-environment-amazonchat - Click Next
- On the next Configure stack options screen, accept all the defaults, and click Next.
- On the next Review testing screen, scroll to the bottom Capabilities section, check the “I acknowledge that AWS CloudFormation might create IAM resources with custom names.” Checkbox, and finally click Create Stack.
Build Amazon Connect Chat Queue and Contact Flow
You will need to setup an Amazon Connect Contact Flow to receive and handle your chat and respective Chat Queue in Amazon Connect and assign it to a Routing Profile, if you are routing your SMS to an agent.
Following Steps
Proceed to Declare Social Messaging Endpoint.
Setting up Sunshine Conversations using Delivery Provider: Symbee Connect
These steps configure the integration of your Sunshine Conversations App and Messaging Service within your Symbee Connect Environment to enable the two-way Social channel.
Note: only follow these steps if you will be using Symbee Connect as your Delivery Provider
Create Skill Queue for Social Messages
- Login to the Symbee Connect Administration Portal.
- If you have more than one Environment configured within your Company in Symbee Connect, make sure you have the appropriate one selected. This can be found on the Navigation bar to the left of the Function menu.
- Click on the Function menu on the in the top navigation bar and the select Skill Queues located under the Contact Center Configuration section.
- Click on Add New Queue.
- Configure the New Queue making sure you select Social WhatsApp from the Queue Type dropbox.

- Click Save.
For more information on Queues and Skill Assignment, click here.
Assign New WhatsApp Skill Queue to Agents
Within Symbee Connect Social messages can either be delivered using the Symbee Connect Chat delivery engine, or alternatively can be delivered via Amazon Connect Chat using Contact Flows configured within Amazon Connect. If using Amazon Connect Chat for delivery, this sub-section can be skipped, and instead create a Starting Contact flow for your SMS Conversations in Amazon Connect and appropriate Amazon Connect Queues for agent delivery.
- On the Queues and Skill Assignment page, select Skill Assignment from the left side menu.
- Put a tick in the checkbox next the Users you want to assign the new WhatsApp queue to and click on the Add Skill to Users... button.
- From the dropdown box, select the WhatsApp Queue you created in the previous step and then click on the Assign Skill button.
For more information on Queues and Skill Assignment, click here.
Declare Social Messaging Endpoint
The following steps need to be performed regardless of your Delivery Provider:
-
From the Function menu, select Social Administration which is located under the. Channel Configuration section.
-
Click on Social Messaging from the left side menu and then click Add Social Messaging Endpoint.
-
Add an Endpoint Code and an Endpoint Name, then click Add.
-
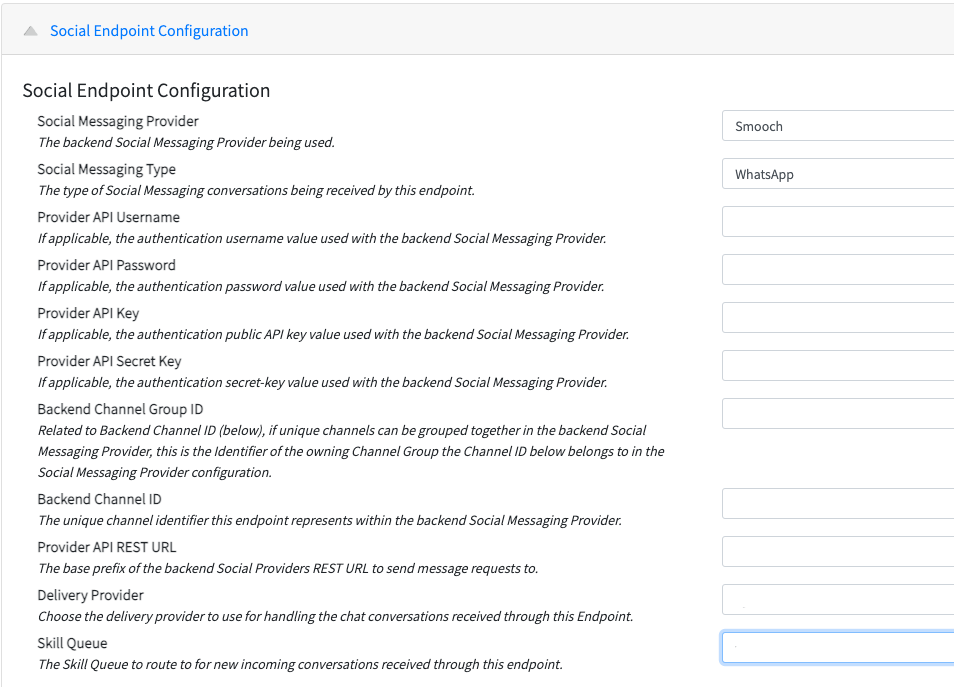
Select your newly created Provider Mapping from the List view and configure the details as follows:
-
Social Messaging Provider: select Smooch
- Social Messaging Type: select WhatsApp
- Provider API Username: leave blank
- Provider API Password: leave blank
- Provider API Key: use the API Key ID value obtained from your Sunshine Conversations App in this step.
- Provider API Secret Key: use the API Key Secret value obtained from your Sunshine Conversations App in this step.
- Backend Channel Group ID: use the App ID value obtained from your Sunshine Conversations App in this step.
- Backend Channel ID: you will need to copy the alpha-numeric value at the end of the URL when on the App Configuration page:
- From the Home screen in Sunshine Conversations, click on the App that contains your WhatsApp configuration.
- Click the Configure button for the WhatsApp channel integration
- Copy the alpha-numeric value at the end of the URL.

- Provider API REST URL: use the following:
https://app.smooch.io/v1/apps/[appID]/appusers/[appUserID]/messages -
Delivery Provider: select either Symbee or Amazon, depending on whether you want to have the Social Conversations delivered through a Symbee Connect Skill Queue, or alternatively via an Amazon Connect Contact Flow.
-
Skill Queue or Contact Flow (depending on your Delivery Provider): assign to a queue or a contact flow.
Sunshine Conversation APP Webhook URL
Once you have declared the WhatsApp messaging endpoint, the resulting Webhook URL needs to populated within your Sunshine Conversations App Integration, refer to Add and Configure Webhooks Integration.
The Webhook URL value can be copied from the bottom of your Social Messaging Endpoint setup above.
- From the Social Messaging Configuration page, click on the Social Endpoint you just created.
- Scroll down to the bottom, Social Endpoint Webhook URL to find the Callback Webhook URL. Copy the URL.
- Now use this URL to populate the Webhook in your Sunshine Conversations Social Message Service. See Add and Configure Webhooks Integration for more details.