Chrome Extension Overview
Symbee Connect maintains a Chrome Browser Extension that assists in delivery of functionality related to integrating with generic third-party applications and CRM's, and also the automation of call recording pause and resume when users are interacting with third-party websites or pages (for example financial payment pages, etc.).
We refer to the extension as the Universal Extension, as it's a multi-purpose extension designed using a plugin architecture, intended to contain any Symbee Connect functionality going forward that needs browser-extension type behavior, in a single browser extension rather than managing multiple different Symbee Connect browser extensions for different features.
The current Symbee Connect Chrome Browser Extension (version 2.0) is used with the following features:
- A no-code implementation enabling Click to Call for fields on generic web pages and/or CRM's where there is no direct CRM Integration plug-in available (including your custom in-house developed web applications)
- Exposing an optional programmatic API for invoking Click to Call from your custom web applications via JavaScript, if you have a need for adding Click to Call at a code development level.
- A no-code implementation enabling Automated Recording Pause and Resume when a user is interacting with targeted input fields on web pages. For example: pausing call and screen recording when a user is completing a web-based Payment form.
- Exposing an optional programmatic API for invoking Recording Pause and Recording Resume from your custom web applications via JavaScript, if you have a specific use-case that needs finer control pause/resume control and you are the maintainer of those sensitive web pages.
Installing the Extension
The Symbee Connect Chrome Browser Extension is published through the Google Chrome Web Store.
-
Either use the link above, of from your preferred web search engine, search on Chrome Web Store and navigate to the store
-
In Search the store, search on: Symbee Universal Plugin (or just Symbee)
-
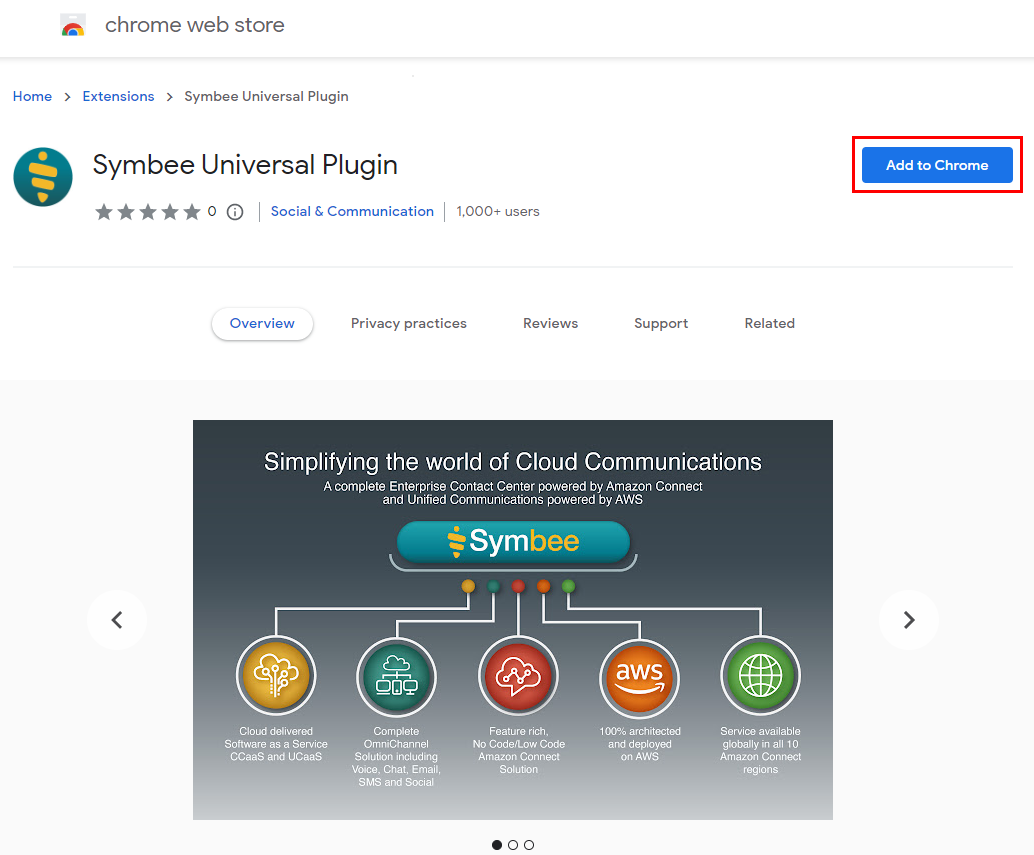
From the Symbee Universal Plugin store entry page, click the Add to Chrome button on the top right...
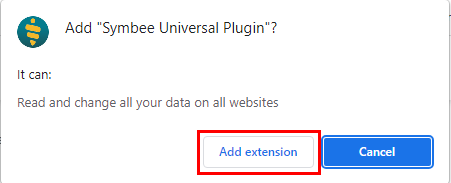
- Click Add Extension on the resulting install confirmation dialog...
The extension is now installed.
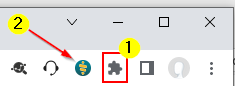
You can optionally pin the extension to be visible in your Chrome extension toolbar (located in the top right of the Chrome Browser window). To do so, (1) click on the little puzzle-piece in the toolbar, and click the little pin to the right of the Symbee Universal Plugin line. The Universal Plugin icon will then appear in the extension toolbar (2).
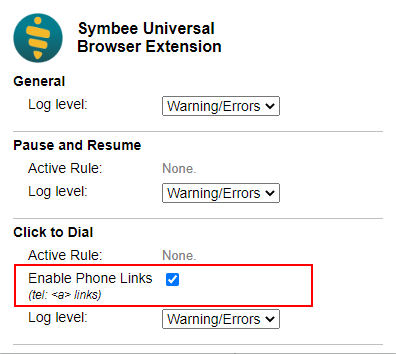
Clicking the extension icon (2) displays a small UI window useful in troubleshooting, that allows you to control the log level of the universal plugin extension, and show any currently active Click-to-Call and Pause/Resume Automation rules.
Generic Click To Call
Enabling Click to Call for specific fields on specific web pages
Generic Click to Call enablement is performed by the Chrome Universal Extension in conjunction with Symbee Connect User Template or Profile settings.
- Within the Symbee Connect Administration portal, from the main Function menu, select User Administration.
- Navigate to either User Templates (if you want to configure at a Template level) or Contact Center Users or Unified Communications Users (if you want to configure at an individual User level)
- Within a User Template or User profile, select Universal CRM Integration on the left, and expand the Generic Click to Call settings section
- Check the Enabled checkbox, and populate the Click to Call Element Selectors setting:
- Click to Call is enabled on fields based on targeting the fields using CSS (Cascading Style Sheets) Selection rules. For an overview, see Mozilla MDN Web Docs - CSS selectors. There are also many similar CSS Selector tutorials and help guides available on the web.
- In a separate browser tab or window, navigate to the pages in your application that contain the phone number fields you want to Click to Call enable
- Right-click on the fields to enable, and click on Inspect to bring up the Chrome Dev Tools window
- In the Dev Tools Elements tab, review the HTML for the phone number field, and determine the best CSS selection rule that will target the fields you want to Click to call enable.
- Once you have determined the best CSS Selection string, configure this in the Click to Call Element Selectors setting on the User Profile or Template in the Symbee Connect Administration Portal
- You may need multiple CSS Selector rules to cover all the fields you need to enable on all the required pages. If so, append all the rules together, delimiting each rule with a pipe (|) character, in the Click to Call Element Selectors setting.
- Save your Template or profile settings (and if using a Template, re-apply your template to the required users)
Users will need to log out and back in for the settings to take effect. And users will also need to have the Symbee Universal Plugin installed within Chrome.
With both settings and the extension in place, when the user navigates to any web page in their Chrome browser that contains fields targeted by your Click to Call Element Selectors, a green click to call icon will appear beside the respective phone number fields. Clicking the green Click to Call icon will invoke an Outbound call via the Symbee Connect User/Agent UI.
Note: To assist in trouble-shooting, the Symbee Universal Plugin has a small UI that displays the currently active Click to Call selection rules. Additionally, note that phone fields matching the rules only get Click to Call enabled if the user is logged in to the Symbee Connect User/Agent UI, and their User Profile has the Generic Click to Call feature enabled (see further above).
Routing Phone HMTL Links to use Symbee Connect
Separate to specific targeting of phone fields in the previous section using CSS Selectors, the Symbee Universal Plugin also has a optional setting to generically apply Click to Call behavior to any HTML phone anchor link present on any HTML page. For reference, a phone anchor link is HTML that looks like (as an example): <a href="tel:+15551112222">+1(555)111-2222</a>
By default, when one of these links is clicked, the Chrome browser will route the request to whatever (if any) default communications device is registered to the browser or desktop.
To re-route all these requests to make outbound calls using the Symbee Connect User/Agent UI instead, click on the little Universal Plugin icon (2) in the Browser Extensions toolbar in the top-right of the Chrome browser...
And check the Enable Phone Links check box on the resulting pop-out Extension UI:
With this setting enabled, and with the user logged in to the Symbee Connect User/Agent UI, with a User Profile that has the Generic Click to Call setting enabled, any new web pages pages visited by the user that contain phone links, will have a green click to call icon added beside each phone link. Clicking the green Click to Call icon will invoke an Outbound call via the Symbee Connect User/Agent UI.
Invoking Click to Call directly from JavaScript in your custom web page
As an alternative to the above two methods of adding click to call to web pages, a third option is available for those that are the authors (developers) of custom web pages or in-house developed web applications, which is to invoke a click to call from within the JavaScript code loaded in the web page.
This option can be used in conjunction with the previous two methods, or as an alternative. Using this method does not disable the ability to use the previous two methods at the same time, on the same web-pages.
When the Universal Plugin extension is installed, in conjunction with a user logged into the Symbee Connect User/Agent UI with a User Profile that has the Generic Click to Call setting enabled, the extension exposes an API accessed via window.postMessage() that allows you to instigate an outbound call from JavaScript.
To invoke an outbound call, add the following JavaScript function code to your web page, and call this new function wherever needed, passing in a string containing the phone number to be dialed:
    function invokeClickToCall(phoneNumber) {
        window.postMessage( {
            destination: "CLICK2DIAL_CONTENT",
            data: {
                action: "INVOKE_CLICK2DIAL",
                numberToDial: phoneNumber
            }
        }, "*");
    }
Automated Recording Pause and Resume
Activate Recording Pause and Resume for specific fields on specific web pages
Enabling Recording Pause and Resume functionality is configured at a User Template or an individual User profile level within the Symbee Connect Administration Portal:
- Within the Symbee Connect Administration portal, from the main Function menu, select User Administration.
- Navigate to either User Templates (if you want to configure at a Template level) or Contact Center Users or Unified Communications Users (if you want to configure at an individual User level)
- Within a User Template or User profile, select Optimize on the left, and expand the Recording Pause/Resume settings section
-
At minimum, check the Enabled checkbox. Then configure the other settings (Pause recording timeout, Agent UI Enabled, Paused Reminder seconds) as appropriate, or leave the defaults, and Save.
- Note: If you are configuring Pause/Resume automation to have pause and resume occur automatically using the Browser extension (below), even though in production you may not wish to show the Pause/Resume button to the Agent (the Agent UI Enabled setting), it is helpful to enable this during configuration, so you can visibly see what is happening during configuration and testing.
With Pause/Resume enabled for the user, the Pause/Resume activity can be automated when a user accesses certain targeted HTML fields within a web page (for example, a web-based payments entry screen). This automation is added by the Chrome Universal Extension in conjunction with Symbee Connect User Template or Profile settings.
In the same User Templates or User profile screen as referred to above in the Administration Portal, in the Optimize => Recording Pause/Resume settings section:
- Check the External Events Enabled check box
- Populate the External Items to Watch setting:
- Pause/Resume automation is enabled based on targeting the fields using CSS (Cascading Style Sheets) Selection rules. For an overview, see Mozilla MDN Web Docs - CSS selectors. There are also many similar CSS Selector tutorials and help guides available on the web.
- Based on the CSS Section rules above, an automated Pause action occurs any time a targeted field receives Input focus (the user has their cursor in this field), and a Resume action occurs when the targeted field loses focus (the user moves their cursor to another field). Internal queuing and threshold management of events is also in place such that a series of repeated focus/unfocus events as a user tabs their way through multiple targeted fields in a row, results in a continued pause until the last targeted field is exited.
- In a separate browser tab or window, navigate to the pages in your application that contain the recording sensitive fields you want to add Pause/Resume automation to
- Right-click on the fields to enable, and click on Inspect to bring up the Chrome Dev Tools window
- In the Dev Tools Elements tab, review the HTML for the fields in question, and determine the best CSS selection rule that will target the fields you want to have Pause/Resume behavior occur on.
- Once you have determined the best CSS Selection string, configure this in the External Items to Watch setting on the User Profile or Template in the Symbee Connect Administration Portal
- Save your Template or profile settings (and if using a Template, re-apply your template to the required users)
Users will need to log out and back in for the settings to take effect. And users will also need to have the Symbee Universal Plugin installed within Chrome.
With both settings and the extension in place, when the user navigates to any web page in their Chrome browser that contains fields targeted by your Pause/Resume External Items to Watch rule, user input into those fields will result in the appropriate Recording Pause/Resume actions automatically occurring via the Symbee Connect User/Agent UI.
Note: To assist in trouble-shooting, the Symbee Universal Plugin has a small UI that displays the currently active Pause/Resume selection rules. Additionally, note that fields matching the rules only get Pause/Resume enabled if the user is logged in to the Symbee Connect User/Agent UI, and their User Profile has the Recording Pause/Resume feature settings enabled (see further above).
Invoking Recording Pause and Resume directly from JavaScript in your custom web page
As an alternative to the above method of adding recording pause/resume automation to web pages, a second option is available for those that are the authors (developers) of custom web pages or in-house developed web applications, which is to invoke Pause and Resume actions programmatically within the JavaScript code loaded in the web page.
Beware that, while technically this option can be used in conjunction with the previous CSS targeting method, or as an alternative, using this method in conjunction with the previous CSS Selector targeting method at the same time on the same web-pages may cause unpredictable results, as a programmatic Pause action may then get undone by the use of a field in the same page that is also being targeted by a CSS Selector rule.
When the Universal Plugin extension is installed, in conjunction with a user logged into the Symbee Connect User/Agent UI with a User Profile that has the Recording Pause/Resume settings enabled, the extension exposes an API accessed via window.postMessage() that allows you to instigate Pause and Resume actions from JavaScript.
To invoke an pause and resume actions, add the following JavaScript function code (or a modified version of this, if you want to consolidate both functions into one, etc.) to your web page, and call these new functions wherever needed:
    function invokeRecordingPause() {
        window.postMessage( {
            destination: "PAUSE_RESUME_CONTENT",
            data: { action: "INVOKE_PAUSE" }
        }, "*");
    }

    function invokeRecordingResume() {
        window.postMessage( {
            destination: "PAUSE_RESUME_CONTENT",
            data: { action: "INVOKE_RESUME" }
        }, "*");
    }