Supervisor Monitoring Setup
Overview
Symbee Connect Supervisor is designed to provide supervisor level features to contact center supervisors so they can effectively manage and monitor their Agents in Real Time.
As part of the Supervisor, features provide the ability for the Supervisor to monitor, barge-in, and if needed, take over a call from an agent and exit the agent from the call if required. In addition, it provides the ability for the Supervisor to make the Agent Available and/or Unavailable depending on the requirements of the contact center.
When enabling the monitor, barge-in and take-over features, some additional configuration is required, detailed in this guide.
Amazon Connect Setup Requirements
You will need to be logged into your AWS Management Console as administrator for the following steps:
Create a Silence Prompt
The below steps create a small silence audio prompt, that can be added to the front of a Loop Prompts block in your Customer hold flow (the flow that describes what the customer hears when they get placed on hold).
When a supervisor monitor gets established, the supervisor is silently added into an agents conversation with a customer - in doing so, the customer gets (very briefly) put through the hold state. Adding a small period of silence to the beginning of the Customer Hold flow avoids the customer inadvertently hearing anything during this setup.
- Select Amazon Connect and open the the Amazon Connect Administration console for the instance you want to configure the Supervisor features for.
- Within the Amazon Connect console, select the Routing menu from the left side navigation bar and click Prompts.
- Click the Create new prompt button.
- Click the Record tab.
- Temporarily Mute your Microphone (so the below captures complete silence)
- Click the red record button two times in a row, with 2-3 seconds in between, to start and stop the recording, creating a small 2-3 second silence prompt.
- Name the prompt Silence – Supervisor Monitor.
- Click the Create button.
Modifying your existing Customer Hold Flow
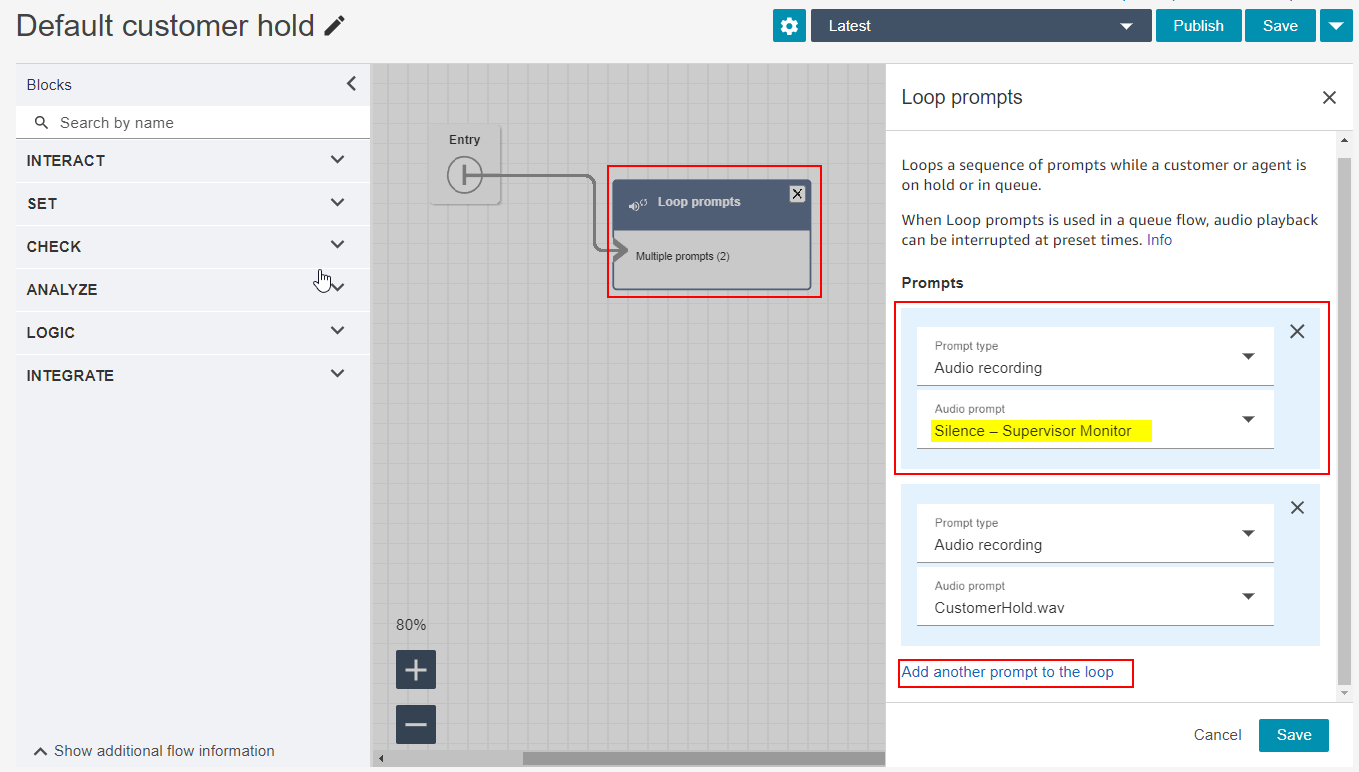
Modify your existing Customer Hold flow to play a small period of silence (the Silence Prompt created above) at the beginning of the Customer Hold experience. Add the new Silence prompt created above to the front of your Loop Prompts block in Customer Hold flows.
-
Within the Amazon Connect console, select the Routing menu from the left side navigation bar and click Contact Flows.
-
Look for and locate your existing Customer Hold flow (or flows) on the Contact Flow listing screen - the flow type in the Type column will be listed as Customer hold. Click on the flow name to edit the flow.
-
Edit the Loop prompts block in your Customer hold flow by clicking on the block heading.
-
You need to add the silence prompt to the beginning of the list of prompts in the Loop prompts list. There is no insert option, so you will need to add an entry to the bottom (by clicking Add another prompt to the loop), and shuffle all the existing prompts down one slot manually.
-
When adding your new Silence prompt, make sure Audio Recording is selected and use the dropdown box the find and select the prompt you created in the previous section.
- Save and Publish the flow.
Create a new Customer Queue Flow (used by the Monitor join - step 1)
As part of silently joining the Supervisor into the call, the monitor setup goes quickly through 3 steps - a Customer Queue Flow is invoked, a Customer Whisper Flow is invoked, and an Agent Whisper flow is invoked. Each of these need to be silent and end immediately. The step below creates the Customer Queue flow for this.
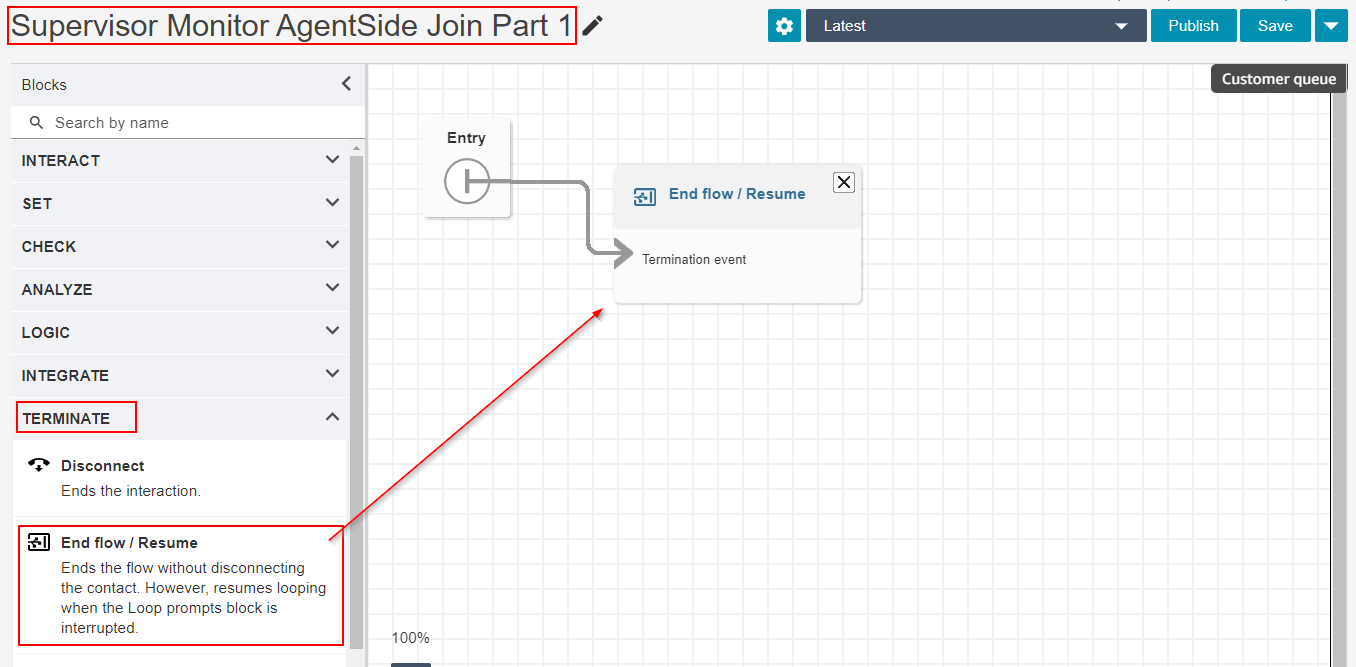
Create a new Customer Queue type flow and call it Supervisor Monitor AgentSide Join Part 1. It should literally do nothing but immediately End flow/Resume.
-
Within the Amazon Connect console, select the Routing menu from the left side navigation bar and click Contact Flows.
-
At the top right of the Contact Flows listing screen, click the drop down triangle button to the right of the Create contact flow button, and choose the Create customer queue flow option.
-
In the flow editor, under the Terminate menu, drag and connect the End flow/Resume block to the Entry (Start) block.
-
Name the flow: Supervisor Monitor AgentSide Join Part 1.
-
The end result should look like below:
- Save and Publish the flow.
Create a new Customer Whisper Flow (used by the Monitor join - step 2)
As part of silently joining the Supervisor into the call, the monitor setup goes quickly through 3 steps - a Customer Queue Flow is invoked, a Customer Whisper Flow is invoked, and an Agent Whisper flow is invoked. Each of these need to be silent and end immediately. The step below creates the Customer Whisper flow for this.
Create a new Customer Whisper type flow and call it Supervisor Monitor AgentSide Join Part 2. It should literally do nothing but immediately End flow/Resume.
- Within the Amazon Connect console, select the Routing menu from the left side navigation bar and click Contact Flows.
- At the top right of the Contact Flows listing screen, click the drop down triangle button to the right of the Create contact flow button, and choose the Create customer whisper flow option.
- In the flow editor, under the Terminate menu, drag and connect the End flow/Resume block to the Entry (Start) block.
- Name the flow: Supervisor Monitor AgentSide Join Part 2.
- Save and Publish the flow.
Create a new Agent Whisper Flow (used by the Monitor join - step 3)
As part of silently joining the Supervisor into the call, the monitor setup goes quickly through 3 steps - a Customer Queue Flow is invoked, a Customer Whisper Flow is invoked, and an Agent Whisper flow is invoked. Each of these need to be silent and end immediately. The step below creates the Agent Whisper flow for this.
Create a new Agent Whisper type flow and call it Supervisor Monitor Supervisor Join. It should literally do nothing but immediately End flow/Resume.
-
Within the Amazon Connect console, select the Routing menu from the left side navigation bar and click Contact Flows.
-
At the top right of the Contact Flows listing screen, click the drop down triangle button to the right of the Create contact flow button, and choose the Create agent whisper flow option.
-
In the flow editor, under the Terminate menu, drag and connect the End flow/Resume block to the Entry (Start) block.
-
Name the flow: Supervisor Monitor Supervisor Join.
-
Save and Publish the flow.
Create the Transfer to Agent Contact Flow used by Monitor join Quick Connects
This step creates the main Transfer to Agent contact flow used by the Observe Quick Connects (created in the next step). This flow combines the use of the previous 3 flows created to engage the Supervisor into the call as quick as possible, without any delays or prompting (as silent and quick as the Amazon Connect functionality allows).
Create a new Transfer to Agent type flow and call it Supervisor Monitor using the steps below.
-
Within the Amazon Connect console, select the Routing menu from the left side navigation bar and click Contact Flows.
-
At the top right of the Contact Flows listing screen, click the drop down triangle button to the right of the Create contact flow button, and choose the Create transfer to agent flow option.
-
In the flow editor, under the SET menu, drag and connect a Set customer queue flow block to the Entry (Start) block. Edit the blocks configuration, choose Set manually, and select your Supervisor Monitor AgentSide Join Part 1 flow created above.
-
Under the SET menu, drag and connect a Set whisper flow block after the block created above in step 3. Edit the blocks configuration, choose To Customer, and Set manually, and select your Supervisor Monitor AgentSide Join Part 2 flow created above.
-
Under the SET menu, drag and connect another Set whisper flow block after the block created above in step 4. Edit the blocks configuration, choose To Agent, and Set manually, and select your Supervisor Monitor Supervisor Join flow created above.
-
Under the SET menu, drag and connect a Set working queue block after the block created above in step 5. Edit the blocks configuration:
- Choose By agent
- Then Set dynamically
- Under Namespace choose Agent
- Under Value chose User Name
-
Under the TERMINATE menu, drag and connect a Transfer to queue block after the block created above in step 6. No configuration is needed for this block.
-
Under the TERMINATE menu, drag and connect a Disconnect block after the block created above in step 7 to complete the flow.
-
Name the flow: Supervisor Monitor.
-
The end result should look like this:

-
Save and Publish the flow.
Create Quick Connects
Each user configured as a Supervisor needs a Quick Connect created to represent their monitor capability. Think of this like their service observe path.
The quick connect needs to be named with the following convention (note: Quick Connects with this naming convention will not appear (they are hidden) in agents and supervisors Directories) :
OBSERVE-(supervisor's user-id)
For example: OBSERVE-JohnSmith
When creating each Quick Connect, use the new Supervisor Monitor flow created above.
- From the Routing menu, click Quick Connects.
- Click the Add New button.
- Name will be OBSERVE-(supervisor's user-id).
- For the Type, select Agent.
- For Destination, choose the Supervisor user id from the dropdown.
- For Contact Flow, select the Supervisor Monitor flow you created above.
- Click Save.
Assign Quick Connects to Agent Queues
Each of the above OBSERVE-… Quick Connects needs to all be assigned to all the queues that agents receive calls via, or for at least those queues that calls wish to be monitored on. The Symbee Connect User/Agent UI will hide these and not display them in the Directory.
If the call center also wants genuine “visible” Quick Connect that agents can use to merge in/transfer to their supervisor, the supervisor can also have a second Quick Connect (not named like above) that the agents can see and use from the directory. (these would also have a different transfer flow)
- On the Routing menu, click Queues.
- Click the queue name you want to add the Quick Connect(s) to.
- Under the Quick Connects (optional) section, click and add each of the Supervisor quick connects you added above.
- Click Save.
Symbee Connect Setup Requirements
Modify Supervisor User Templates
Any Symbee Connect Users that need the Supervisor functionality will need to be setup as a Supervisor user mode. This can be done by modifying each of the Symbee Connect Supervisor User profiles.
Note: If you don't have a separate Supervisors template, you will need to modify each of the individual supervisor user profiles using the steps below.
- Log into the Symbee Connect Administration Portal.
- If you have more than one Environment configured within your Company in Symbee Connect, make sure you have the appropriate one selected. This can be found on the Navigation bar to the left of the Function menu.
- Click on the Function menu and select User Administration located under User Configuration.
- Select User Templates left side menu.
- From the User Templates page, click the Supervisor template that needs to be updated.
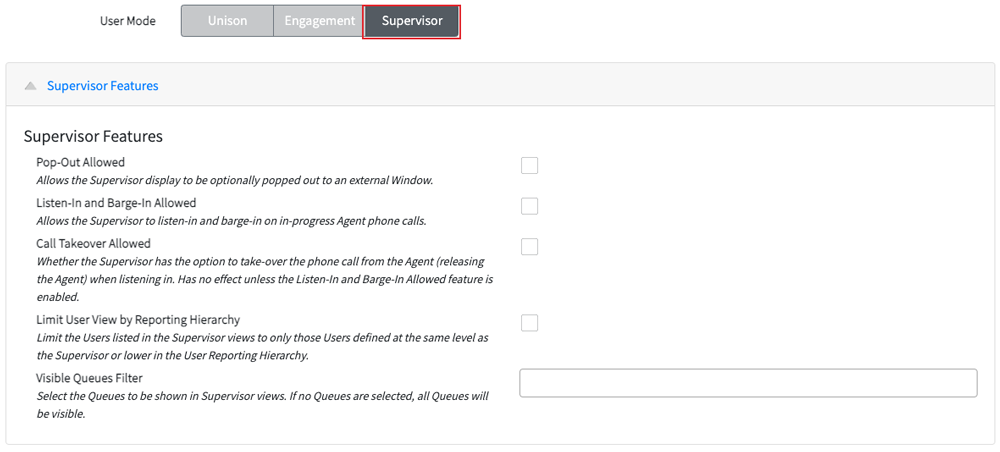
- Make sure the User Mode is set to Supervisor at the top of the Template.
- Scroll down to the Supervisor features section and configure as desired.
- Select the Supervisors that need the Supervisor functionality by clicking the checkbox next to their name.
- Click the Apply Profile button.
- Choose the appropriate Supervisor profile and click Apply Template.
Symbee Connect Supervisor Monitor Restrictions/Caveats
Some Context: The current Amazon Connect API’s do not support establishing a Silent Monitor. The only way to perform a Silent Monitor is via the Amazon Connect Administration Console. Additionally, there is the need for full supervisor features beyond basic monitoring (Supervisor Barge-In, and Take-Over).
The Symbee Connect Supervisor functionality fills these gaps, however due to the API limitations there are a few restrictions/caveats as noted below.
Monitoring calls with third-party activity
Supervisor Monitor is a genuine third-party connection on the call. Amazon Connect currently only supports 3 parties on a call (the agent, the customer, plus 1 other party). Therefore:
- A Monitor cannot be established if the Agent/Customer call is already engaged with some other party (e.g. on a conference, or customer is on hold, while the agent is speaking with another third party – either another agent or an external number). A denial informational message is displayed to the supervisor if they attempt a monitor on a call and the call is found to be in this state.
- If a Monitor is in progress on a call (agent not being aware), the supervisor monitor will be automatically dropped from the call if/when an agent begins to initiate any third-party calling activity (add party, blind transfer). An informational message is displayed to the supervisor as the monitor is dropped, notifying them of why.
Supervisors must use a Softphone, not a Hard phone.
Symbee Connect Supervisor makes use of Mute/Unmute features to achieve the Supervisor Barge-in functionality. API driven mute and unmute are not available if the user (the Supervisor) has the Amazon Connect “hard phone” setting configured, as there is no way to automatically control the mute state of the user’s external physical phone. Supervisors should therefore be configured for soft phone.
Supervisor is transitioned to Available when Monitor Starts
In Amazon Connect, the only way to receive any call is to be in the Available state. Symbee Connect Supervisor handles this automatically, however, please note this behavior when Monitoring. Train your supervisors to go Pending Unavailable once they start a monitor if they don’t want the possibility of receiving another call after the monitor is finished.