NetSuite CRM Configuration
Overview
When using the NetSuite CRM with Symbee Connect, Symbee Connect provides the option to perform screen pop in your NetSuite CRM for incoming interactions and saving of interaction related information once the interaction is complete.
This guide assumes the following pre-requisites have already been completed:
- Your Amazon Connect instance has already been set up with the appropriate phone numbers, contact flows, routing profiles and call queues.
- Your Symbee Connect instance has been set up and configured with your Amazon Connect instance details.
Enable Call Trace Record (CTR) streaming within Amazon Connect
You will need to enable Call Trace Record (CTR) streaming on your Amazon Connect instance. This is used by the Lambda Function for updating Netsuite with the call data (including Call Recordings) when the call completed.
For step by step instructions check out Enabling CTR stream within Amazon Connect.
Download and Install NetSuite Restlet
-
Log into the Symbee Connect Administration Portal.
-
If you have more than one Environment configured within your Company in Symbee Connect, make sure you have the appropriate one selected. This can be found on the Navigation bar to the left of the Function menu.
-
Then click on the main Function menu in the top navigation bar, and click on Feature Integrations (CloudFormations) in the Company Environment Configuration section.
-
From the Feature Integrations (AWS CloudFormations) page, scroll down and locate the Symbee Connect NetSuite Restlet file located under the NetSuite CloudFormation section. Click link to download and save.
-
Log into your NetSuite environment as Administrator.
-
Click on Customization from the top navigation bar, then select Scripting, Scripts and finally New.
-
Click on the + button beside the SCRIPT FILE field, under SELECT FILE, click on Browse.
-
Locate the downloaded file from the above step and click Save.
-
Click Create Script Record.
-
From the Select 1.0 Script Type page, choose Restlet.
-
On the Script page, enter the following values:
- NAME: Symbee ConnectNetSuiteRestlet
- DESCRIPTION: Restlet provides access to NetSuite environment
- POST FUNCTION: performOperation
-
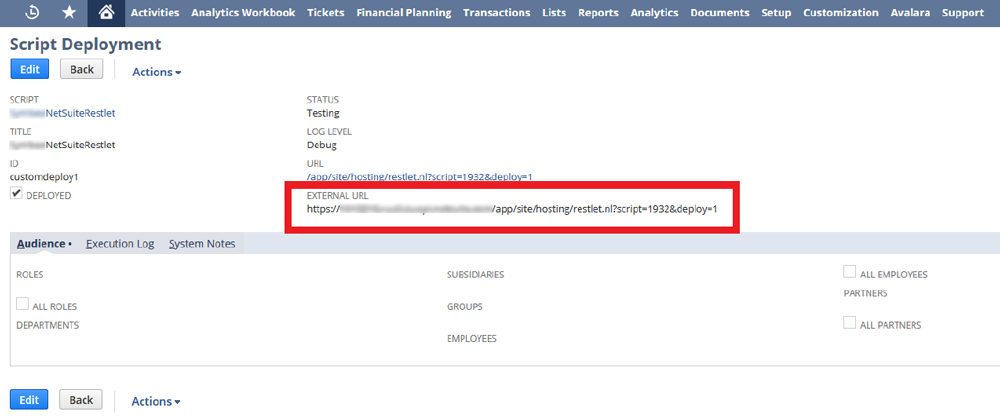
Click the arrow beside Save and select Save and Deploy.
-
Once deployed, the following screen will be displayed. Copy and paste the value of the EXTERNAL URL to notepad.
Obtaining NetSuite API Credentials
You will need your NetSuite API credentials to complete later steps. You can obtain these credentials by doing the following:
- Log into your NetSuite environment as Administrator.
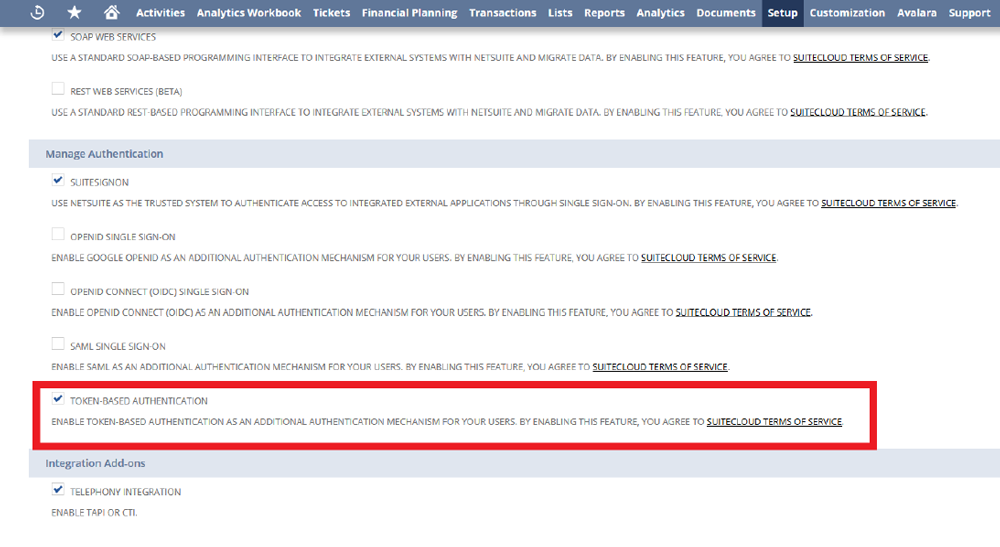
- Click on Setup from the top navigation bar, then select Company and finally Enable Features.
- Click on the SuiteCloud tab.
- Scroll down to the Manage Authentication section and enable TOKEN-BASED AUTHENTICATION.
- Go back to the top navigation bar and select Setup, Integration and then SOAP WebServices Preferences.
- Take note of the ACCOUNT ID - this will be required to use the Symbee ConnectNetSuite Restlet.
Create a Token-based Authentication Role
- Select Setup from the top navigation bar, then User/Roles, Manage Roles and then New.
- Complete the following fields:
- NAME: Symbee ConnectRestletRole
- ID: Symbee ConnectRestletRole
- EMPLOYEE RESTRICTIONS: none - no default
- ACCESSIBLE SUBSIDIARIES: ALL
- ALL CROSS_SUBSIDIARY RECORD VIEWING: Enabled
- Scroll to the bottom and Click Permissions.
- Click on the Lists under Permissions and add the following permission levels:
- Accounts – LEVEL - Full
- Cases – LEVEL - Full
- Competitors – LEVEL - Full
- Contacts – LEVEL - Full
- Customers – LEVEL - Full
- Items – LEVEL - Full
- Phone Calls – LEVEL - Full
- Vendors – LEVEL - Full
- Employee Record – LEVEL - View
- Employee – LEVEL – View
- From the top navigation bar, click on Setup and then select Permissions.
- Add entries for User Access Token and Web Services - both with a Level of Full and then click Save.
- Assign a user to the new Role created above by going to the top navigation bar and selecting List, Employees, Employees, then Search.
- Scroll down to the bottom and click the Access tab.
- Click Roles under the Access tab.
- Add the new Symbee ConnectRestletRole to the employee and click Save.
- After completing above steps, you can confirm success by navigating back to the SymbeeRestletRole and validate the Employee is assigned to the role.
Create a new Integration Record
- Select Setup, Integration, Manage Integrations and then New.
- Set the following values:
- NAME: Symbee ConnectIntegration
- DESCRIPTION: This integration is used by Symbee Connect to perform screen-pop and store Symbee Connect voice, task and workcode data in NetSuite.
- TOKEN-BASED AUTHENTICATION (TBA): Enabled
- TBA: ISSUETOKEN ENDPOINT: Enabled
- TBA: AUTHORIZATION FLOW: Disabled
- USER CREDENTIALS: Enabled
- Click Save.
- The Integration screen will be updated with a confirmation and your Application ID, Consumer Key and Consumer Secret will be displayed. Note these values, as they are needed later.
Create an Access Token
- Select Setup from the top navigation bar, then User/Roles, Access Tokens and then New.
- Set the following values:
- APPLICATION NAME: Symbee ConnectIntegration
- USER: Symbee Connect Integration
- ROLE: Symbee ConnectRestletRole
- Click Save.
- A Confirmation screen will apppear and your generated Token ID and Token Secret will be displayed. Note these values, as they are needed later.
Adding Custom Fields to NetSuite PhoneCall record
The steps in this section result in the NetSuite PhoneCall record having additional custom fields. These custom fields are populated by the Symbee Connect NetSuite post-contact processing Lambda.
-
Log into your NetSuite environment.
-
Click on Customization from the top navigation bar, then select Lists, Records, & Fields, CRM Fields and then New.
-
For each of the new fields to be created in the following steps, click the New Button in the upper left-hand corner to bring up the Custom CRM Field create screen.
-
Create a new connect_login_name Custom CRM field. Set the new field’s attributes as follows:
- LABEL: Connect Login Name
- ID: connect_login_name
- DESCRIPTION: Connect Login Name
- TYPE: Free-Form Text
- Applies To: PHONE CALL
Click Save & New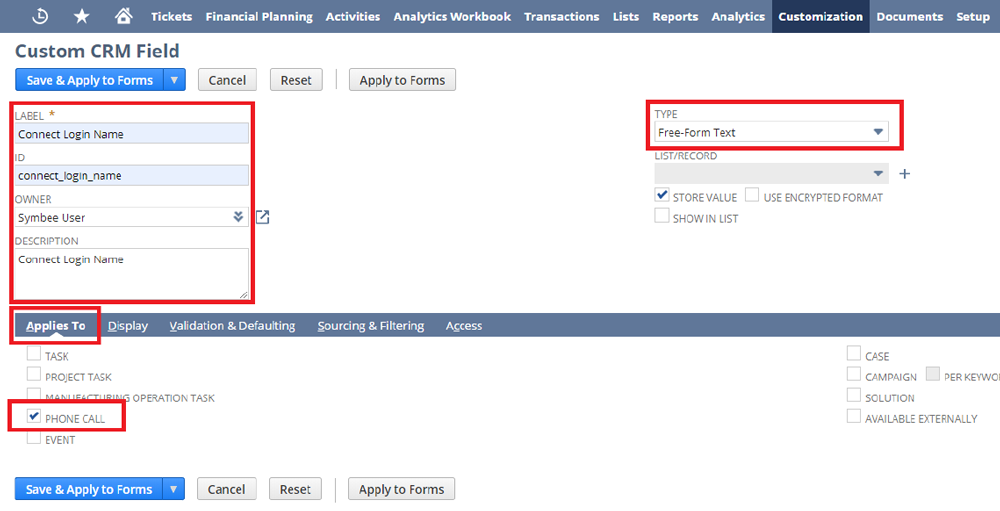
-
Create a new connect_media_type Custom CRM field. Set the new field’s attributes as follows:
- LABEL: Connect Media Type
- ID: connect_media_type
- DESCRIPTION: Connect Media Type
- TYPE: Free-Form Text
- Applies To: PHONE CALL
Click Save & New
-
Create a new connect_queue_name Custom CRM field. Set the new field’s attributes as follows:
- LABEL: Connect Queue Name
- ID: connect_queue_name
- DESCRIPTION: Connect Queue Name
- TYPE: Free-Form Text
- Applies To: PHONE CALL
Click Save & New
-
Create a new connect_call_url Custom CRM field. Set the new field’s attributes as follows:
- LABEL: Connect call URL
- ID: connect_call_url
- DESCRIPTION: URL of connect call recording
- TYPE: Hyperlink
- Applies To: PHONE CALL
Click Save & New
-
Create a new connect_call_is_outbound Custom CRM field. Set the new field’s attributes as follows:
- LABEL: Connect call is outbound
- ID: connect_call_is_outbound
- DESCRIPTION: Connect call direction
- TYPE: Check Box
- Applies To: PHONE CALL
Click Save & New
-
Create a new connect_call_duration_seconds Custom CRM field. Set the new field’s attributes as follows:
- LABEL: Connect call duration in seconds
- ID: connect_call_duration_seconds
- DESCRIPTION: Connect call duration in seconds
- TYPE: Integer Number
- Applies To: PHONE CALL
Click Save & New
-
Create a new connect_workcode_1 Custom CRM field. Set the new field’s attributes as follows:
- LABEL: Connect Work Code 1
- ID: connect_workcode_1
- DESCRIPTION: Connect Work Code
- TYPE: Free-Form Text
- Applies To: PHONE CALL
Click Save & New
-
Create a new connect_workcode_2 Custom CRM field. Set the new field’s attributes as follows:
- LABEL: Connect Work Code 2
- ID: connect_workcode_2
- DESCRIPTION: Connect Work Code
- TYPE: Free-Form Text
- Applies To: PHONE CALL
Click Save & New
-
Create a new connect_workcode_3 Custom CRM field. Set the new field’s attributes as follows:
- LABEL: Connect Work Code 3
- ID: connect_workcode_3
- DESCRIPTION: Connect Work Code
- TYPE: Free-Form Text
- Applies To: PHONE CALL
Click Save & New
-
Create a new connect_contact_id Custom CRM field. Set the new field’s attributes as follows:
- LABEL: Connect Contact ID
- ID: connect_contact_id
- DESCRIPTION: Contact ID of the Connect Call (unique identifier for the call)
- TYPE: Free-Form Text
- Applies To: PHONE CALL
Click Save
Download and Run NetSuite CloudFormation
If this is the first Symbee Connect CloudFormation you have run, you will need to run the Integrations CloudFormation first. For step by step instructions and further information about CloudFormations click here.
- Log into the Symbee Connect Administration Portal.
- If you have more than one Environment configured within your Company in Symbee Connect, make sure you have the appropriate one selected. This can be found on the Navigation bar to the left of the Function menu.
- Then click on the main Function menu in the top navigation bar, and click on Feature Integrations (CloudFormations) in the Company Environment Configuration section.
- From the Feature Integrations (AWS CloudFormations) page, scroll down and locate the NetSuite CloudFormation. Click link to download and save the NetSuiteCloudFormation.yaml file locally to your PC for use in the following steps.
- Log into your AWS Management Console.
- Make sure you are in the correct AWS region for where you want to deploy (top right of the Navigation bar).
- Click on Services at the top, and under Management and Governance, choose CloudFormation
- Select Stacks in the left-hand navigation bar, and select Create Stack (with new resources (standard)).
- In the Specify Stack Details screen, complete the fields as follows:
- Stack Name: Enter a name appropriately. We suggest using your Symbee Connect Environment (e.g. dev, prod, etc.) in the name for better organization, in case you have CloudFormations for multiple Symbee Connect Environments being deployed into the same AWS Account.
For example:
companyalias-environment-netsuite - AccountId: Enter the AccountId obtained in Step 6 of the NetSuite API Credentials section above
- ConnectAccessUrl: The domain part of the Access URL of your Amazon Connect Instance. Obtain this from within Amazon Connect in your AWS Account. The value will like either: https://xxxxxxxxxxxx.awsapps.com (the older style) or https://xxxxxxxxxxxx.my.connect.aws (the newer style)
- ConnectCTRKinesisStreamARN: The ARN of the Amazon Connect CTR Kinesis Stream
- ConsumerKey: Enter: Consumer Key obtained in Step 4 of the Create a new Integration Record section above
- ConsumerSecret: Enter: Consumer Secret obtained in Step 4 of the Create a new Integration Record section above
- FieldName: Enter the name of the field in the NetSuite table being updated, that will be queried to locate which record to update. When updating the phonecall table, the field name here is "title".
- FieldValue: Enter the name of the Amazon Connect Contact Attribute that holds the value of the ContactId, which is used in the query to locate which record to update.
- InteractionStreamArn: The ARN of the Symbee Connect Interaction Kinesis Stream
- LambdaDistroBucket: This is the Symbee Connect Lambdas S3 bucket where the NetSuite Lambda will uploaded from. Select the bucket name from the drop-down that matches the AWS region you are running the CloudFormation in.
- LambdaSourceFile: Select from the dropdown, there will only be 1 value to pick from
- LogLevel: choose either DEBUG|INFO|ERROR - usually ERROR is suffice
- RestUrl: Enter the External URL you obtained in Step 13 of the Download and Install NetSuite Restlet section above
- TableName: Enter the name of the NetSuite table the contact/interaction details are to be pushed into. This is the same table you added the custom fields to in the Adding Custom Fields to NetSuite section above. Usually "phonecall".
- TokenId: Enter the Token ID obtained in Step 4 of the Create an Access Token section above
- TokenSecret: Enter Token Secret obtained in Step 4 of the Create an Access Token section above
- WorkCodeStreamArn: The ARN of the Symbee Connect WorkCode Kinesis Stream
- Stack Name: Enter a name appropriately. We suggest using your Symbee Connect Environment (e.g. dev, prod, etc.) in the name for better organization, in case you have CloudFormations for multiple Symbee Connect Environments being deployed into the same AWS Account.
- Click Next
- On the next Configure stack options screen, accept all the defaults, and click Next.
- On the next Review testing screen, scroll to the bottom Capabilities section, check the “I acknowledge that AWS CloudFormation might create IAM resources with custom names.” checkbox, and finally click Create Stack.
Enable NetSuite
Create User Profile Template for NetSuite Users
- Login to the Symbee Connect Administration Portal.
- If you have more than one Environment configured within your Company in Symbee Connect, make sure you have the appropriate one selected. This can be found on the Navigation bar to the left of the Function menu.
- Click on the Function menu on the in the top navigation bar and then select User Administration located under the User Configuration section.
- Select User Templates on the left navigation bar and from the User Templates list view, click Add Template.
- In the New User Profile Template dialog box, enter the following:
- Template Identifier: NetSuiteUsers
- User Profile Template Name: NetSuite Users Template
- Once the new template has been created, it will appear in the User Templates listing screen, select and click on the Modify button.
- Make sure you have the User Mode set to Engagement, this is in the center of the screen.
- Select AWS Integration from the let menu, then choose Amazon Connect Integration. Make sure there is a tick in checkbox next to ACD Amazon Connect Integration.
- Now select CRM Integrations from the left menu and then select NetSuite Fusion.
- Make the following changes in the NetSuite Fusion settings:
- Set Plugin Enabled to true
- Set Enable Test Data to false
- Set Rest Url to the External URL you obtained in Step 13 of the Download and Install NetSuite Restlet section above
- Set Employee Name:
This is user profile specific. Search the NetSuite employee record for the first and last name of the employee. - Set Account Id to the AccountId obtained in Step 6 of the NetSuite API Credentials section above
- Set ConsumerKey to the Consumer Key obtained in Step 4 of the Create a new Integration Record section above
- Set ConsumerSecret to the Consumer Secret obtained in Step 4 of the Create a new Integration Record section above
- Set TokenId to the Token ID obtained in Step 4 of the Create an Access Token section above
- Set TokenSecret to the Token Secret obtained in Step 4 of the Create an Access Token section above
- Set Screen Pop Direction to Inbound|Outbound|Both as needed
- Set Country Code to the E.164 country code used by default. E.g. For US “+1”
- Set Table Name1 to the Entity you want to query first in NetSuite for a match
- Set Field Name1 to the field associated with the Table 1 NetSuite entity to query
- Set Field Value1 to the contact attribute value received via connect contact flow, or task delivered to the agent, to be used for the Table 1 NetSuite entity query
- Set Screen Pop Url1 to:
https://your-netsuite-domain-domain/app/common/entity/custjob.nl?id={netsuiteentityid} - Set Table Name2 to the Entity you want to query second in NetSuite for a match
- Set Field Name2 to the field associated with the Table 2 NetSuite entity to query
- Set Field Value2 to the contact attribute value received via connect contact flow, or task delivered to the agent, to be used for the Table 2 NetSuite entity query
- Set Screen Pop Url2 to:
https://your-netsuite-domain-domain/app/common/entity/custjob.nl?id={netsuiteentityid} - Set Table Name3 to the Entity you want to query third in NetSuite for a match
- Set Field Name3 to the field associated with the Table 2 NetSuite entity to query
- Set Field Value3 to the contact attribute value received via connect contact flow, or task delivered to the agent, to be used for the Table 3 NetSuite entity query
- Set Screen Pop Url3 to:
https://your-netsuite-domain-domain/app/common/entity/custjob.nl?id={netsuiteentityid} - Set Login Url to:
https://your-netsuite-domain-domain/pages/customerlogin.jsp?country=US - Set Window Name - this will be used to identify the netsuite browser
- Scroll back to the top and Save.
Apply NetSuite Template to Users
- From the Administration Portal, choose Function and then User Administration located under the User Configuration section.
- Select User Profiles from the left navigation bar.
- Check all the users you would like to apply the new NetSuite template to and click Apply Profile button.
- Select the NetSuite template from the dropdown menu and then click on the Apply Template button.