Amazon Chime Integration
Overview
The steps in this guide configure the optional Amazon Chime Integration for operation in your Contact Center.
Functionality of the Amazon Chime Integration enables:
- Unison (Non-Contact Center) Users to directly call other Unison users internally, without calling out through Amazon Connect and without having to assign individual DID’s or user extensions
- Engage (Contact Center) users to call each other regardless of their Contact Center Agent state, and regardless of whether they are on other calls, and without having to assign individual DID’s or user extensions
- Unison Users to call Engage users and vice versa (again regardless of Agent state and without DID’s or extensions)
- Inbound PSTN DID calling through Chime directly to all types of Users (regardless of their Contact Center Agent state)
- Outbound PSTN Calling for all types of Users
An AWS CloudFormation is provided to establish the functionality and configuration needed in your AWS Account.
There can only be a maximum of 12 parties involved in a single Chime call.
NOTE: The Chime CloudFormation run in this document can ONLY be deployed in US-EAST-1 or US-WEST-2 regions. The resources deployed by this CloudFormation prime for the use of Voice Connector and SMA (SIP Media App) functionality, which is only currently physically located in the US.
The Symbee Connect Chime usage can still be in any region (the closest region to your users) for User to User calling and can be configured as such within the Symbee Connect Administration Portal. However, PSTN and Voice Connector access can only run through the US – therefore the CloudFormation needs to be executed within one of these US Regions.
Run CloudFormation
Currently creation of Chime objects and configuration is not supported in AWS CloudFormation. Therefore, some of the installation steps (the declaration of the SIP Media Application) need to be performed manually via the AWS Chime Console.
In summary the instructions below step you through:
-
Downloading and running the Amazon Chime CloudFormation:
-
Part of this CloudFormation deploys a Lambda to use as a Chime SIP Media Application (SMA)
Optionally, if you also plan on using PSTN (public external number) calling (either inbound or outbound) through Chime:
-
Declaring a Chime SIP Media Application (using the noted Lambda deployed above)
-
Running an Update of the Amazon Chime CloudFormation to set the MediaApplicationId of the SMA declared in step 2 above.
Download and Run Amazon Chime CloudFormation
If this is the first Symbee Connect CloudFormation you have run, you will need to run the Integrations CloudFormation first. For step by step instructions and further information about CloudFormations click here.
- Log into the Symbee Connect Administration Portal.
- If you have more than one Environment configured within your Company in Symbee Connect, make sure you have the appropriate one selected. This can be found on the Navigation bar to the left of the Function menu.
- Then click on the main Function menu in the top navigation bar, and click on Feature Integrations (CloudFormations) in the Company Environment Configuration section.
- From the Feature Integrations (CloudFormations) page, scroll down and locate the Amazon Chime CloudFormation and click the download link to download and save the CloudFormation script.
- You will be prompted with a Save As dialog screen. Save the ChimeIntegrationTemplate.yaml file locally to your PC for use in the following steps.
- Log Into your AWS Management Console.
- Make sure you are in either the us-east-1 or us-west-2 regions as those are the only supported regions for Chime currently.
- Navigate to the CloudFormation console (under Management and Governance, on the Services menu).
- From the CloudFormations console, select Stacks in the left-hand navigation bar, and select Create Stack (with new resources (standard)).
- Under the Prepare Template section, select Template is Ready.
- Under Specify Template, select Upload a template file.
- Under Upload a template file, click Choose File.
- In the resulting file selector, find and upload the file you saved from Step 4 above.
- Click Next at the bottom.
- On the Specify stack details page, give the stack an appropriate name – suggestion is to indicate Chime, and the environment name its associated with.
- In the Parameters section:
- ChimeApiRegion: Always set to us-east-1
- ChimeMeetingRegion: Set this to the AWS region geographically closest to your users
(Only used as a fallback if no better region can be determined during call setup) - MediaApplicationId: Leave this blank during the initial run (You will update this later in a following section if you also plan on using PSTN calling through Chime)
- On the Configure stack options page, scroll to the bottom and click the orange Next button.
- On the next Review testing screen, scroll to the bottom Capabilities section, check the I acknowledge that AWS CloudFormation might create IAM resources with custom names. Checkbox, and finally click Create Stack.
Declare a SIP Media Application in Chime
The following steps are optional and are only required in you plan on using PSTN (public external number) calling (either inbound or outbound) through Chime.
PSTN Calling in Chime is achieved using a SIP Media Application, which is backed by a Lambda that was deployed by the Amazon Chime CloudFormation above.
- Log Into your AWS Management Console.
- navigate to the Amazon Chime service, found under the Business Applications on the Services menu.
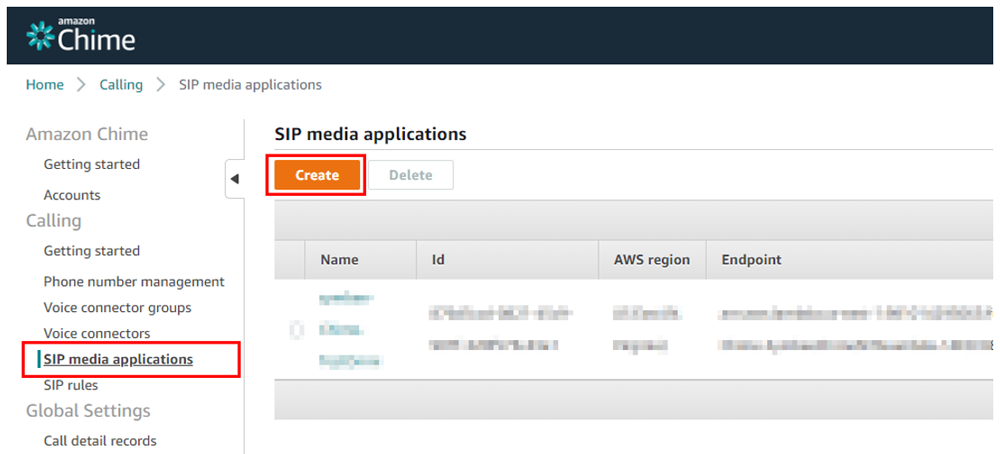
- Click on the SIP media applications link on the left hand side.
- Click the orange Create button towards the top.
- The Create a SIP media application box will come up:
- Populate Name with something like Symbee Connect-Chime-
- Set the AWS Region to the region that you ran the Chime CloudFormation in and are configuring Chime in
Note: (Currently only supported in us-east-1 or us-west-2) - Populate the Lambda function ARN with the ARN of the Chime Lambda that was deployed by the CloudFormation above:
i. Navigate to the Lambda Console and search for a Function with “chime” in the name
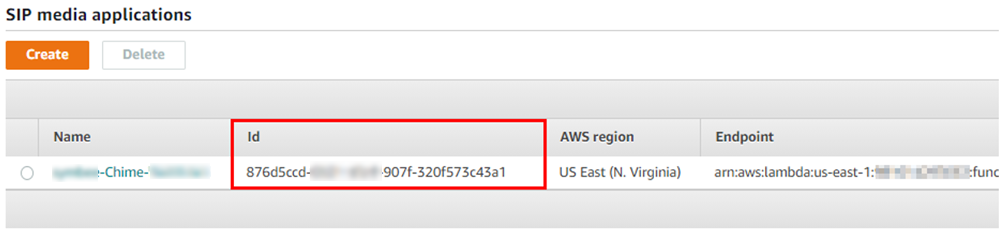
ii. Click to open the Lambda Function and copy the ARN to paste in this box - Click the orange Create button to finish the initial setup
- Once completed, copy the ID that is displayed. This is used in both section 2.3 further below, and in Section 4.
Update Amazon Chime CloudFormation to set MediaApplicationId
The following steps are optional and only required if you plan on using PSTN (public external number) calling (either inbound or outbound) through Chime and you performed the steps in Declare a SIP Media Application in Chime above.
- From the AWS Console Home Page, navigate back to the CloudFormations service in the same region you originally deployed the Amazon Chime CloudFormation.
- Within the CloudFormation console, under Stacks, locate the Amazon Chime CloudFormation you deployed.
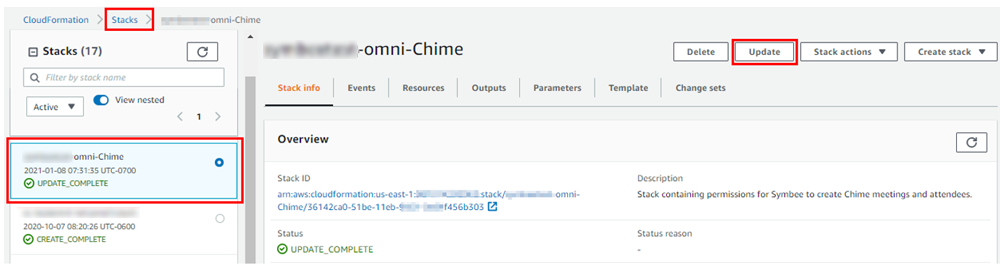
- On the stack details to the right, click Update in the top right to begin updating the stack.
- On the following screen, select Use current template.
- In the Specify Stack Details page, locate the MediaApplicationId parameter, and paste the ID value of the SIP Media Application you configured and obtained in above in Step 5 above.
- Step through the remaining three screens using, Next, Next, and Update Stack to complete the CloudFormation update.
Claiming Phone Numbers in Chime Service for PSTN Calling
This section is only applies if you are using PSTN (public external number) calling (either inbound or outbound) through Chime and you performed the steps in the previous two sections. Otherwise skip this section.
Claim Phone Numbers
-
From the Amazon Chime service page, click on Phone Number Management under the Calling menu.
-
Click on the Orders tab.
-
Click the orange Provision phone numbers button.
-
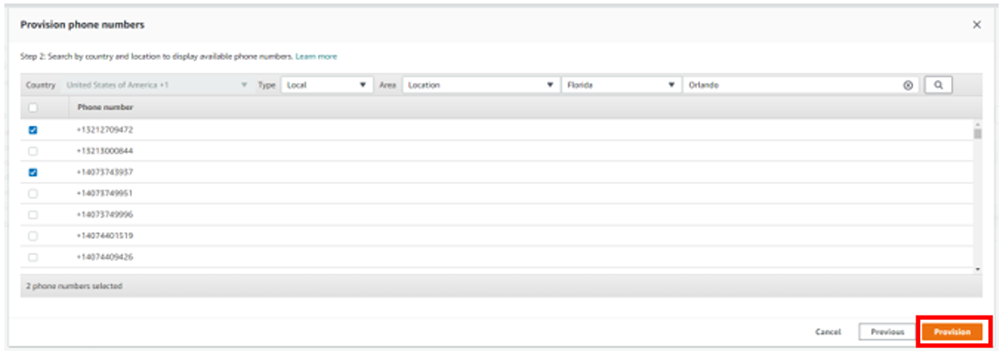
Choose Voice Connector and click Next.
-
Update your search criteria and click the search button.
-
Click the checkbox next to the number(s) you wish to Claim and click the Provision button.
-
You can’t add additional numbers to this order later. You will need to create a new order to claim additional phone numbers in the future.
Removing a Phone Number
To remove a phone number, navigate to the Phone number management menu, select the checkbox next to the Phone Number(s) you want to delete and choose Delete phone number(s) from the Actions menu.
Create SIP Rules for Inbound Calls
The following steps map arriving inbound Chime PSTN calls, using Chime SIP rules to the SIP Media Application configured in the section, Declare a SIP Media Application in Chime, to integrate the calls into your Symbee Connect environment. This is to account for any Chime Inbound PSTN Calls, whether they are inbound DID calls targeting Symbee Connect users directly, or calls being returned to a Chime number originally used for Outbound PSTN calls via the Symbee Connect client
-
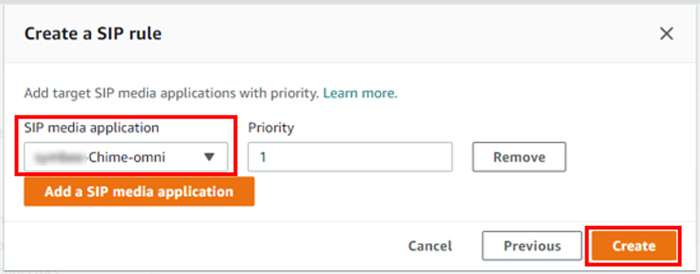
From the Amazon Chime service page, click on SIP rules under the Calling menu, and click the orange Create button.
-
The Create a SIP rule window will open. Complete with the following settings:
-
Fill in a name like Inbound -
- Set the Trigger Type to To phone number
- Select the appropriate phone number from the Phone number drop down
- Confirm the Enabled checkbox is checked
- Click the Next button
- Choose the SIP media application that you created above from the dropdown.
-
Confirm the correct Priority is set and click the orange Create button.
-
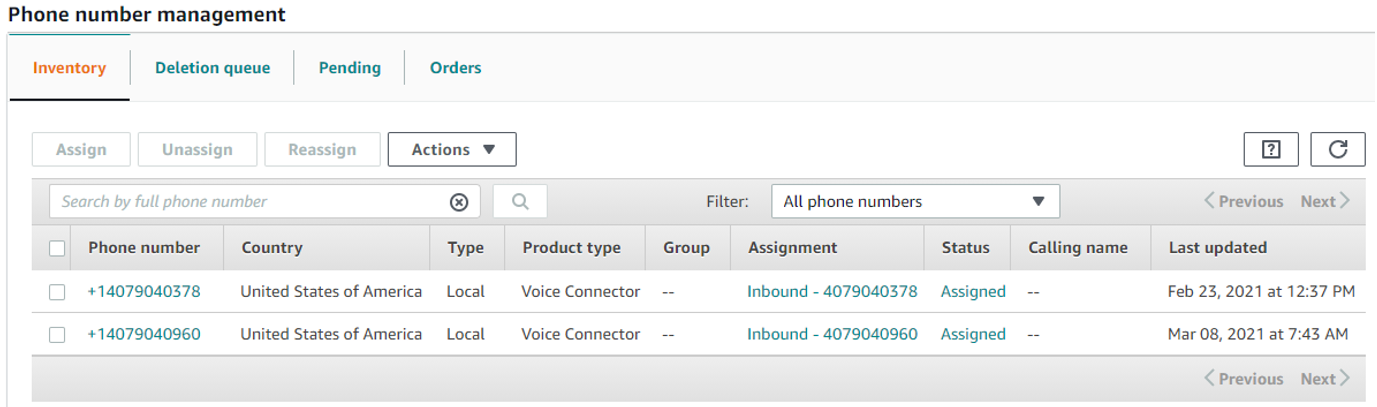
You’ll now see the SIP rule assigned to the phone number on the Phone Number Management page under the Assignment column.
-
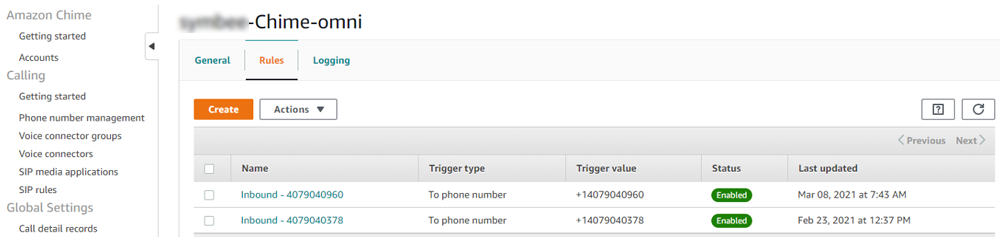
You’ll also see the assignment under the Rules tab of the SIP media application.
Removing a SIP Rule
To remove a SIP rule, navigate to the SIP rules menu, disable the rule first by selecting the checkbox and choosing Disable from the Actions menu. Once disabled, select the checkbox again and choose Delete from the Actions menu.
Configuring Amazon Chime Integration
The following steps configure your Symbee Connect Environment for Chime usage, in conjunction with the CloudFormation and setup previously performed above.
- Login to the Symbee Connect Administration Portal.
- If you have more than one Environment configured within your Company in Symbee Connect, make sure you have the appropriate one selected. This can be found on the Navigation bar to the left of the Function menu.
- Click on the Function menu on the in the top navigation bar and the select Amazon Chime Integration located under the Company Environment Configuration section.
- Configure settings as follows:
- Amazon Chime Integration Enabled - needs to be checked in order to enable any of the Chime functionality.
- Chime SDK Master AWS Region – always set to us-east-1. This is for future use. Currently all Chime API requests are serviced by the AWS Chime service in the us-east-1 region. This setting exists in case in future the AWS Chime Service changes this strategy.
- Default Chime Meeting AWS Region – set to the AWS region that is geographically closest to your users (NOT necessarily where you ran the CloudFormation). This can be overridden at a user level (see section below) if you users reside in multiple different geographic locations.
- Default Maximum Concurrent Chime Calls to Users - set here at a Company level, but can be overridden at the user level using templates.
- Direct User Calling Enabled - needs to be checked if you want to allow user to user calling.
- Outbound PSTN Calling Enabled - needs to be checked if you want to allow the users to make outbound PSTN calls via Chime (in addition to outbound calls through Amazon Connect).
- Default Outbound Calling Number Presented – for Outbound PSTN calling, the default number claimed through your Chime Service (see Claiming Phone Numbers in Chime Service for PSTN Calling) to use as the outbound ANI if not overridden at a user level.
- PSTN Outbound SIP Media Application ID – for Inbound or Outbound PSTN calling, the ID of your SIP Media Application you configured in Declare a SIP Media Application in Chime. Use the value you obtained in step 5.
- Click the Save button.
Enabling Chime Integration for User
- Login to the Symbee Connect Administration Portal.
- If you have more than one Environment configured within your Company in Symbee Connect, make sure you have the appropriate one selected. This can be found on the Navigation bar to the left of the Function menu.
- Click on the Function menu on the in the top navigation bar and the select User Administration located under the User Configuration section.
Updating a Single User
-
Click the user you wish to update to open their profile.
-
On the left side menu, click on the AWS Integration menu option and expand the Amazon Chime Integration section.
-
In the Amazon Chime Integration section, check the Amazon Chime Integration Enabled option.
-
Set the Chime Meeting AWS Region to the AWS Region that is geographically closest to your user.
-
On the left side menu, click on the Voice Channel menu option and expand the Chime Calling section.
-
Set the Maximum Concurrent Chime Calls to the maximum number of chime calls you want this user to be able to participate in at one time (this overrides the Company Environment level value set above). Leave at 0 to use the Company Environment level value.
-
Set the Direct User to User Calling Allowed to one of the following:
- Not Allowed
- Initiate Only
- Receive Only
- Initiate and Receive
-
Set the Direct Outbound Calling Allowed to one of the following:
- Not Allowed
- During Contact Center Calls Only
- Always Allowed
-
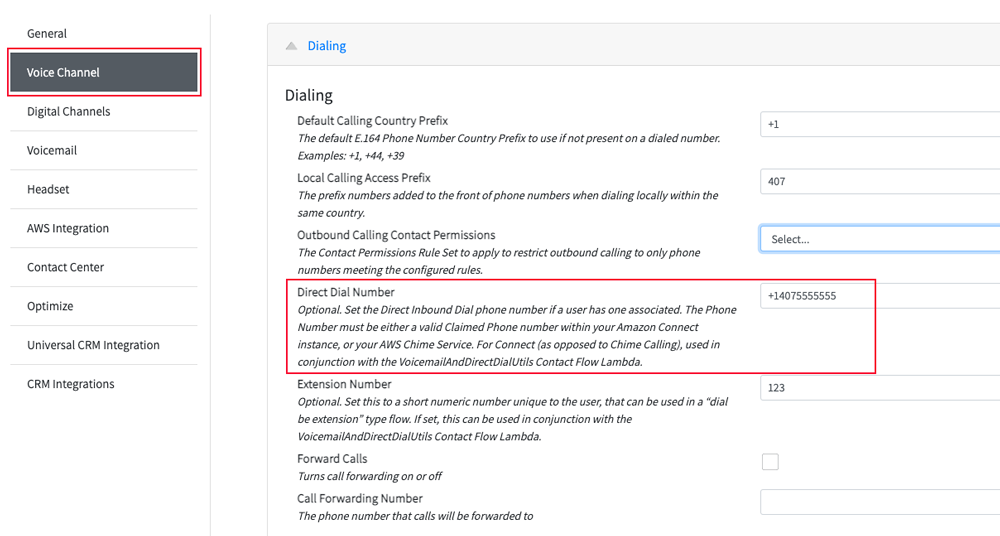
Set the Direct Outbound Calling Number Presented to one of the following:
- Environment Default: uses what you set on the Company Amazon Chime Integration above.
- User Direct Dial Number: uses the Direct Dial Number you have set in the user's Dialing configuration under Voice Channel.
-
Click the Save button to save changes.
Updating a Group of Users
- From the User Administration page, click on User Templates from the left side menu.
- Click on the template you want to update.
- Repeat the above steps for Updating a Single user and click Save.
- On the User Administration page, click on User Profiles from the left side menu.
- Click the checkbox next to each of the users you want to add the new Chime Integration options to and then click Apply Profile.
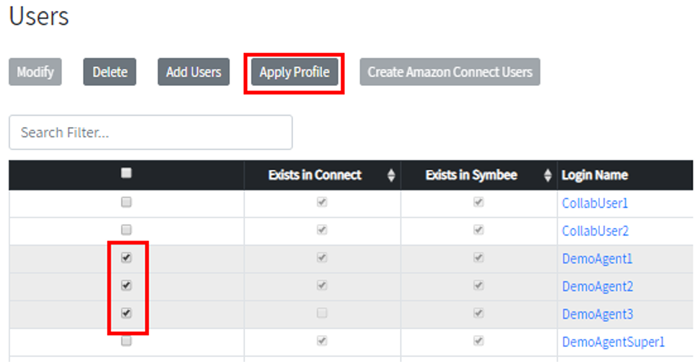
- Select the template with the Chime Integration configuration from the Template dropdown and click the red Apply Template.