Salesforce CRM Configuration
Overview
The steps in this document will configure Symbee Connect for use as an embedded contact center phone within a Salesforce Lightning Instance, including integrated screen pop and click to dial.
Adding Symbee Connect Softphone to Salesforce
Download Salesforce Call Center Definition file
-
Log into the Symbee Connect Administration Portal.
-
If you have more than one Environment configured within your Company in Symbee Connect, make sure you have the appropriate one selected. This can be found on the Navigation bar to the left of the Function menu.
-
Then click on the main Function menu in the top navigation bar, and click on Feature Integrations (CloudFormations) in the Company Environment Configuration section.
-
From the Feature Integrations (AWS CloudFormations) page, scroll down and locate the Symbee Connect Salesforce Call Center Definition file located under the Salesforce CloudFormation section. Click link to download and save.
Adding Softphone to Salesforce
- Log into your Salesforce instance as an Administrator.
- Change your view to Lightening Experience by clicking on Switch to Lightening Experience in the top right corner.
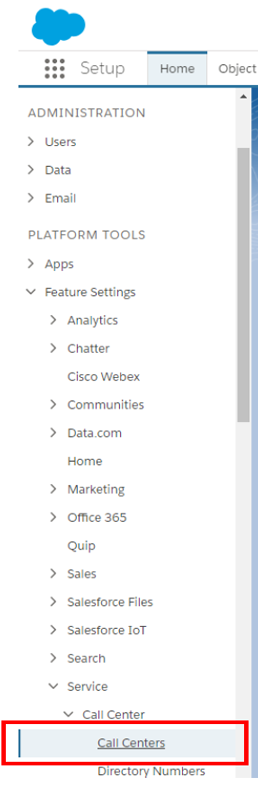
- Select Setup located in the top right.
- From the Settings menu on the left, select PLATFORM TOOLS, then Feature Settings, then Service, then Call Center, and finally Call Centers.
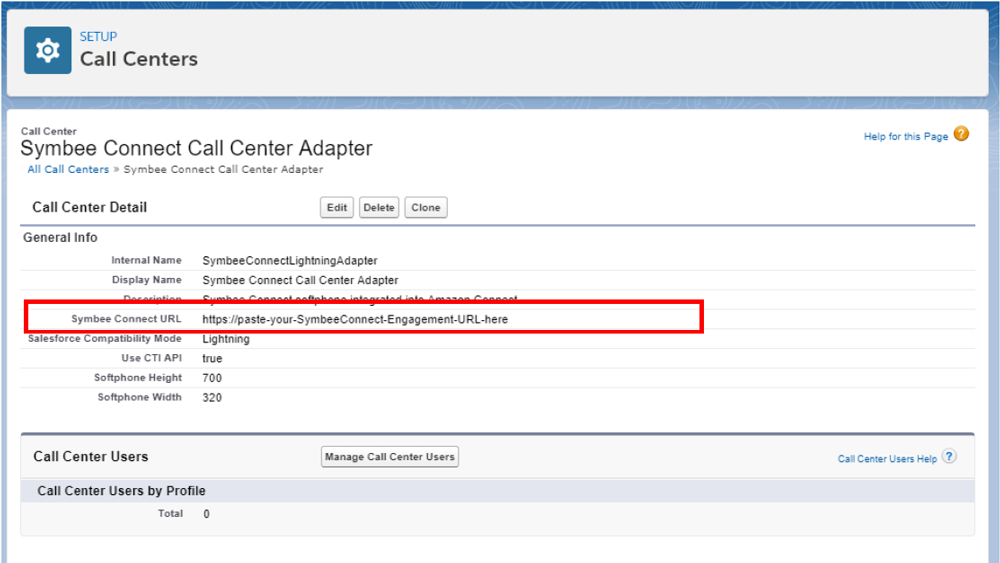
- In the All Call Centers List screen, select the Import button and select the file you download and saved in the above step.
- After importing, edit the defined Symbee Connect Call Center Adapter settings and update the Symbee Connect URL by pasting in the provided URL from the front page of the Symbee Connect Administration Portal.
Associate Adapter with Lightning App
The following steps add Symbee Connect as a softphone to the bottom utility bar of your chosen Salesforce Lightening App.
Build a new Lightening App
- Within Salesforce Setup select the Settings menu from the left side navigation bar.
- Select PLATFORM TOOLS, then Apps and then App Manager.
- Click on the New Lightening App button located at the top of the list section.
- A New Lightening App dialog box will appear. Complete the following sections:
- App Name: add an appropriate name.
- Description: add a brief description.
- Image: if you would like to add a custom icon, add it here.
- Click Next.
- A new Add Options dialog box will appear. Select the following settings:
- Navigation:
- Navigation Style: Standard navigation
- Setup and Personalization:
- Setup Experience: Setup (full set of Setup Options)
- From the Utility Items dialog box, click on the Add Utility Item and then select Open CTI Softphone from the dropdown box.
- Select Accounts, Cases, Contacts and Leads for your Navigation Items, then click Next.
- In the User Profiles dialog box, select Standard User and then click Save & Finish.
Editing an existing App
- Within Salesforce Setup select the Settings menu from the left side navigation bar.
- Select PLATFORM TOOLS, then Apps and then App Manager.
- Locate the existing App you would like to modify and click on the arrow icon on the right of the app.
- Select Edit.
- From the resulting Lightning App Builder screen, select Utility Bar from the left side navigation bar.
- Within the Utility Bar Items configuration, click Add new item and select Open CTI Softphone from the dropdown menu.
- Select Accounts, Cases, Contacts and Leads for your Navigation Items, then click Next.
- In the User Profiles dialog box, select Standard User and then click Save & Finish.
Assign New Call Center Adapter to Users in Salesforce
- Within Salesforce Setup select the Settings menu from the left side navigation bar.
- Select Administration, then Users and then Users.
- Click on Edit next to the user you want to add the Symbee Connect phone on their Utility Bar.
- On the Edit Users screen, in the Call Center field at the bottom, select and assign the new Symbee Connect Call Center Adapter.
- Click Save.
Configuring Salesforce Symbee Connect API Integration
To achieve screen-pop integration and any post-call Notes updates, Symbee Connect needs access to the Salesforce API within your Salesforce instance. API access is managed in Salesforce by a User – usually this API user is a separate user account that can be managed accordingly.
Login and confirm the Salesforce API user
The User ID and Password for this user will be used in Section 4 below to configure the Salesforce Fusion settings in Symbee Connect User profiles.
This confirms the user access that Symbee Connect will use for API integration.
In addition, you also need a Security Token for the user. If this user is already set up and you know the Security Token, note this token and move on to Section 4. To generate a new Security token for your API user, do the following.
- Log into your Salesforce instance as an Salesforce API User.
- Go to the User's personal settings located on the top right of the screen.
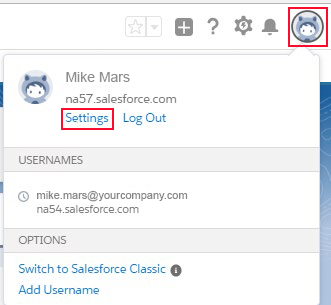
- Under My Personal Information on the left side navigation bar, select Reset My Security Token.
- Click the Reset Security Token button and a new security token will be emailed to the email address associated with the API user account.
Configure Salesforce Connected App
- Within Salesforce Setup select the Settings menu from the left side navigation bar.
- Select PLATFORM TOOLS, Apps, App Manager and then New Connected App.
(Note: if you already have an existing Connected App with a set of OAuth credentials configured, those can be used – the step below declares a new one) - Configure the new Connected App as follows:
- Connected App Name: Symbee Connect
- API Name: Symbee Connect
- Contact Email: Add your administrator's email
- API (Enable OAuth Settings): Make sure to check Enable OAuth.
- Set a Callback URL (not used, but required by SFDC) – use:

- Selected OAuth Scope: Full Access
- Once the Connected App is created (or if you already had a Connected App defined), view the generated OAuth API credentials by going to PLATFORM TOOLS, Apps, and then App Manager.
- Locate the App and click on the arrow icon on the right of the app.
- Select View.
- Click to reveal values and take a note the API Consumer Key and Consumer Secret. You will need them to configure the Salesforce Fusion settings in the Symbee Connect User Profiles in the following section.

Configuring Users in Salesforce Fusion in Symbee Connect
Configure Default Window Size
Configure the default Window size in Symbee Connect to be smaller than the default size.
- Log into the Symbee Connect Administration Portal.
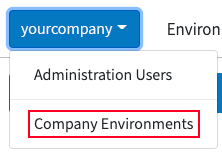
- Click on the Company button on the top navigation bar and select Company Environment.
- Click the checkbox next to the environment you want to modify and then click the Modify button.
- Go down to the User Interface section and enter 90 in the Pre-Login Window Size field.
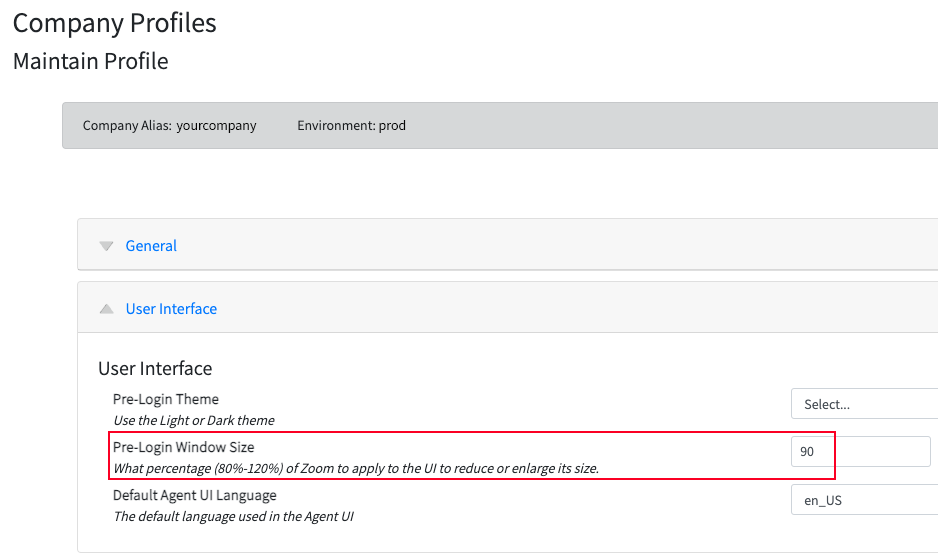
- Click Save at the top.
Configure User Profiles
- From the Administration Portal, choose Function and then User Administration located under the User Configuration section.
- Select User Profiles from the left navigation bar.
- Click the checkbox next to the user you want to configure and click Modify.
- General should be selected on the left side navigation bar.
- Click on User Interface in the main panel and enter 90 in the Window Size field.
- Click on CRM Integrations on the left side navigation bar.
- Click on Salesforce Fusion and configure with the following settings:
- Enabled: Click the checkbox.
- Javascript Files: The path of the SFDC API JavaScript library.
For Example:
https://your-salesforce-domain/support/api/41.0/lightning/opencti_min.js - Client ID: The Consumer Key of your Connected App defined in Salesforce obtained this step.
- Client Secret: The Consumer Secret of your Connected App defined in Salesforce obtained this step.
- User Name: The username of your Salesforce API user (see this step)
- Password: The password of your Salesforce API user appended with the API’s OAuth Token on the end (see this step).
Note: The value of this setting field needs to be both values concatenated together (no space or delimiter in between). - Rest Login Url: The Salesforce API URL:
https://login.salesforce.com/services/oauth2/token?- NOTE: If you are using a Salesforce Sandbox, replace login.salesforce.com in the above URL to test.salesforce.com
- Look Up Order: Salesforce Entity lookup order. A pipe-separated values list of entity names.
For example:
Contact|Lead|Account - Enable Add Note: When enabled, automatically attaches a Note to the Contact in Salesforce at the end of a call, containing key details about the contact.
Note: Use of this feature requires the additional Symbee Salesforce Lambda to be deployed in your AWS Account. - Contact Field Name: The field in the Salesforce Contact table to be queried. This field will be considered if Contact is one of the entities listed in the Look Up Order setting above.
- Contact Field Value: The name of a Connect Contact Attribute containing the value to use in the contact query.
- Lead Field Name: The field in the Salesforce Lead table to be queried. This field will be considered if Lead is one of the entities listed in the Look Up Order setting above.
- Lead Field Value: The name of a Connect Contact Attribute containing the value to use in the lead query.
- Account Field Name: The field in the Salesforce Lead table to be queried. This field will be considered if Lead is one of the entities listed in the Look Up Order setting above.
- Account Field Value: The name of a Connect Contact Attribute containing the value to use in the account query.
- Screen Pop Direction: Screen Pop behavior: Inbound - Executes screen pop on inbound calls; Outbound - Executes screen pop on outbound calls; BOTH - Executes screen pop on inbound and outbound calls.
- Country Code: This field can be used to remove the country code from the phone number.
- Add New Entity: Add Salesforce Entity: Lead - Creates a new lead; None - Will not create a new entity.
Adding Custom Fields to Tasks in Salesforce
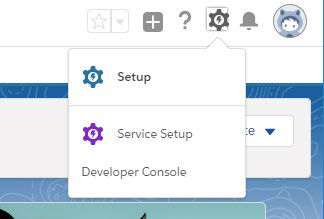
- Log into your Salesforce instance as an Administrator.
- Click on the cog in the top right corner of the navigation bar.
- Click on Setup.
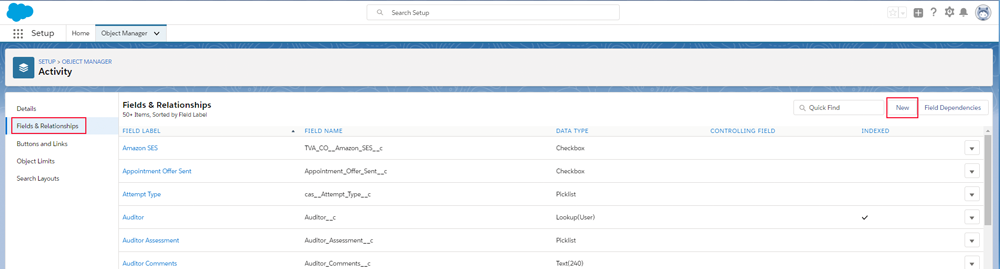
- Select Object Manager from the tab at the top of the page or type it in the search field.
- Once the Object Manager screen is displayed, click on Activity.
- Click on Fields & Relationships and then New on the right side.
- Under Data Type, choose Time.
- Enter the following values:
- Call Start Time
- Field Label: Call Start Time (UTC)
- Field Name: Call_Start_Time_UTC
- Description: Connect call start time in UTC
- Help Text: Connect call start time in UTC
- Call Start Time
- Click Next.
- Accept all of the defaults set and click Next.
- Accept all of the defaults set and click Save & New.
-
Now repeat above steps the following fields:
-
Call End Time: (Data Type: Time)
- Field Label: Call End Time (UTC)
- Field Name: Call_End_Time_UTC
- Description: Connect call end time in UTC
- Help Text: Connect call end time in UTC
-
Call Duration: (Data Type: Number)
- Field Label: Call Duration
- Field Name: Connect_Call_Duration_In_Seconds
- Description: Connect call duration in seconds
- Help Text: Connect call duration
-
Call Outbound: (Data Type: Checkbox)
- Field Label: Connect call is outbound
- Field Name: Connect_Call_Is_Outbound
- Description: Connect call direction
- Help Text: Connect call direction
- Call URL: (Data Type: URL)
- Field Label: Connect call URL
- Field Name: Connect_Call_URL
- Description: URL of connect call recording
- Help Text: URL of connect call recording
- Contact: (Data Type: Text)
- Field Label: Connect Contact ID
- Field Name: Connect_Contact_ID
- Length: 150
- Description: Contact ID of the Connect Call (unique identifier for the call)
- Help Text: Contact ID of the Connect Call (unique identifier for the call)
- Login: (Data Type: Text)
- Field Label: Connect Login Name
- Field Name: Connect_Login_Name
- Length: 150
- Description: Connect Login Name
- Help Text: Connect Login Name
- Media: (Data Type: Text)
- Field Label: Connect Media Type
- Field Name: Connect_Media_Type
- Length: 30
- Description: Connect Media Type
- Help Text: Connect Media Type
- Queue Name: (Data Type: Text)
- Field Label: Queue Name
- Field Name: Queue_Name
- Length: 80
- Description: Queue the interaction was delivered through
- Help Text: Queue the interaction was delivered through
- Work Code 1: (Data Type: Text)
- Field Label: Work Code 1
- Field Name: WorkCode_1
- Length: 100
- Description: First Work Code selected
- Help Text: First Work Code selected
- Work Code 2: (Data Type: Text)
- Field Label: Work Code 2
- Field Name: WorkCode_2
- Length: 100
- Description: Second Work Code selected
- Help Text: Second Work Code selected
- Work Code 3: (Data Type: Text)
- Field Label: Work Code 3
- Field Name: WorkCode_3
- Length: 100
- Description: Third Work Code selected
- Help Text: Third Work Code selected
- Transfer Location: (Data Type: Text)
- Field Label: Transfer Location
- Field Name: Transfer_Location
- Length: 100
- Description: Transfer Location if the interaction was transferred
- Help Text: Transfer Location if the interaction was transferred
-
Run CloudFormation
Download and Run Salesforce CloudFormation
If this is the first Symbee Connect CloudFormation you have run, you will need to run the Integrations CloudFormation first. For step by step instructions and further information about CloudFormations click here.
-
Log into the Symbee Connect Administration Portal.
-
If you have more than one Environment configured within your Company in Symbee Connect, make sure you have the appropriate one selected. This can be found on the Navigation bar to the left of the Function menu.
-
Then click on the main Function menu in the top navigation bar, and click on Feature Integrations (CloudFormations) in the Company Environment Configuration section.
-
From the Feature Integrations (AWS CloudFormations) page, scroll down and locate the Salesforce CloudFormation. Click link to download and save the SaleforceKinesisLambdaCloudFormation.yaml file locally to your PC for use in the following steps.
-
Log Into your AWS Management Console.
-
Make sure you are in the correct AWS region for where you want to deploy (top right of the Navigation bar) – the same region as your Amazon Connect instance.
-
Navigate to the CloudFormation console (under Management and Governance, on the Services menu).
From the CloudFormations console, select Stacks in the left-hand navigation bar, and select Create Stack (with new resources (standard)).- Under the Prepare Template section, select Template is Ready.
- Under Specify Template, select Upload a template file.
- Under Upload a template file, click Choose File.
- In the resulting file selector, find and upload the file you saved from Step 4 above.
- Click Next at the bottom.
-
In the Specify Stack Details screen, complete the fields as follows:
-
Stack Name: Enter a name appropriately. We suggest using your Symbee Connect Environment (e.g. dev, prod, etc.) in the name for better organization, in case you have CloudFormations for multiple Symbee Connect Environments being deployed into the same AWS Account. For example:
companyalias-environment-salesforce**- AWSLambdaBasicExecutionRoleARN: use the provided default values
- ClientId: Enter the Consumer Key of your Connected App as defined in Salesforce.
- ClientSecret: Enter the Consumer Secret of your Connected App asdefined in Salesforce.
- ConnectAccessURL: The Access URL of the connect instance.
- ConnectCTRKinesisStreamARN: The ARN of the Kinesis Stream configured to provide CTR records
- EnableAddNote: Enable if you want to automatically attach a Note to the Contact in Salesforce at the end of a call, containing key details about the contact.
- EnableAddTask: Enable if you want to automatically create a Task on the Entity in Salesforce at the end of a call, with key details about the contact.
- InteractionStreamArn: The ARN of the Interaction Kinesis stream. If provided will collect Interaction records.
- LambdaDistroBucket: The software distribution S3 bucket to pull Lambda binaries from. Choose the bucket for the region you are running this CloudFormation in. Note: CloudFormation can only install Lambdas from the region they are run in. If you select a bucket from another region in this field, the CloudFormation will error during creation.
- LambdaSourceFile: Name of the binary file containing the Lambda function - use the default.
- LogLevel: Log level at which to send log message to CloudWatch group. Choose ERROR.
- Password: The password of your Salesforce API user appended with the APIs OAuth Token on the end (no space or delimiter in between).
- RestLoginUrl: Salesforce API URL. e.g. https://login.salesforce.com/services/oauth2/token?
- NOTE: If you are using a Salesforce Sandbox, replace login.salesforce.com in the above URL to test.salesforce.com.
- UserName: The username of your Salesforce API user.
- WorkCodeStreamArn: The ARN of the WorkCode Kinesis stream. If provided will collect work code records.
-
Click Next.
-
On the next Configure stack options screen, accept all the defaults, and click Next.
-
On the next Review testing screen, scroll to the bottom Capabilities section, check the “I acknowledge that AWS CloudFormation might create IAM resources with custom names.” check box, and finally click Create Stack.
Optional - Making use of the Symbee Connect Salesforce Contact Flow Lambda
The Symbee Connect Salesforce CloudFormation above, installs two Lambdas. The first Lambda is attached to the various Kinesis Streams and is fired at the completion of Contacts, to update details about the call into Salesforce once the Contact is complete.
The second Lambda is optionally available for use in Amazon Connect Contact Flows to perform Lookup, Create, and Updating of entities in Salesforce within Contact Flows before a contact is delivered to an Agent.
To use the Symbee Connect Salesforce Contact Flow Lambda in your Contact Flows, you need to add permissions to your Amazon Connect Instance to allow it to invoke the Symbee Connect Salesforce Lambda:
- Log into your AWS Console, and navigate to the Amazon Connect Service
- Select your Amazon Connect instance (don't log into the actual Amazon Connect Console)
- From the left hand navigation bar, select Contact Flows
- In the right hand side of Contact Flows, scroll down to the AWS Lambda section
- In the Lambda Functions dropdown, select the Lambda with the name that contains "SymbeeSFCFLambda" and click the + Add Lambda Function button
Once this is complete, the Symbee Connect Salesforce Contact Flow Lambda will be selectable in your Invoke Lambda contact flow blocks.