Zendesk CRM Configuration
When Symbee Connect is integrated with Zendesk, Symbee Connect will run embedded within the Zendesk CRM user interface, and provides the option to perform screen pops in your Zendesk Support CRM for incoming interactions, as well as saving of interaction related information into tickets once the interaction is complete.
This guide provides the steps for setting up the Symbee Connect Zendesk Fusion.
Prerequisites
Prior to following these steps, this document assumes the following pre-requisites have already been completed:
- Your Amazon Connect instance has already been set up with the appropriate phone numbers, contact flows, routing profiles and call queues.
- Your Symbee Connect instance has been set up and configured with your Amazon Connect instance details.
Whitelisting Zendesk Domain
Before you can embed the Symbee Connect within Zendesk, you will need to add your Zendesk domain to the whitelist of trusted domains in your Amazon Connect Instance.
Please refer to the reference guide on how to Whitelist a URL in Amazon Connect.
Enable Call Trace Record (CTR) streaming within Amazon Connect
You will need to enable Call Trace Record (CTR) streaming on your Amazon Connect instance. This is used by the Lambda Function for updating Zendesk Support with the call data (including Call Recordings) when the call completed.
For step by step instructions check out Enabling CTR stream within Amazon Connect.
Download and Install the Zendesk Managed App
- Log into the Symbee Connect Administration Portal.
- If you have more than one Environment configured within your Company in Symbee Connect, make sure you have the appropriate one selected. This can be found on the Navigation bar to the left of the Function menu.
- Then click on the main Function menu in the top navigation bar, and click on Feature Integrations (CloudFormations) in the Company Environment Configuration section.
- From the Feature Integrations (AWS CloudFormations) page, scroll down and locate the Symbee Connect Zendesk Managed App located under the Zendesk CloudFormation section. Click link to download and save.
- Log into your Zendesk environment as an Administrator, and click on the Admin Cog (last icon on the bottom of the left-hand Nav bar).
- Go to Manage which is under APPS
- Click the Upload Private App button.
- Set the App Name to Symbee Connect and the click the Choose File to select the Zendesk Managed App file you downloaded above and click Upload.
- A Creating a new App dialog box will appear. Click Upload again to proceed.
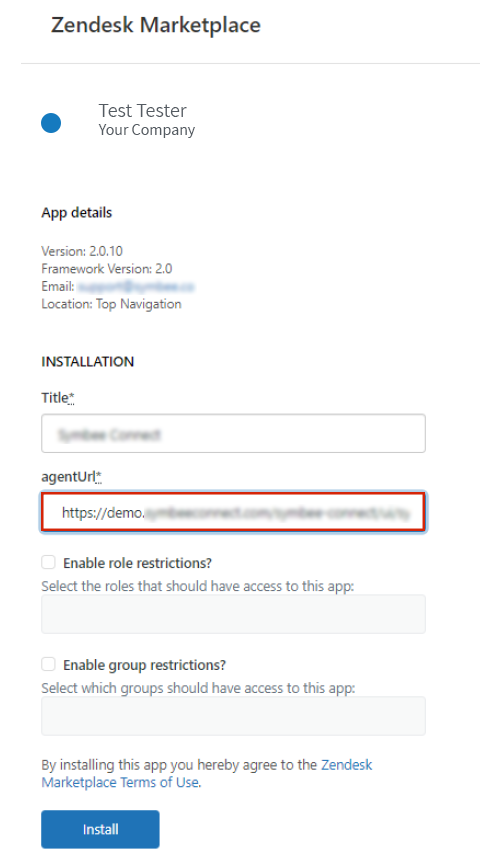
- Once done processing, fill in the following information:
- Agent URL – Use the Symbee Connect User Login URL from the Symbee Connect Admin portal - this is the Symbee Connect User Shortcut that can be obtained here.
- Assign the app to the required User Groups/Roles
- Click Install
Obtaining Zendesk API Credentials
You will need your Zendesk API credentials to complete both Sections 6 and 7. You can obtain these credentials by doing the following:
-
Login to your Zendesk Instance
-
Click on the Admin Cog (last icon on the bottom of the left-hand Navigation bar).
-
Go to People under Manage.
-
Click on Add User.
-
Create a API User using the following:
Name: Symbee ConnectAPIUSER
Email: APIUSER@yourcompany - this MUST be a unique email address
Select Role: Administrator
- Click Add.
Enable Zendesk API Access
From within your Zendesk instance:
- Click on the Admin Cog (last icon on the bottom of the left-hand Navigation bar).
- Go to API under Channels.
- On the Settings tab, make sure the Password Access is Enabled.
Download and Run Zendesk CloudFormation
If this is the first Symbee Connect CloudFormation you have run, you will need to run the Integrations CloudFormation first. For step by step instructions and further information about CloudFormations click here.
- Log into the Symbee Connect Administration Portal.
- If you have more than one Environment configured within your Company in Symbee Connect, make sure you have the appropriate one selected. This can be found on the Navigation bar to the left of the Function menu.
- Then click on the main Function menu in the top navigation bar, and click on Feature Integrations (CloudFormations) in the Company Environment Configuration section.
- From the Feature Integrations (AWS CloudFormations) page, scroll down and locate the Symbee Connect Zendesk CloudFormation. Click link to download and save the ZendeskCloudFormation.yaml file locally to your PC for use in the following steps.
- Log Into your AWS Management Console.
- Make sure you are in either the us-east-1 or us-west-2 regions as those are the only supported regions for Chime currently.
- Navigate to the CloudFormation console (under Management and Governance, on the Services menu).
- From the CloudFormations console, select Stacks in the left-hand navigation bar, and select Create Stack (with new resources (standard)).
- Under the Prepare Template section, select Template is Ready.
- Under Specify Template, select Upload a template file.
- Under Upload a template file, click Choose File.
- In the resulting file selector, find and upload the file you saved from Step 4 above.
- Click Next at the bottom.
- In the Specify Stack Details screen, complete the fields as follows:
- Stack Name: Enter an appropriate name. We suggest using your Symbee Connect Environment (e.g. dev, prod, etc.) in the name for better organization, in case you have CloudFormations for multiple Symbee Connect Environments being deployed into the same AWS Account.
For example: companyalias-environment-Zendesk - AWSLambdaBasicExecutionRoleARN: Use Default
- AWSLambdaKinesisExecutionRoleARN: Use Default
- ConnectAccessUrl: The domain part of the Access URL of your Amazon Connect Instance. Obtain this from within Amazon Connect in your AWS Account. The value will like: https://xxxxxxxxxxxx.awsapps.com
- ConnectCTRKinesisStreamARN: The ARN of the Amazon Connect CTR Kinesis Stream you obtained when you enable CTR streaming.
- CountryCode:
- FieldName: Enter ticket
The field in the Zendesk table to be queried. - FieldName2: Enter phone
The field in the Zendesk table to be queried. - FieldName3: Enter email
The field in the Zendesk table to be queried. - FieldValue: Enter Ticket_Id
The name of a Connect Contact Attribute containing the value to use in the query - FieldValue2: Enter ANI
The name of a Connect Contact Attribute containing the value to use in the query - FieldValue3: Enter emailaddress
The name of a Connect Contact Attribute containing the value to use in the query - InteractionStreamArn: The ARN of the Symbee Connect Interaction Kinesis Stream
- LambdaCFSourceFile: Select from the dropdown, there will be only 1 value to pick from
- LambdaDistroBucket: This is the Symbee Connect Lambdas S3 bucket where the Zendesk Lambda will uploaded from. Select the bucket name from the drop-down that matches the AWS region you are running the CloudFormation in
- LambdaSourceFile: Select from the dropdown, there will be only 1 value to pick from
- LogLevel: choose either DEBUG|INFO|ERROR
Default is ERROR - Password: Use the Password set while creating the API User above.
- RestUrl: Use https://[instance-name].Zendesk.com/api/v2 and update the [Instance-name] placeholder with your Zendesk instance-name
- SecretsManagerRegion: Use the region that you installed the Integration CloudFormation in
- TableName: Enter ticket
The table in Zendesk to be queried - TableName2: Enter user
The table in Zendesk to be queried - TableName3: Enter user
The table in Zendesk to be queried. - UserName: Use the API Username create above
- Stack Name: Enter an appropriate name. We suggest using your Symbee Connect Environment (e.g. dev, prod, etc.) in the name for better organization, in case you have CloudFormations for multiple Symbee Connect Environments being deployed into the same AWS Account.
- Click Next.
- On the next Configure Stack Options screen, accept all the defaults, and click Next.
- On the next Review Testing screen, scroll to the bottom Capabilities section, check the “I acknowledge that AWS CloudFormation might create IAM resources with custom names.” checkbox, and finally click Create Stack.
Enable Zendesk Fusion
The last steps are to configure your Symbee Connect Company and User Profiles for use with the Zendesk CRM.
These steps include:
- Creating a User Profile Template for your Zendesk users – makes it easier to provision new Zendesk users in Symbee Connect.
- Applying the new Zendesk Symbee Connect User profile to your first User/Agent.
Create User Profile Template for Zendesk Users
- Login to the Symbee Connect Administration Portal.
- If you have more than one Environment configured within your Company in Symbee Connect, make sure you have the appropriate one selected. This can be found on the Navigation bar to the left of the Function menu.
- Click on the Function menu on the in the top navigation bar and then select User Administration located under the User Configuration section.
- Select User Templates on the left navigation bar and from the User Templates list view, click Add Template.
- In the New User Profile Template dialog box, enter the following:
- Template Identifier: ZendeskUsers
- User Profile Template Name: Zendesk Users Template
- Once the new template has been created, it will appear in the User Templates listing screen, select and click on the Modify button.
- Make sure you have the User Mode set to either Engagement or Supervisor in the center of the screen at the top.
- If you set the User Mode to Engagement, select AWS Integration from the left menu, then choose Amazon Connect Integration. Make sure there is a tick in the checkbox next to ACD Amazon Connect Integration (this step is not required if you selected User Mode Supervisor)
- Now select CRM Integrations from the left menu and then select Zendesk Fusion.
- Make the following changes in the Zendesk Fusion settings:
- Enabled: Checkbox ticked
- Zendesk Product: Select the product you are integrating with.
- JavaScript Files:
https://static.zdassets.com/Zendesk_app_framework_sdk/2.0/zaf_sdk.min.js - API User Name: API User Name created in Obtaining Zendesk API Credentials (likely Symbee ConnectAPIUser)
- API User Password: API User Password created in Obtaining Zendesk API Credentials
- Rest URL: https://[instance-name].Zendesk.com/api/v2 and update the [Instance-name] placeholder with your Zendesk instance-name
- Screen Pop Direction: Options are Inbound / Outbound / Both
- Country Code: E.164 country code used by default. E.g. For US “+1”
- Table Name 1: Set to the table in Zendesk to be queried
- Field Name 1: Set to the field in Zendesk table to be queried
- Field Value 1: Set to the name of a Connect Contact Attribute containing the value to use in the query.
- Table Name 2: Set to the table in Zendesk to be queried
- Field Name 2: Set to the field in Zendesk table to be queried
- Field Value 2: Set to the name of a Connect Contact Attribute containing the value to use in the query.
- Table Name 3: Set to the table in Zendesk to be queried
- Field Name 3: Set to the field in Zendesk table to be queried
- Field Value 3: Set to the name of a Connect Contact Attribute containing the value to use in the query.
- Scroll back to the top and Save.
Apply Zendesk Template to Users
- From the Symbee Connect Administration Portal, choose Function and then User Administration located under the User Configuration section.
- Select User Profiles from the left navigation bar.
- Check all the users you would like to apply the new Zendesk template to and click Apply Profile button.
- Select the Zendesk template from the dropdown menu and then click on the Apply Template button.