Business Intelligence CloudFormation install
The following provides a quick step-by-step for downloading and deploying the Symbee Connect Business Intelligence CloudFormation stack.
Running this CloudFormation is the main part of the Business Intelligence install, but has pre-requisites, and further post deploy activities. Refer back to the overall Installation and Setup section here for context.
Note about Updates to this Business Intelligence CloudFormation
Symbee Connect Business Intelligence is continuously improving, new features are being added, and we are regularly releasing updates. Occasionally, some of those fixes or updates also require us to publish updates to the CloudFormation template referenced in this section.
If our release notes indicate an update of this CloudFormation is available, you can download the latest template version (using the same Download steps documented here), and then perform a CloudFormation Update (instead of a Create Stack) to apply the downloaded updated CloudFormation template to your existing deployed stack. When performing a stack Update, CloudFormation will remember and pre-populate the Input Parameters page with all the parameter settings you used previously, so the documentation in this section about the purpose of each input parameter remains relevant.
See here for additional guidance on applying our CloudFormation updates.
Download the Business Intelligence CloudFormation
-
Log into the Symbee Connect Administration Portal.
-
If you have more than one Environment configured within your Company in Symbee Connect, on the top Navigation bar, ensure you select the appropriate Environment you wish to configure for Business Intelligence before downloading any CloudFormation script.
-
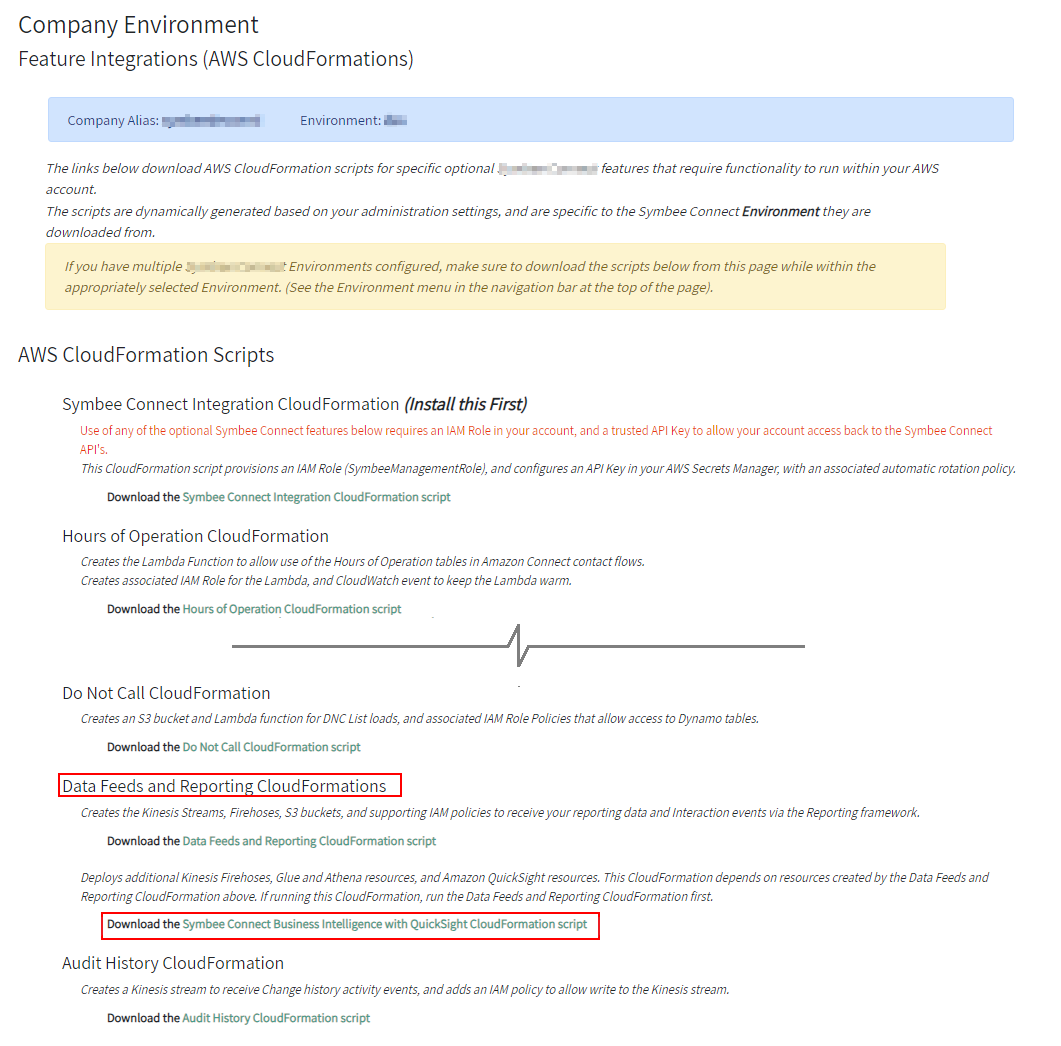
Then click on the main Function menu in the top navigation bar, and click on Feature Integrations (CloudFormations) in the Company Environment Configuration section.
-
From the Feature Integrations (AWS CloudFormations) page, scroll down and locate the Data Feeds and Reporting CloudFormations heading, and click the second Business Intelligence with QuickSight CloudFormation script download link to download...
-
You will be prompted with a Save As dialog screen.
-
Save the Symbee-BI-CloudFormation.yaml file locally to your PC for use in the next section.
Deploy the CloudFormation stack in your AWS Account
-
Log Into your AWS Management Console.
-
Make sure you are in the correct AWS region for where you want to deploy (this can be found on the top right of the Navigation bar).
-
Click on Services at the top, and under Management and Governance, choose CloudFormation (or search CloudFormation)
-
From the CloudFormations console, select Stacks in the left-hand navigation bar, and select Create Stack (with new resources (standard)) (button is in the top right of the screen).
-
You will be presented the Create Stack view for creating/deploying a new CloudFormation script (known as a stack):
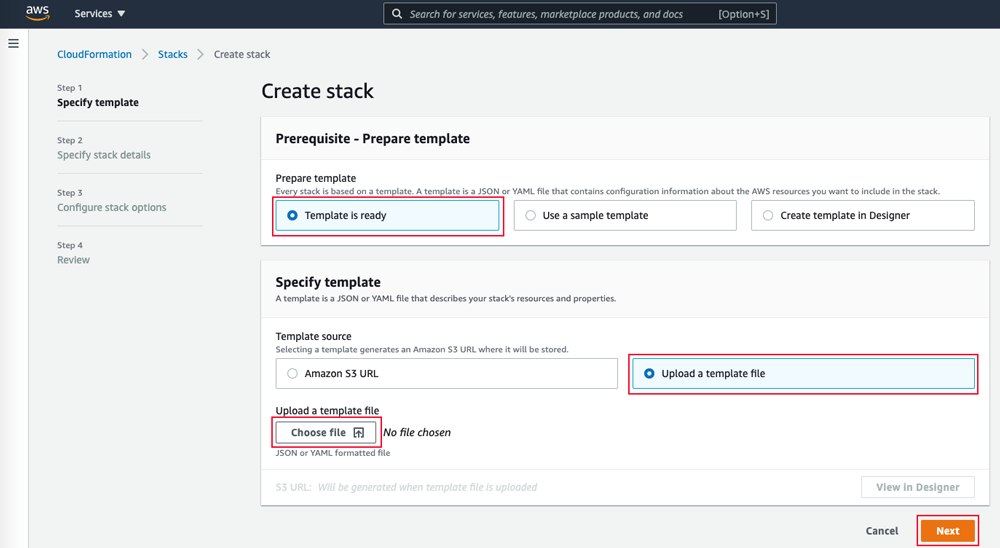
- Under the Prepare Template section, select Template is Ready
- Under Specify Template, select Upload a template file
- Under Upload a template file, click Choose File
- In the resulting file selector, find and upload the file you saved from Step 6 above
- Click Next at the bottom
-
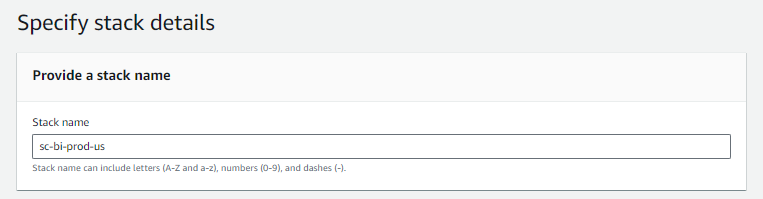
On the next Specify stack details page:
-
At the top, give your stack an appropriate name - for example: sc-bi-your-environment, or similar
-
Following the Stack Name, the Parameters section contains an extensive set of input parameters due to the extent and optional capabilities of the CloudFormation. The input parameters are grouped and ordered as follows:
-
A separate subsection (further below, linked above) is provided for each parameter group, describing the purpose of each parameter and what to enter.
- Complete the input parameters using these sections as reference, then click the Next button at the bottom of the Specify stack details page to progress.
-
-
On the next Configure Stack options page, keep all the defaults, and click Next at the bottom
-
On the next Review page, scroll to the bottom. Because this CloudFormation is a Nested Stack (a parent template with child templates) you are asked for 2 acknowledgements rather than the usual 1 (the additional Auto Expand capability requires acknowledgment because the template installs a nested stack):

- Check the blue "I acknowledge that AWS CloudFormation might create IAM resources" check box
- Check the blue "I acknowledge that AWS CloudFormation might require the following capability: CAPABILITY_AUTO_EXPAND"
-
Finally, click the Submit button at the bottom to complete and initiate the stack install.
The Business Intelligence stack will take approximately 15-20 minutes to install the first time (a stack Update usually takes a lot less and will likely complete within 4-5 minutes). Click the refresh button on the Events tab to see progress, until deployment is complete.
Note that the complete stack is deployed as a parent stack (with the name you initially provided in step 6 above), along with 5-6 child/nested stacks. After the stack deployment is complete, expect to see something similar to the below in your CloudFormation Stacks listing view:
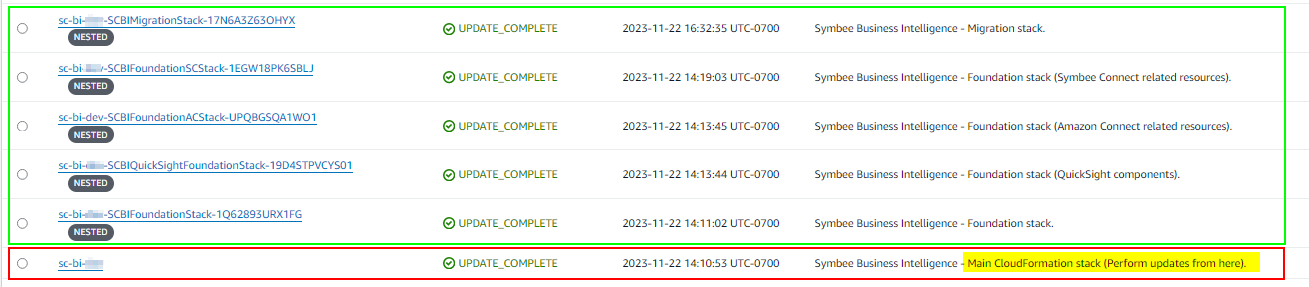
The stack highlighted in red represents the parent stack (always perform stack actions (updates, deletes, etc) on this parent stack).
The stacks highlighted in green are the nested/child stacks (never perform stack actions on these - these stacks are managed through the parent stack).
Note at the top of the stacks listing view, there is a toggle option that lets you show or hide nested stacks (it defaults to showing all nested stacks):

CloudFormation Input Parameter details
The following sections provide details and instructions for each group if Business Intelligence CloudFormation input parameters.
QuickSight and Time Zone related parameters
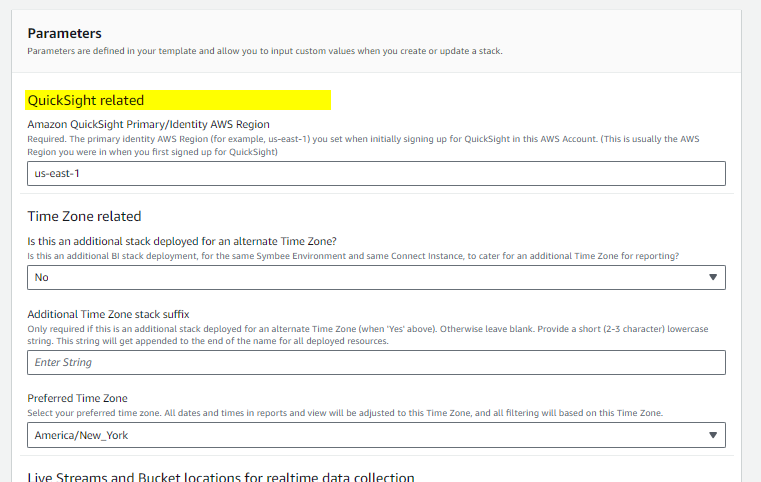
Amazon QuickSight Primary/Identity Region: The very first parameter. This is required and is asking for the name of the "Home" AWS region you set when Amazon QuickSight was first enrolled/enabled in your AWS Account. Its needed because the CloudFormation creates skeleton User Groups in your Amazon QuickSight account, and Amazon QuickSight only allows User Groups to be maintained via the nominated Amazon QuickSight "Home" region. See here for further details on this concept.
Is this an additional stack deployed for an alternate Time Zone?: Set this to No if this is the first installation for your environment (most cases). The majority of deployments only have 1 installation so this is usually always no. If you set this to Yes, you must supply a value in the Additional Time Zone stack suffix parameter (below), otherwise the stack deploy will fail. See here for further details on preferred time zones, and setting up with multiple preferred time zones.
Additional Time Zone stack suffix: Required if Is this an additional stack deployed for an alternate Time Zone? is set to Yes, otherwise leave this blank. If set, this suffix is appended to the end of all default Amazon QuickSight report/dashboard names, shared folder names, user group names, as well as Athena/Glue resources. If setting this value:
- keep the value short (3-4 characters)
- always use lowercase only (avoids case sensitivity in places)
- do not change this value after the initial stack deploy (it will essentially cause a complete re-install)
- do not use the actual name of a time zone as this suffix string, as it could become misleading. It's trivial to change your actual preferred time-zone for your installation (simply doing a CloudFormation Update and changing the value of the next parameter below), however if you name an alternate deployment using the actual time zone name, and then change the time zone it uses later, it will become very misleading to end users. For example set a suffix to something line "east" rather than 'EST'.
Preferred Time Zone: Select the preferred time zone your company works in / business users expect to see all they data/reports in. For more details on why we do this, see here.
Live Streams and Bucket locations related parameters
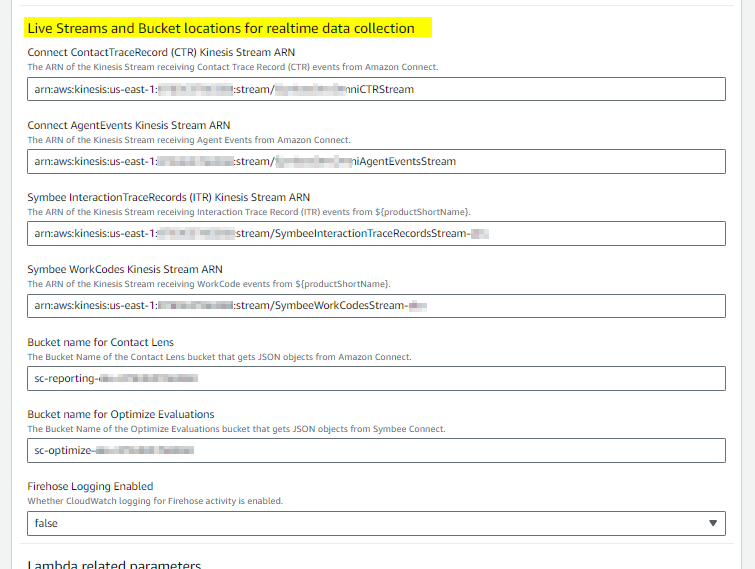
ContactTraceRecord (CTR) and AgentEvents Kinesis Stream ARN's: Supply the ARN's of each of these two streams. If you are not sure, see the pre-requisite discussion on setting these up here and here.
InteractionTraceRecords (ITR) and WorkCodes Kinesis Stream ARN's: These two Kinesis streams are created when you deploy the Data Feeds and Reporting CloudFormation - see here. Navigate to the Kinesis service your the AWS Console, locate these under Data streams, and supply the ARN's of each of these two streams.
NOTE: Collectively all 4 of the above ARN's are optional, however supplying at least 1 of the 4 ARN's is required or the stack deploy will fail. The CloudFormation will only deploy resources associated with the stream types you provide an ARN for.
Bucket name for Contact Lens: Optional and can be left blank. If you are using Amazon Connect Contact Lens and want to deploy the resources to allow you to report on this data in Amazon QuickSight, provide the name of the S3 bucket where your Contact Lens data is being stored.
Bucket name for Optimize Evaluations: Optional and can be left blank. If you are using Symbee Connect Optimize Evaluations and want to deploy the resources to allow you to report on Evaluations in Amazon QuickSight, provide the name of the S3 bucket where your Optimize Evaluation data is being stored. If used, your bucket name will be in the format: sc-optimize-environment-aws account number
Lambda related parameters
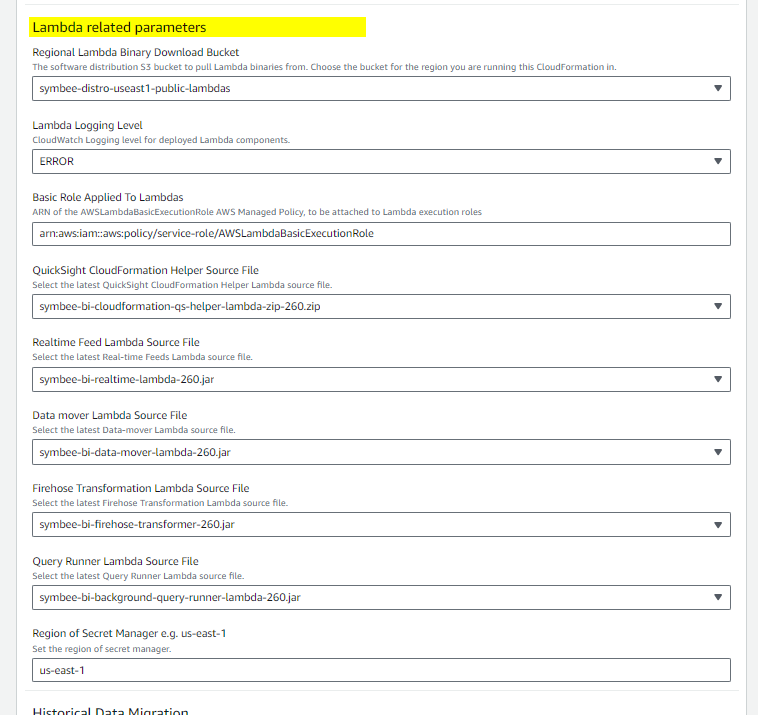
Regional Lambda Binary Download bucket: Select the Symbee Connect distribution S3 bucket associated with the AWS Region you are deploying the CloudFormation stack in.
Lambda Log Level and Basic Role Applied to Lambdas: Leave as the defaults.
The 5 Lambda Source File parameters: Each of these has a drop-down of allowed values, with (intentionally) only 1 value available. Select the single option available for all 5 of these parameters.
Region of Secret Manager: Enter the name of the AWS region where the initial Symbee Connect Integration CloudFormation was run in in your AWS Account. Examples: us-east-1, us-west-2, eu-central-1, etc.
Historical Data Migration related parameters
Refer also to the Migration of Historical Data section for more details on data migration.
In summary, the CloudFormation can optionally deploy the temporary components needed for migrating historical data. The very first parameter in this section controls whether the migration components are deployed, or undeployed. If migrating (and setting to Yes), after migration, you can perform a CloudFormation Update (using existing template) and change this first parameter to No, which will then clean up and remove the temporary migration components (you can always re-enable/deploy later if needed).

Deploy Migration Components?: If you are intending on migrating Historical data, set this to Yes, otherwise set to No. Also set to No if you are doing an Update after your migration is complete (to un-deploy migration components that are no longer needed).
NOTE: If Deploy Migration Components? is No, all the remaining parameters in this section are ignored so just leave the defaults. One exception is the Migration Lambda Source File parameter which needs to be set to a valid value in its drop-down. Just select the only value present in the dropdown to satisfy the validation.
Everything further below is for the case where you set Deploy Migration Components? to Yes.
Start historic data migration from date, and End historic data migration on date: Enter values in YYYY-MM-DD for both parameters (for example: 2023-12-01 for December 1, 2023). When started, the migration process uses this date range as the scope of data to pull into the new solution from the S3 buckets and locations your provide further below.
Note: Don't overlap the historical migration dates window with Live Data collection
Live data collection starts as soon as the initial CloudFormation Create Stack is complete. The Migration process start/end window only looks for a granularity of Date (day). Therefore set the End date to be the day prior to the date you are installing, otherwise depending on the time of day you are deploying, you may get a small window of time (in the current day) where your reports are artificially inflated due to duplicate data in the overlap period.
For example, if you are running the CloudFormation for the first time on 2023-12-01, then set the End migration date to 2023-11-30.
Migration Lambda Source File: The drop-down of allowed values, will (intentionally) only 1 value available. Select the single option available.
AWS Region of the S3 Buckets below: Set to the name of the AWS Region where your S3 historical data resides.
Bucket name of historical Contact Trace Records (CTR's) and Prefix for CTR's: Supply the name of the S3 Bucket, and any S3 Key prefix (ending with a slash) of where your historical CTR data resides. The contents of this location is expected to be a folder structure of YYYY / MM / DD / HH / .... (the same structure AWS Firehose normally creates). If you are an existing Symbee Connect customer and already had the Symbee Connect Data Feeds CloudFormation deployed, your historical data will be in a Bucket named: sc-reporting-... and the Prefix is defaulted to the correct location.
If you don't want to migrate CTR data into the solution, leave these 2 fields blank.
Bucket name of historical Agent Events (AES) and Prefix for AES: Supply the name of the S3 Bucket, and any S3 Key prefix (ending with a slash) of where your historical Agent Events data resides. The contents of this location is expected to be a folder structure of YYYY / MM / DD / HH / .... (the same structure AWS Firehose normally creates). If you are an existing Symbee Connect customer and already had the Symbee Connect Data Feeds CloudFormation deployed, your historical data will be in a Bucket named: sc-reporting-... and the Prefix is defaulted to the correct location.
If you don't want to migrate Agent Events data into the solution, leave these 2 fields blank.
Bucket name of historical Interaction Trace Records (ITR's) and Prefix for ITR's: Supply the name of the S3 Bucket, and any S3 Key prefix (ending with a slash) of where your historical Symbee Connect ITR data resides. The contents of this location is expected to be a folder structure of YYYY / MM / DD / HH / .... (the same structure AWS Firehose normally creates). If you are an existing Symbee Connect customer and already had the Symbee Connect Data Feeds CloudFormation deployed, your historical data will be in a Bucket named: sc-reporting-... and the Prefix is defaulted to the correct location.
If you don't want to migrate ITR data into the solution, leave these 2 fields blank.
Bucket name of historical Work Codes (WC's) and Prefix for WCs: Supply the name of the S3 Bucket, and any S3 Key prefix (ending with a slash) of where your historical Symbee Connect Work Codes data resides. The contents of this location is expected to be a folder structure of YYYY / MM / DD / HH / .... (the same structure AWS Firehose normally creates). If you are an existing Symbee Connect customer and already had the Symbee Connect Data Feeds CloudFormation deployed, your historical data will be in a Bucket named: sc-reporting-... and the Prefix is defaulted to the correct location.
If you don't want to migrate Work Codes data into the solution, leave these 2 fields blank.
Migrate Historical Evaluation Records?: If set to Yes, in addition to CTR, AE, ITR and WC data (above) being migrated, the historical migration process will also look for and migrate any historical Symbee Connect Optimize Evaluations data within the specified historic data migration start and end date window set at the top of this section. If Yes, the location of the historical data is assumed to be the same bucket set in the Bucket name for Optimize Evaluations parameter specified further up in the Live Streams and Bucket locations parameters section.
Migrate Historical Contact Lens Records?: If set to Yes, in addition to CTR, AE, ITR and WC data (above) being migrated, the historical migration process will also look for and migrate any historical Amazon Connect Contact Lens data within the specified historic data migration start and end date window set at the top of this section. If Yes, the location of the historical data is assumed to be the same bucket set in the Bucket name for Contact Lens parameter specified further up in the Live Streams and Bucket locations parameters section.