Email Channel Set up and Configuration
The following step-by-step guide walks you through the first-time setup of the Standard Email Channel in Symbee Connect. For further details on administering the Standard Email Channel, also refer to the the respective administration guide here: Email Administration
Overview
The Symbee Connect Email Channel uses Amazon Simple Email Service (SES) to receive emails. SES can be configured to work directly with your public Email routing (SMTP) for inbound email however, our recommended setup allows you to avoid changes to your inbound SMTP configuration by using Amazon WorkMail inboxes for your Queue Inboxes. If you want to take advantage of SMTP routing directly to SES please contact Symbee Connect Support for additional guidance.
For sending outbound emails (for example: replying to inbound emails, forwarding, and sending unsolicited outbound emails) the Symbee Connect Email Channel can be configured to deliver the outbound emails out through either Amazon SES, or alternatively deliver them via an external SMTP gateway that you provide the configuration and credentials for.
A note on Amazon SES Regions
When deploying the Email CloudFormation in this step by step guide, you will need to deploy it in an AWS Region that supports SES receiving inbound email.
While Amazon SES is now deployed in many regions, only some of the SES AWS regions currently support full outbound and inbound email. The other regions not listed below support outbound email only. The AWS Regions that support receiving inbound Email are:
- us-east-1 (US East Virginia)
- us-east-2 (US East Ohio)
- us-west-2 (US West Oregon)
- ca-central-1 (Canada Central)
- eu-west-1 (Europe Ireland)
- eu-west-2 (Europe London)
- eu-central-1 (Europe Frankfurt)
- ap-southeast-1 (Asia Pacific Singapore)
- ap-southeast-2 (Asia Pacific Sydney)
- ap-northeast-1 (Asia Pacific Tokyo)
Configuring Outbound and Inbound Email Addresses
Prerequisites
- Create a list of the Email Queues/Skills you will be creating an Inbound Email Address for.
- Associate an Email Account ID to the each of the entries on the Email Queues/Skills List.
Note: you only need the first part of the address, not the domain.
For example: support@yourcompany.com - Gather the email addresses your company would like customers to interact with:
Note: you only need the first part of the address, not the domain.
For example: support@yourcompany.com, sales@yourcompany.com, etc.
Creating WorkMail Organization to a contain Email Address
- Log Into your AWS Management Console.
- In the Search field in the top menu, type in WorkMail and press enter.
- Amazon WorkMail should appear as one of the first listed in the search results.
- Click on the Create organization button in the Get Started section.
- Make sure you have an AWS region selected that supports sending and receiving email. Currently there are only three, so select one that is the closest to your company geographically:
- us-east-1: Virginia
- us-west-2: Oregon
- eu-west-1: Ireland
- Under Organization settings, select Free test domain.
- Add an Alias, we recommend you use your company name. Your alias can have up to 45 characters. Aliases can only include lowercase letters (a-z), numbers (0-9), and dashes (-). This will determine the login URL for the web application:
[alias].awsapps.com/mail - Click Create, the Organization will take a couple minutes to create.
- When it’s completed, it will show up under Organizations.
Creating Email Addresses in WorkMail for Inbound delivery to Queue
- On the WorkMail Organizations page, click on the alias for your new Organization, this will display the WorkMail Users page.
- Click on Create User.
- Provide the following information:
- User name: The name you want to associate to this Email Skill/Queue.
- First name: optional
- Last name: optional
- Display name: The name the email will display
- Click Next Step.
- Provide a password for this account.
- Click Add User.
- Repeat this for each of your Email Queue/Skills.
Configuring Email Settings
Add Email Skill Queue
- Login to the Symbee Connect Administration Portal.
- If you have more than one Environment configured within your Company in Symbee Connect, make sure you have the appropriate one selected. This can be found on the Navigation bar to the left of the Function menu.
- Click on the Function menu on the in the top navigation bar and the select Queues and Skill Assignment located under the Contact Center Configuration section.
- Click on Add New Queue.
- Configure the New Queue making sure you select Email Standard from the Queue Type dropbox.
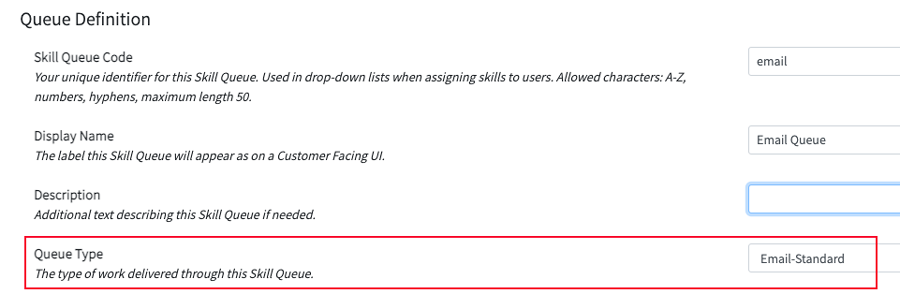
- Click Save.
- You will need to Add New Queue for each of the email queues.
For more information on Queues and Skill Assignment, click here.
Configuring New Queue or Skill for Email
- Click on the Function menu on the in the top navigation bar and the select Email Administration located under the Channel Configuration section.
- Select Email Standard (default) from the left side navigation bar.
- For each Email Queue/Skill address you want to add, complete the following:
- Click Add Email Configuration.
- Complete the form with the following fields:
- Email Address: Enter the Queue/Skill address, this can be viewed and copied directly from the Amazon WorkMail Users Screen.
- Description: A short description for this new Email Configuration - optional.
- Click Add.
- Click on the Queue/Skill email address you have just created to Modify.
- Click on Inbound Email Routing and select the Skill Queue for email.
- Configure your Automated Responses by Event as required. Below is an example of Plain Text for the Closed message and HTML Formatted for the Open message. Make sure to enable the messages you want displayed and then either configure the Plain Text or the HTML for each.

- Click Save.
Forward Contact Center Emails to WorkMail Address
In most situations you will already have existing public email addresses that your customers contact you on. You will probably need to be able to reply to a customer with a specific email address that appears to be from your company domain.
You will need to set up Email Forwarding on that address to forward to the address/addresses you created in WorkMail. How you forward that email address depends on what email platform or email service you are using.
Verifying Outbound Email Address
If you have set up an email forward to a Workmail address in the previous step, you will need to verify the address:
- Log Into your AWS Management Console.
- In the Search field in the top menu, type in SES and press enter.
- SES should appear as one of the first listed in the search results.
- Select Email Addresses from the left side menu.
- Click Verify a New Email Address.
- Enter the Email Address to verify and click the Verify This Email Address button.
- A verification email will be sent to that email address, follow the instructions in that email to complete the verification process.
Run the Email Channel CloudFormation
Download Email Channel CloudFormation
If this is the first Symbee Connect CloudFormation you have run, you will need to run the Integrations CloudFormation first. For step by step instructions and further information about CloudFormations click here.
In the steps below, you will download the Email CloudFormation from the Symbee Connect Administration Portal for your environment. Notes on this:
- There are two alternative Email CloudFormation templates.
- Either of the two templates can be used, and you only need to download and run one of them.
- Both templates provide all the functionality for receiving and sending emails via Amazon SES, and also for optionally sending outbound emails using an external SMTP gateway (rather than delivering out via Amazon SES).
- The difference between the two templates relates to how the SMTP part of the outbound delivery is configured in your AWS Account:
- If you are not using SMTP for outbound delivery, just run the first listed template, labeled Email CloudFormation script (non VPC attached, the original, and default)
- If you will be using SMTP for outbound delivery, the first listed template will also be suffice, but note the outbound SMTP traffic will have a source IP address that will be randomly any address from the documented AWS Lambda IP-address ranges in that region.
- If you will be using SMTP for outbound delivery, and require your outbound SMTP traffic to have a fixed, known source IP address, then use the second listed template, labelled Email CloudFormation script (VPC attached), which will attach the installed Symbee Connect Outbound SMTP Email delivery Lambda into a VPC that you specify, so you can control the outbound IP-address using an Elastic IP-Address, a NAT Gateway, and your VPC Internet Gateway. Symbee Connect does not provide or build a VPC for this, the assumption is, if you are using the VPC-attached model, that you already have a VPC configured and in place in your AWS account. Contact support if you need further assistance or guidance with this latter option.
- Log into the Symbee Connect Administration Portal.
- If you have more than one Environment configured within your Company in Symbee Connect, make sure you have the appropriate one selected. This can be found on the Navigation bar to the left of the Function menu.
- Then click on the main Function menu in the top navigation bar, and click on Feature Integrations (CloudFormations) in the Company Environment Configuration section.
- From the Feature Integrations (AWS CloudFormations) page, scroll down and locate the Email Channel CloudFormation section, and click the download link to download and save one of the two Email CloudFormation scripts (see notes above for which one to use).
Run Email Channel CloudFormation in your AWS Account
- Log Into your AWS Management Console.
- Make sure you are in the correct AWS region for where you want to deploy (top right of the Navigation bar) – specifically for the Email CloudFormation, this needs to be an AWS Region that supports Amazon SES receiving inbound email. Refer here.
- Navigate to the CloudFormation console (under Management and Governance, on the Services menu).
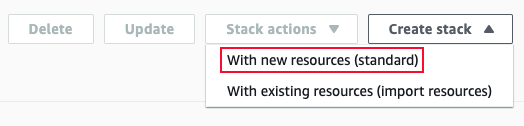
- From the CloudFormations console, select Stacks in the left-hand navigation bar, and select Create Stack and select With new resources (standard) from the dropdown box.
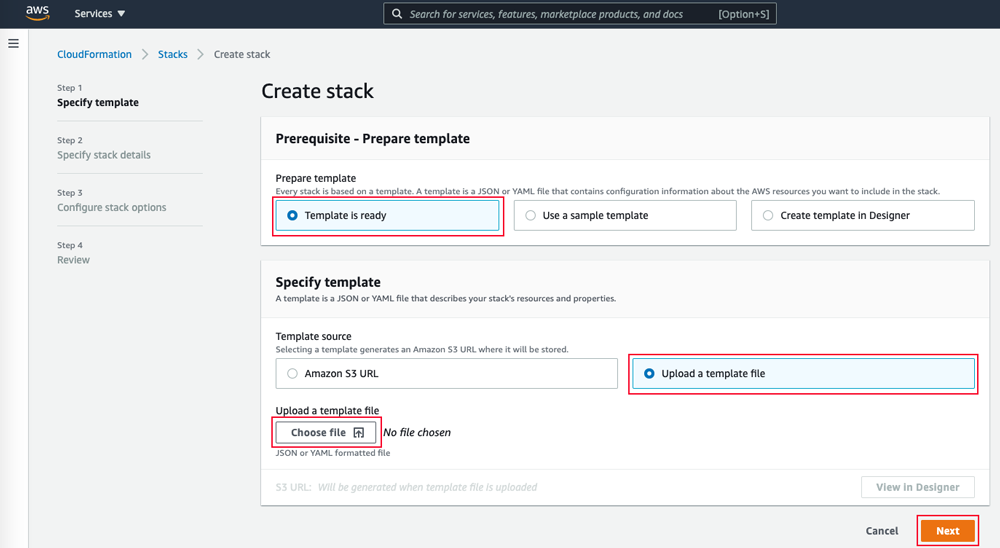
- You will be presented the “Create Stack” view for creating/deploying a new CloudFormation script (known as a stack):
- Under the Prepare Template section, select Template is Ready
- Under Specify Template, select Upload a template file
- Under Upload a template file, click Choose File
- In the resulting file selector, find and upload the file you saved from above.
- Click Next at the bottom.
-
In the Specify Stack Details screen, complete the fields as follows:
- Stack Name: ConnectEmailProvidedBySymbee Connect
- CreateIncomingEmailRuleset: true
- EmailAddressList: The external email address(es) you configured in the Creating Email Addresses in WorkMail for Inbound delivery to Queue step above to the appropriate internal WorkMail address, separated by commas if more than one.
- Note: Amazon SES has a limit for SES Inbound Rules of only being able to configure up to 100, of what SES refers to as, recipient conditions. For most implementations this is fine, and this EmailAddressList value can be a comma separated list of each individual complete email address. If you have more than 100 inbound email addresses being serviced, SES supports partial domain recipient conditions. For example, rather than johnny.tester@abccompany.com, you can just state abcompany.com which will match all incoming email addresses with a domain-part matching abccompany.com. You can mix both complete email addresses and partial domain addresses in the EmailAddressList comma-delimited list.
- SourceDistroBucket: Select the distribution bucket for where to source the Lambda's from - this bucket needs to match the AWS Region you are creating this Stack in. For example: select symbee-distro-useast1-public-lambdas if you are deploying the stack in the us-east-1 Virginia region
- LambdaSourceFile: Select the only value available in the dropdown
- LambdaProcessorSourceFile: Select the only value available in the dropdown
- LambdaRuleProcessorSourceFile: Select the only value available in to the dropdown
- SMTPLambdaSourceFile: Select the only value available in the dropdown
- LogLevel: Leave the defaulted value
- SESRegion: Enter the AWS region you are deploying this CloudFormation in - this needs to be either: us-east-1, us-west-2, or eu-west-1
- SecretsManagerRegion: Enter the name of the AWS region where the initial Symbee Connect Integration CloudFormation was run in. For Example: us-east-1, us-west-2, eu-central-1, etc.
- Subnet1ToAttachLambdaTo: Only relevant and present if you are running the VPC-attached version of the Email CloudFormation template. Select a Subnet from the VPC you want to attach the Outbound SMTP Email Lambda to.
- Subnet2ToAttachLambdaTo: Only relevant and present if you are running the VPC-attached version of the Email CloudFormation template. Select a Subnet from the VPC you want to attach the Outbound SMTP Email Lambda to.
- VPCSecurityGroupForLambda: Only relevant and present if you are running the VPC-attached version of the Email CloudFormation template. Select which VPC Security Group you want the Outbound SMTP Email Lambda to be associated with. The selected Security Group needs to, at minimum, allow outbound TCP traffic to your SMTP Gateway Host and port.
- Click Next.
- On the next Configure stack options screen, accept all the defaults, and click Next.
- On the next Review testing screen, scroll to the bottom Capabilities section, check the “I acknowledge that AWS CloudFormation might create IAM resources with custom names.” checkbox.
- Click Create Stack.
Complete SES Configuration
Confirm Rule Set Creation
- Log Into your AWS Management Console.
- In the Search field in the top menu, type in SES and press enter.
- SES should appear as one of the first listed in the search results.
- On the left side menu bar, click Rule Sets under Email Receiving.
- Under Inactive Rule Sets, verify the INBOUND_RULES set exists.
Set Active Rule Set
- Click the check box next to the INBOUND_RULES rule set to select it.
- Click the checkbox next in to INBOUND_RULES and then click on Set as Active Rule Set.
- SES will now have an Active Rule Set.