Preview and Progressive Dial
Overview
This guide provides both the initial one-time steps to install the optional Symbee Connect Preview Dial Channel for operation in your AWS Account prior to setting up your first Preview Campaign, and then also documentation for the administration and use of Preview and Progressive Campaigns within Symbee Connect and your AWS Account after initial installation is complete.
Refer here for an overview of the Preview and Progressive Dial Channel, Campaign concepts, and a description of workflow.
Decide and Set Preview AWS Region
This step needs to be performed before you download the CloudFormation below, as it determines the contents of the CloudFormation:
- Decide what AWS region your Preview Campaign Data is going to reside in, in your AWS account. This will usually be the same region as your Amazon Connect instance and any other Symbee Connect CloudFormations.
- Log into the Symbee Connect Administration Portal.
- If you have more than one Environment configured within your Company in Symbee Connect, make sure you have the appropriate one selected. This can be found on the Navigation bar to the left of the Function menu.
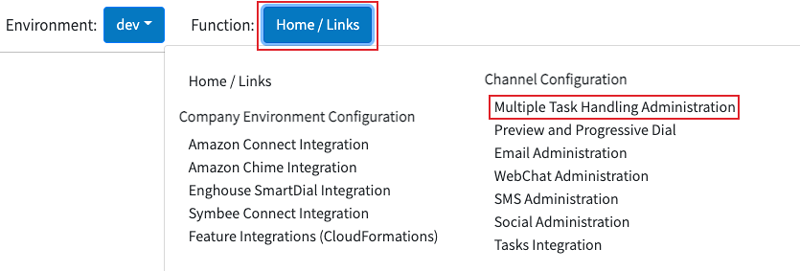
- Then click on the main Function menu in the top navigation bar, and click on Symbee Connect Integration in the Company Environment Configuration section.
- Go to the Preview Campaign Configuration and enter the region. For example, us-east-1.
Run CloudFormation
Download Preview Dial CloudFormation
If this is the first Symbee Connect CloudFormation you have run, you will need to run the Integrations CloudFormation first. For step by step instructions and further information about CloudFormations click here.
- Log into the Symbee Connect Administration Portal.
- If you have more than one Environment configured within your Company in Symbee Connect, make sure you have the appropriate one selected. This can be found on the Navigation bar to the left of the Function menu.
- Then click on the main Function menu in the top navigation bar, and click on Feature Integrations (CloudFormations) in the Company Environment Configuration section.
- From the Feature Integrations (AWS CloudFormations) page, scroll down and locate the Preview Dial CloudFormation, and click the download link to download and save the CloudFormation script:

- You will be prompted with a Save As dialog screen. Save the PreviewContactCloudFormation.yaml file locally to your PC for use in the following steps.
Run Preview Dial CloudFormation in your AWS Account
-
Log Into your AWS Management Console.
-
Make sure you are in the correct AWS region for where you want to deploy (top right of the Navigation bar) – the same region as your Amazon Connect instance (this needs to be the same region you specified above).
-
Navigate to the CloudFormation console (under Management and Governance, on the Services menu).
-
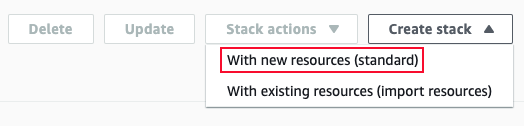
From the CloudFormations console, select Stacks in the left-hand navigation bar, and select Create Stack and select With new resources (standard) from the dropdown box.
-
You will be presented the “Create Stack” view for creating/deploying a new CloudFormation script (known as a stack):
-
Under the Prepare Template section, select Template is Ready
-
Under Specify Template, select Upload a template file
-
Under Upload a template file, click Choose File
-
In the resulting file selector, find and upload the file you saved from above.
-
Click Next at the bottom
-

-
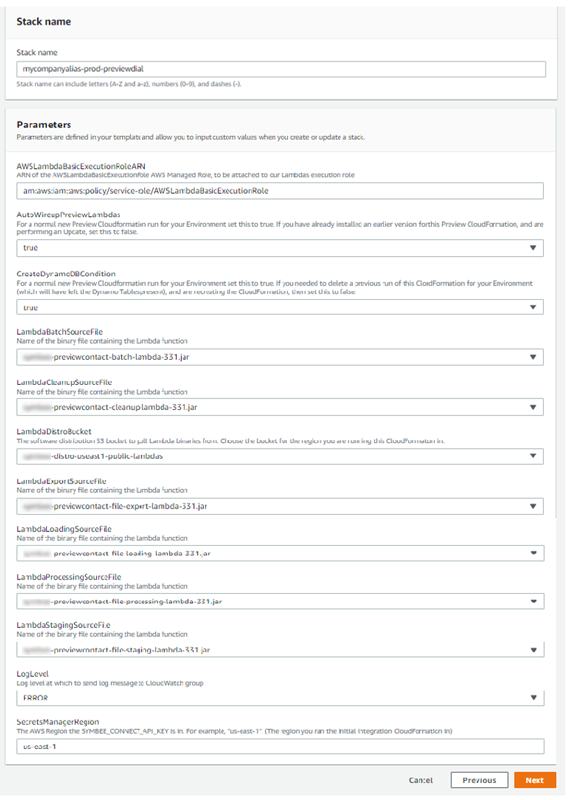
In the Specify Stack Details screen, complete the fields as follows:
-
Stack Name: Enter a name appropriately. We suggest using your Symbee Connect Environment (e.g. dev, prod, etc.) in the name for better organization, in case you have CloudFormations for multiple Symbee Connect Environments being deployed into the same AWS Account.
For example: companyalias-environment-previewdial
-
AutoWireupPreviewLambdas: For a new install, set to true. This functionality was added after the initial release, so if you have a previous install and had already performed the Lambda wire-up steps manually, set this to false.
-
CreateDynamoDBCondition: For a new install, set to true. If for some reason you had a previous installation and needed to completely delete the stack, the stack deletion would by default not remove the DynamoDB tables (so you don’t lose data you may wish to complete). If you are choosing to re-install after delete, and are keeping your previous DynamoDB tables intact, set this to false.
-
LambdaDistroBucket: This is the Symbee Connect Lambdas S3 bucket where the Preview Channel Lambdas will be uploaded from. Select the bucket name from the drop-down that matches the AWS region you are running the CloudFormation in
-
In each of the six LambdaBatchSourceFile, LambdaCleanupSourceFile, LambdaExportSourceFile, LambdaLoadingSourceFile, LambdaProcessingSourceFile and LambdaStagingSourceFile0, select from the dropdown, there will be only 1 value to pick from.
-
SecretsManagerRegion: Enter the name of the AWS region where the initial Symbee Connect Integration CloudFormation was run in: Examples: us-east-1, us-west-2, eu-central-1, etc.
-
-
Click Next
-
On the next Configure stack options screen, accept all the defaults, and click Next
-
On the next Review testing screen, scroll to the bottom Capabilities section, check the I acknowledge that AWS CloudFormation might create IAM resources with custom names. Checkbox, and finally click Create Stack.
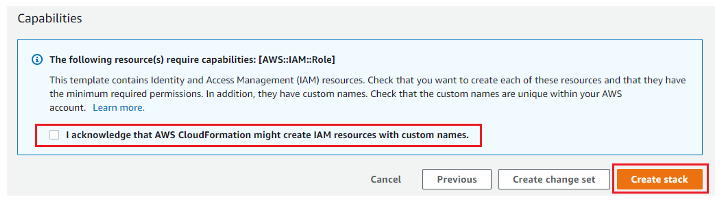
Note: This CloudFormation may take 10 to 15 minutes to complete.
Post CloudFormation Manual Configuration
The CloudFormation performs most of the setup automatically, however there are 2 steps (below) that need to be completed manually from the AWS console, after running the CloudFormation, to complete the install.
The CloudFormation creates an S3 Bucket for Preview Campaign File Intake and Processing:
S3 Bucket name: sc-preview-{environment}-{account}
The CloudFormation installs a set of Lambda functions to handle the intake file processing. The following Lambda Event Trigger assignments need to be configured manually via the AWS Portal in the Lambda console – this step results in arriving files into the S3 bucket being picked up and processed automatically.
Symbee ConnectContactStagingLambda S3 Triggers
- Select Lambda from the AWS Management Console.
- Locate the StagingLambda created by the CloudFormation and select it to maintain its settings:
- Under the Function Overview section at the top, click + Add Trigger
- Select S3 as the Trigger source, which will bring up the Add S3 Trigger form
- In the Bucket dropdown, select the sc-preview-accountnumber S3 bucket created by the CloudFormation (see above).
- Select PUT create events, and leave Prefix and Suffix blankComplete the form at the bottom by clicking Add.
- Repeat the steps above to add a second trigger for Multipart upload completed events.
SymbeePreviewContactBatchLambda Amazon EventBridge Rule
Data loaded from intake files into the Dynamo tables, gets pushed into Symbee Connect via the BatchLambda. The following step creates an Amazon EventBridge Rule that runs each minute, to check the status of your Symbee Connect Preview skill queues, and replenish them with more data as needed:
- Select EventBridge from the AWS Management Console.
- Select Rules in the left navigation bar.
-
Click the Create Rule button to begin creating a new rule:
- Enter a name and description for the Rule, such as PreviewBatchTrigger, and Preview Batch Replenishment runs every 1 minute respectively
- Under the Define pattern section, select Schedule:
- Select Fixed rate every, and configure 1 minute.
-
Under the Select targets section:
- Select Lambda Function from the dropdown
- In the Function dropdown select the PreviewContactBatchLambda function (it wont be called this exactly, it will have the Preview Channel CloudFormation name you used when running the Preview Channel CloudFormation initially, prepended to the front of it, and will have a unique identifier added after the -PreviewContactBatchLambda- text in the name - entering "Preview" in the search filter should get you the list of the 6 preview lambdas which helps).
- Expand Configure input, select the Constant (JSON text) option, and in the input box provided, enter the string of:
{ }(i.e. just an open and close curly bracket, nothing else)
-
Scroll to the bottom and click the Create button to complete the new rule.
Preview and Progressive Campaigns
Creating a new Preview or Progressive Campaign
-
Login to the Symbee Connect Administration Portal.
-
If you have more than one Environment configured within your Company in Symbee Connect, make sure you have the appropriate one selected. This can be found on the Navigation bar to the left of the Function menu.
-
Click on the Function menu on the in the top navigation bar and the select Preview and Progressive Dial located under the Channel Configuration section.
-
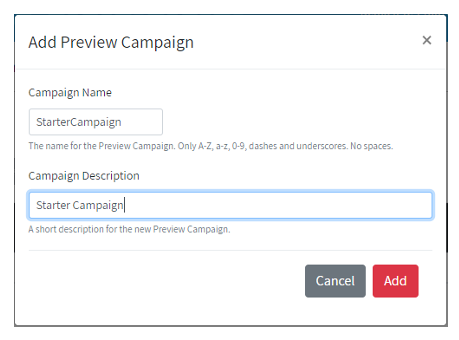
Select Preview and Progressive Campaigns on the left and then click Add Preview Campaign to create a new campaign.
-
Complete the resulting dialog box to create the new Campaign:
- After creating the Campaign, from the listing screen, click on your new Campaign to modify its Campaign-level settings:
In the background, as part of the Campaign creation in step 5, a new backing AWS Dynamo Table is created in your AWS Account that will hold the Campaign Data. In addition, a new directory/folder is created in the AWS S3 Bucket (discussed here) in your AWS Account, to be used as the Campaign data Intake file drop location for the new Campaign.
Preview / Progressive Campaign Skill Queue Association
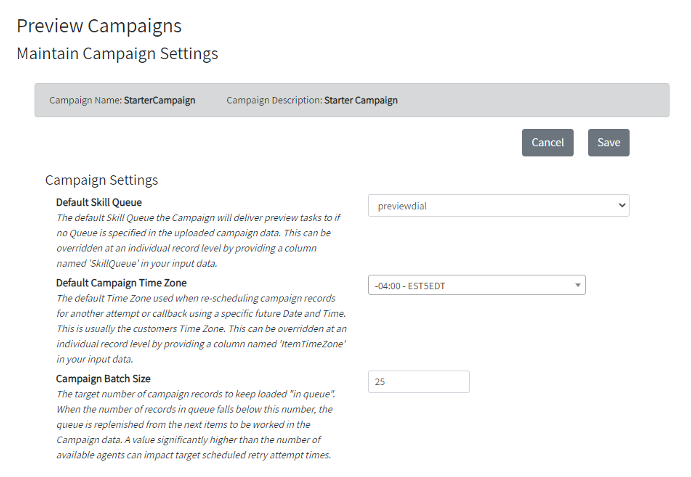
Once data is loaded into a Campaign, it is queued for delivery to Agents using Skill Queues. Each Skill Queue can have its own Operating Hours controlling when task delivery should begin and end each day.
Which Skill Queue each task/record in your campaign is delivered through can be controlled at an individual record level by declaring a specific specially treated column named (exactly) SkillQueue in your Campaign intake files. If this column exists in your files, the values must exactly match the name of a Skill Queue defined in your Symbee Connect Environment. If not, then the records will not load.
If no SkillQueue column exists in your Campaign intake files, all tasks will be delivered through the Default Skill Queue set on the Campaign Settings (see above).
Preview versus Progressive behavior is determined by the Skill Queue each task/record is delivered through (see Skill Queues in relation to Preview and Progressive Dial).
Campaigns and Skill Queues
While the Symbee Connect Preview Channel supports dispersing/routing tasks from a single Campaign out to multiple different Skill Queues (as described above), configuring multiple different Campaigns to disperse tasks into the same skill queues shared by other campaigns is not supported, and will result in unexpected behavior.
Preview / Progressive Campaign Time Zone Association
When a task is delivered to an agent, if the Maximum Attempts (set at the Skill Queue level – see Skill Queues in relation to Preview and Progressive Dial ) is set to more than 1, the agent can request for the task to be re-attempted at a later time (for example, if they attempted to call the customer and the customer wasn’t available).
Agents have three options when rescheduling a future attempt – when doing so, this sets the Earliest Next Work Time on the task:
-
Use the Default Attempt Interval in minutes (set on the Skill Queue).
-
Use a Custom Attempt Interval in minutes (i.e. override the Default Attempt interval).
-
Set the next attempt for a specific Future Date and Time.
If number 3 is used (Future Data and Time), the date and time selected is intended to be in the Time Zone of the Customer. The Time Zone for each task/record in your campaign can be controlled at an individual record level by declaring a specific specially treated column named (exactly) ItemTimeZone in your Campaign intake files. If this column exists in your files, the record level Time Zone will be used when setting a Future Date and Time.
If no ItemTimeZone column exists in your Campaign intake files, the Default Time Zone set on the Campaign Settings (see above) will be used.
If an invalid ItemTimeZone value is specified on the record, the Time Zone defaults to UTC.
Campaign Batch Size
Campaign tasks/records are queued up into your Skill Queues in “batches”, to allow for scheduled re-attempts of tasks, once their Earliest Next Work Time is reached, to make their way into a batch and reach the front of the queue for delivery to an agent. Once a rescheduled tasks’ Earliest Next Work Time is reached, it becomes available as a candidate to be placed back into a queue batch.
The batching process runs every 60 seconds, checks the current depth of the Skill Queue, and replenishes it continuously, targeting to keep the Batch Size number of items always in queue if possible. For example, if the batch size is set to 50, and it finds 23 in queue, it will batch up another 27 records to replenish.
When setting the batch size, take into consideration the expected number of active Agents working the queues, keeping in mind if the batch size is too low, agents could end up waiting for work until replenishment occurs. If the Batch size is set significantly higher than the number of Agents, it will impact the timeliness of when a rescheduled item that reaches its Earliest Next Work Time makes its way to the front of the queue to be represented.
Skill Queues in relation to Preview and Progressive Dial
Preview / Progressive Campaign tasks are delivered to available agents via Symbee Connect Skill Queues. The notes in this document/section do not cover administering Symbee Connect Skill Queues in general, but rather the specifics as it relates to the Preview Channel.
Configuring Skill Queues for Preview and Progressive
-
From your Symbee Connect Administration Portal
-
Make sure to select the appropriate Environment in the top Navigation bar for where you want to create your new Preview Skill Queues, and from the Function menu, select Queues and Skill Assignment.
-
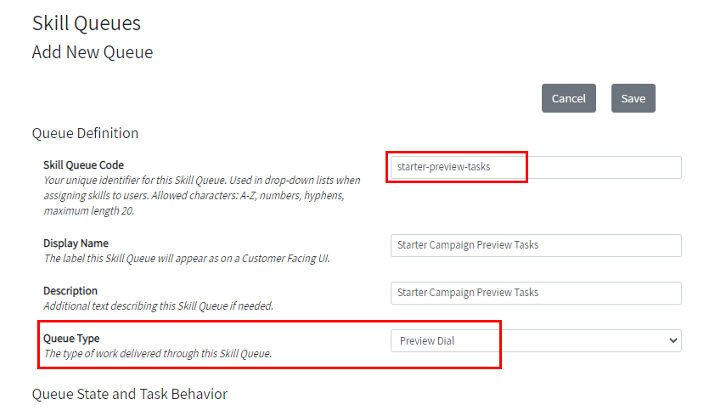
Select Skill Queues on the left, and click Add New Queue.
-
Begin completing the resulting Add Skill Queue screen, setting the new code for the skill-queue (numbers, lowercase letters, and dashes only), and the set the Queue Type to Preview Dial.
-
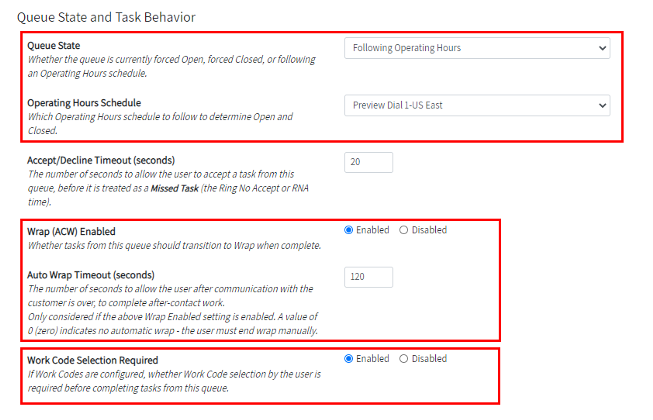
Under the Queue State and Task Behavior section, configured the following settings based on your needs:
-
Use the Queue State (Force Open, Forced Closed, or Follow Operating Hours) to set how you want your Preview Skill Queue to start and stop delivering tasks to agents.
-
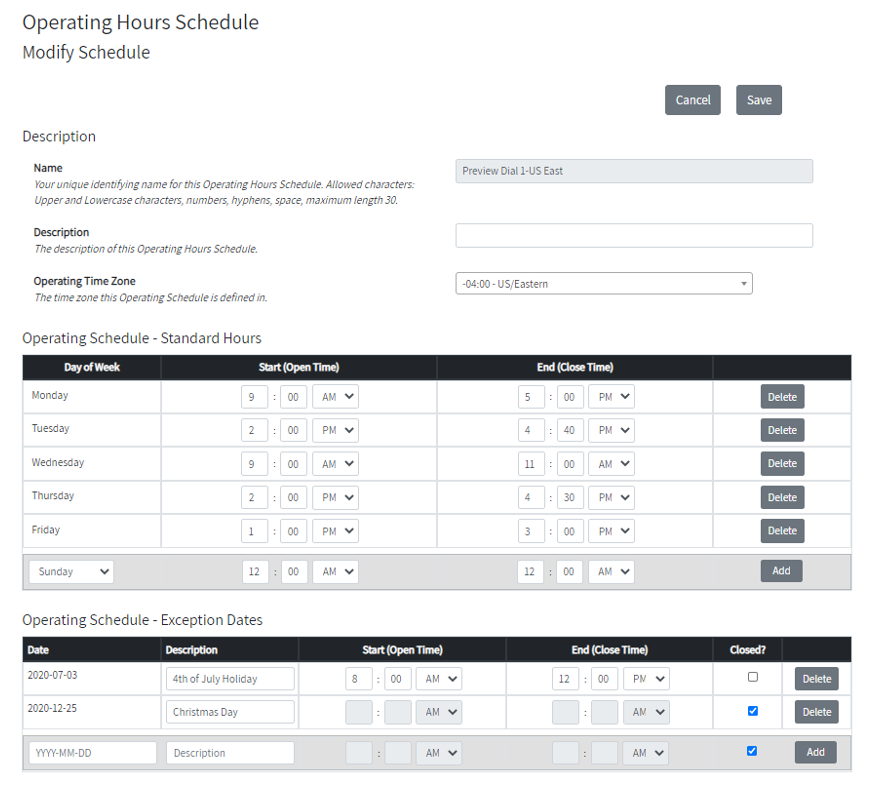
If setting to Follow Operating Hours, select the Operating Hours Schedule you want the Skill Queue to follow.
-
Set Wrap (ACW) to Enabled, and select the Auto Wrap Time as needed if you want your Agents to be forced Available for the next task after a maximum period of time.
-
Set Work Code Selection Required to Enabled.
-
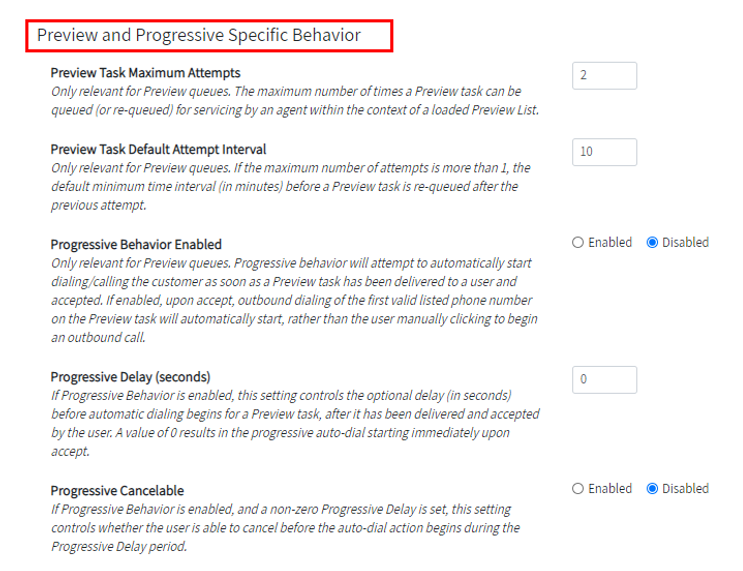
Under the Preview and Progressive Specific Behavior section
- Set the Maximum Attempts to meet your needs.
- If set higher than 1, Agents will have options available when wrapping each preview task, allowing a follow-on attempt to be scheduled.
- Follow-on attempt options will not be available to the agent during the last attempt on a task.
-
Set the Default Attempt Interval to meet your needs.
- This determines the default behavior in the Agent UI, of the delay used to schedule the next attempt if a task is worked but not set with a Work Code that indicates completion.
- The Agent can override this default value as needed, on a task by task basis:
-
Set Progressive Behavior Enabled If progressive behavior is required.
-
Set the optional Progressive Delay and Progressive Cancelable settings as required.
- Set the Maximum Attempts to meet your needs.
- Scroll to the top and Save to finish creation of your new Skill Queue.
Skill Queue Assignment to Agents
Once your Skill Queue is created, it can then be assigned to Agents, as necessary. Preview Skill Queue assignment to agents works the same as assignment for all other Skill Queues to agents:
- Each agent can have multiple Skill Queues assigned, at differing Skill Levels.
- Agents can have Skill Queues for different Task Types be assigned at the same time.
Multiple Task Handling
Related to Preview Campaigns and Omnichannel behavior, Agents can have Skill Queues for different Task Types be assigned at the same time, meaning an Agent assigned to preview tasks can also be available to work other types of tasks as well.
Refer to the Multiple Task Handling Administration view in your Symbee Connect instance related to this control.
Operating Hours
Operating Hours are configured in the same manner as all other uses for Operating Hours within Symbee Connect, allowing a base set of Standard operating hours for a week to be defined, and then overriding Exception Days (e.g. Holidays) to be defined for special days throughout the year where different behavior is needed.
Related to Preview Campaigns, an Operating Hours Schedule controls when preview tasks begin and end being presented to assigned agents each day.
Because Operating Hours are set at a Skill Queue level, this allows preview tasks from a single Preview Campaign to follow multiple differing Operating Hours schedules (for example, if your Campaign contains tasks for customers in multiple countries) if the SkillQueue is set on your Campaign data at an individual record level.
Work Codes
Work Codes - also often referred to as Result Codes, Dispositions, or Finish Codes - is a feature common across all channels within Symbee Connect, and are used to capture outcomes and activity from agents about the handling of calls and tasks.
Work Codes are organized into Work Code Groups, with each Work Code Group then able to be configured against which Skill Queues it should appear to the Agent for. This allows Agents to be presented different groups of Work Codes to select from for tasks and calls from different queues and channels.
An agent can select multiple relevant Work Codes for each single call or task.
Relating to Preview Campaigns, the outcome of each task attempt (e.g. Invalid Number, Busy, No Answer, Voicemail, Live Connect, Sale Made, Promised to Pay, etc.) is recorded using Work Codes.
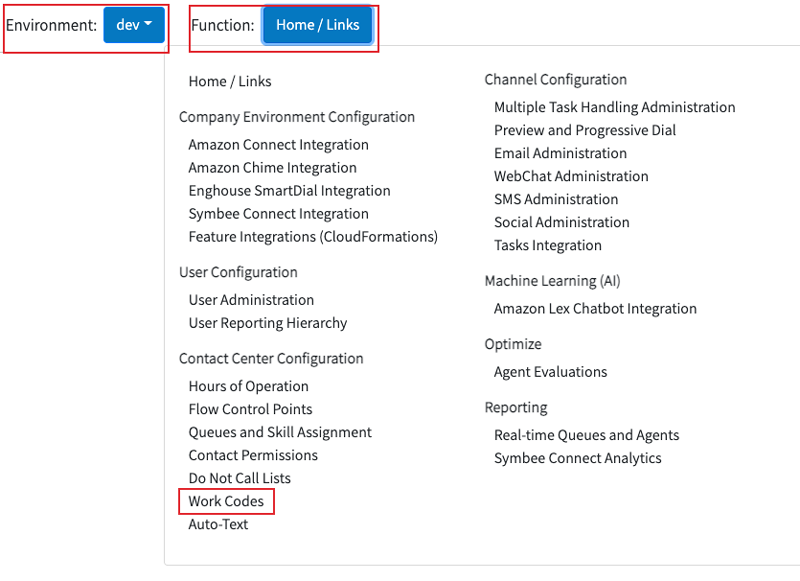
Work Codes, and Work Code Groups are configured via the Work Codes option off the main Function menu in your Symbee Connect Environment:
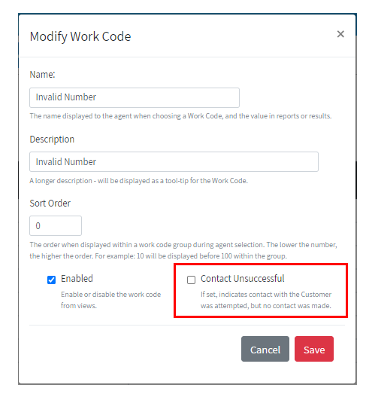
Specifically relating to Preview Campaigns, when a Work Code is created, there is a Contact Unsuccessful setting on the work code.
This can be used to indicate which work codes, when selected by the Agent, should automatically pre-select options for the Agent to schedule a follow-on retry attempt for the preview task.
Uploading Campaign Intake Files for Processing
Preview tasks can be loaded into Campaigns either from intake files uploaded via S3, and/or dynamically in real-time via API. The following details cover file based intake. For details on how to load tasks dynamically via API, see Preview Campaign Realtime API.
For file-based loading, Preview tasks are loaded into Campaigns via preview intake files uploaded into an S3 bucket in your AWS Account (refer to the Preview Dial and Progressive Dial section of the Administration Guide for file formatting).
Automate File Upload
When the initial Symbee Connect Preview Dial CloudFormation is run in your AWS account (refer above) for your specific Symbee Connect Environment, an S3 bucket is provisioned in your account, which is used like a “drop box” for Preview Campaigns.
The S3 Bucket is named:
sc-preview-{environment}-{account}
As each new Campaign is created (refer section 5.1), a new top-level folder of the same name as the Campaign is created in this S3 bucket. Each top-level Campaign folder then has a subfolder named “staging”.
As an example:
sc-preview-{environment}-{account}/StarterCampaign/staging
Campaign Intake File Upload Automation
Any file that arrives in the respective <CampaignName>/staging folder automatically and immediately initiates the Symbee Connect Preview Campaign upload and intake process (refer to section 11.3 for File naming conventions). Staged files are then moved from the /staging folder to the /segments folder, split as required, and uploaded into the Campaign. This process is all automatic.
Additionally, Campaign data does not have to come from only 1 single intake file at the start. Once an initial intake file is uploaded into a Campaign and the campaign is running, additional intake files can continue to be dropped into the /staging and will continue to be picked up and added to the Campaign.
Campaign Intake File Modes and File Naming Convention
As described in 11.2, a running Campaign can continuously intake new files arriving into the S3 /staging folder. How the contents of each intake file are treated is based on the File Mode. The File Mode is indicated by the file naming convention, with supported file modes of APPEND, PURGEAPPEND, REPLACE, and REMOVE.
The beginning of intake file names can be whatever convention you choose, but the file name suffix MUST be one of the following:
_APPEND.csv
_PURGEAPPEND.csv
_REPLACE.csv
_REMOVE.csv
As examples:
StarterCampaign/staging/starter-campaign-list-202005270915_APPEND.csv
StarterCampaign/staging/starter-campaign-list-202005271030_REPLACE.csv
The following table describes how records in each intake file mode are treated, with respect to any tasks already uploaded and existing within the Campaign. All the below behavior is keyed off a matching process that uses the value of the first Unique Matching ID column in the file (refer to section 10 for more details on this column)
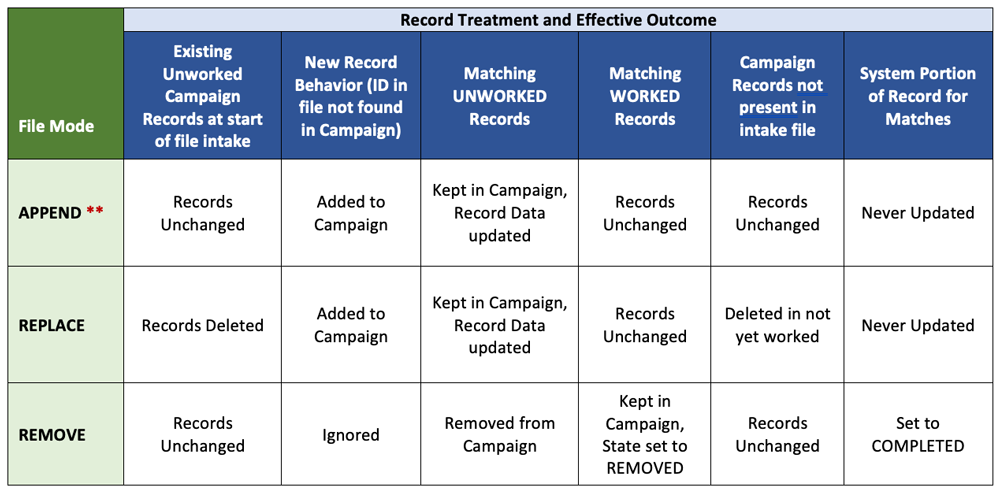
NOTE: A file with a suffix of PURGEAPPEND is treated as an APPEND, except that a Campaign Purge action (which completely empties the Campaign of all tasks) is performed before the intake file is processed. The PURGEAPPEND mode was introduced as a means of easier automation of batch processes when needed.
Manual Campaign File Upload
As a convenience for ad-hoc campaigns, manual File Upload functionality is also provided via the Symbee Connect Administration Portal (see below - Viewing Campaign Status, Monitoring, Actions and Notifications), allowing you to select a file from your local desktop and upload it into a campaign.
In the background, this upload is effectively loading the file up into the same S3 Campaign staging folder discussed in Uploading Campaign Intake Files for Processing.
Manual file uploads (via the Campaign Status screen within the Administration Portal) offer the same three file modes above, when selecting a file for upload. The PURGEAPPEND mode is only through batch processing. If purge/append behavior is needed manually, the Purge action is available from that same Campaign Status screen.
Campaign Status, Monitoring and Notifications
Campaign Status View
The Campaign Status view in the Symbee Connect Administration Portal shows the real-time status of each of your configured Campaigns, including the current Campaign State (active or suspended, and progress of any in-progress data load actions, etc.), the number of records/tasks currently being worked by the campaign, and totals by record/task state.
- To access the Campaign Status view, select Campaigns off the main Function menu.
- Select Campaign Status on the left side navigation bar.
Click here for information and full descriptions of Campaign States, Preview Task States and Campaign actions.
Campaign Automation
To allow a Campaign to continuously run without manual intervention, the following Campaign Actions can be automated through batch or automatic pushing of intake files into the Preview Channel S3 Bucket, and setup of scheduled AWS EventBridge Rules:
-
Automated Campaign Purging, by uploading a PURGEAPPEND intake file
-
Automated Campaign Loading, by uploading PURGEAPPEND, APPEND, REPLACE, and REMOVE intake files
-
Automated Campaign Exports, by setting up an AWS EventBridge Rule
-
Automated Campaign Record/Task Cleanup, by setting up an AWS EventBridge Rule
Refer to section 11 for details on automating Purging and Loading of Campaign data.
The following 2 sub-sections describe the setup for automating Exports and Cleanup.
Configuring an AWS EventBridge Rule to Schedule Campaign Export
As described in Campaign Actions, you can manually request the contents of a Campaign to be exported using the Export action via the Campaign Status view.
When an Export is manually requested, the actual Export Action is performed by invoking the Preview Export Lambda that gets installed in your account when you ran the Preview Channel CloudFormation (see above).
The following steps configure a Rule in AWS EventBridge, to run a Campaign Export automatically on a timed schedule:
- Log into your AWS Account, and navigate to the Amazon EventBridge Service
- Select Rules in the left navigation bar
-
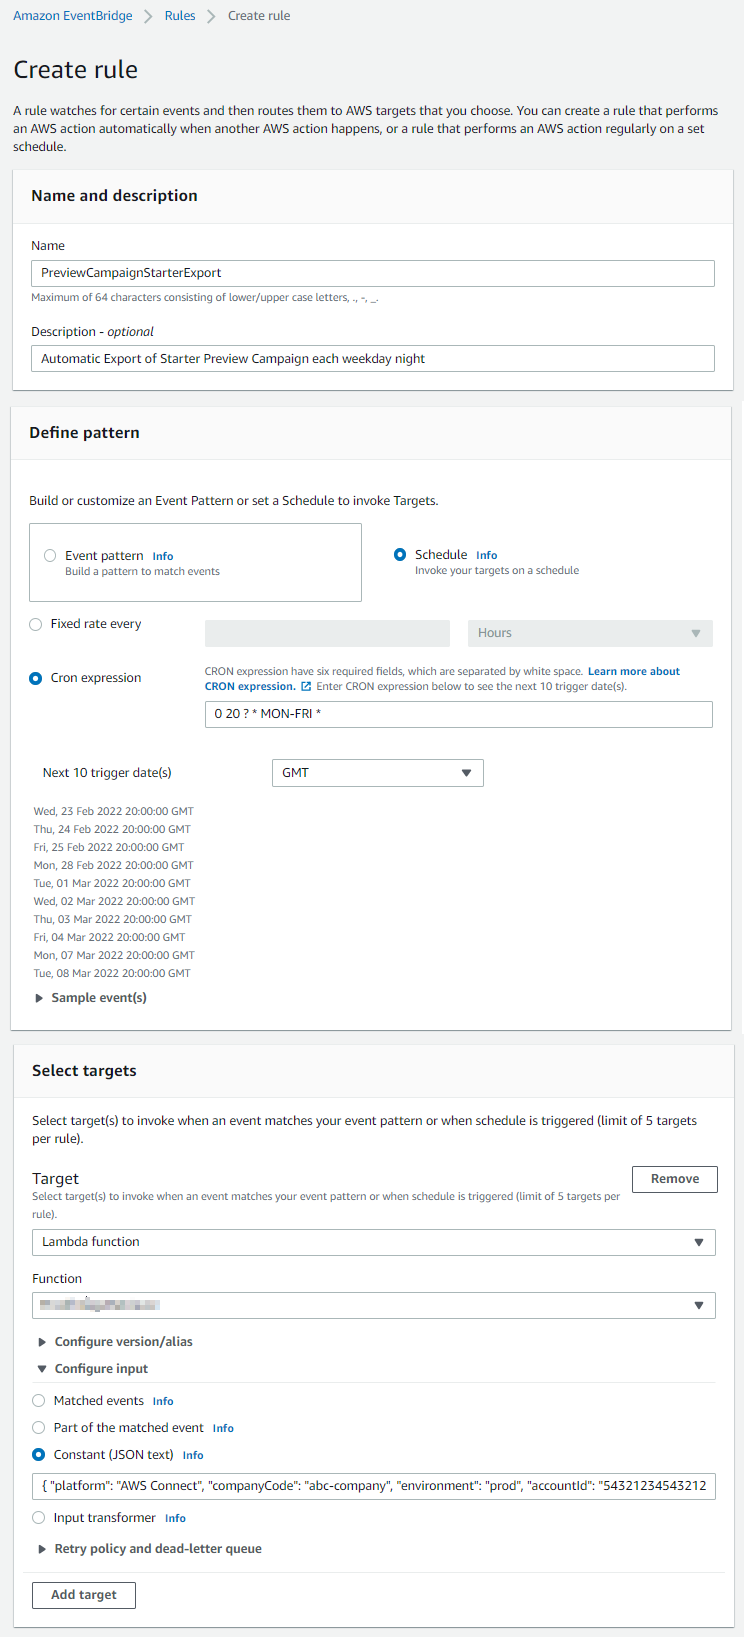
Click the Create Rule button to begin creating a new rule:
- Enter a name and description for the Rule, such as PreviewCampaignXXXExport, and Automatic Export of XXX Preview Campaign each night respectively
-
Under the Define pattern section, select Schedule:
- Select either Fixed Rate or Cron Expression based on how often and/or when you want the Campaign Export to be run. Note that times, when creating EventBridge Rule schedules, are always specified in UTC. The example in the screen shot further below schedules the action every Monday-to-Friday at 8pm.
-
Under the Select targets section:
- Select Lambda Function from the dropdown
- In the Function dropdown select the PreviewContactExportLambda function (it wont be called this exactly, it will have the Preview Channel CloudFormation name you used when running the Preview Channel CloudFormation initially, prepended to the front of it, and will have a unique identifier added after the -PreviewContactExportLambda- text in the name - entering "Preview" in the search filter should get you the list of the 6 preview lambdas which helps).
- Expand Configure input, and select the Constant (JSON text) option
- In the input box provided, enter the JSON string describing the Campaign you want to run the Export for. See the JSON payload listed below (copy the JSON, update as needed, and remove all the carriage returns to paste the JSON as a single line into the input box provided)
-
Scroll to the bottom and click the Create button to complete the new rule.
Campaign Export EventBridge Rule JSON payload (In the payload below, where it reads company-alias and company-environment, enter your Symbee Connect company alias and environment.):
    {
      "platform":   "AWS Connect",
      "companyCode":  "*<your-symbee-connect-company-alias>*",
      "environment":  "*<your-symbee-connect-environment>*",
      "accountId":  "*<your 12-digit AWS Account Number>*",
      "region":    "*<your AWS Region - e.g. us-east-1>*",
      "campaignName": "*<Preview Campaign Name>*",
      "fileName":   "*<Name of export file to create. Example: StarterCampaignExport.csv>*"
    }
EventBridge Rule Example:
Configuring an AWS EventBridge Rule to Schedule Campaign Cleanup
As described in Campaign Actions, you can manually request cleanup/removal of old or completed records/tasks from a Campaign using the Clean Up action via the Campaign Status view.
When a Clean Up action is manually requested, the actual Clean Up Action is performed by invoking the Preview CleanUp Lambda that gets installed in your account when you ran the Preview Channel CloudFormation (see above).
The steps to schedule an automated Campaign Cleanup action using an AWS EventBridge Rule are the same as the steps for automating a Campaign Export (see previous section), except you invoke the Preview CleanUp Lambda instead of the Export Lambda, and the JSON payload is slightly different.
During setup of the EventBridge Rule for a Campaign Cleanup, when configuring the Lambda Target Input JSON Constant, use the JSON payload as follows (copy the below, update as needed, and remove all the carriage returns to paste the JSON as a single line into the input box provided):
(In the payload below, where it reads company-alias and company-environment, enter your Symbee Connect company alias and environment.)
     {

      "platform":   "AWS Connect",
      "companyCode":  "<your-company-alias>",
      "environment":  "<your-environment>",
      "accountId":   "<your 12-digit AWS Account Number>",
      "region":    "<your AWS Region - e.g. us-east-1>",
      "campaignName": "<Preview Campaign Name>",
      "intervalInDays": 3  (age of the records to be cleaned up - example here is more than 3 days old)
      "removeCompleteRecords": true,
      "removeFailedRecords": false,
      "removeAbandonedRecords": false,
      "removeRemovedRecords": true,
     }
Campaign Notifications
The various actions and operation of your Preview campaigns, for the functionality that deals with your campaign data, is performed by the Lambda functions deployed in your account (for security purposes, as your customer data remains in your AWS Account) by the Preview Channel CloudFormation.
If any errors occur, for example errors loading data, or errors during scheduled actions, notification events are emitted to a specifically created Topic in AWS SNS (Simple Notification Service). You can subscribe to this topic to be alerted via Email or SMS when errors occur.
The Preview Channel CloudFormation (see above) creates a Topic in AWS SNS, named as follows:
SCPreview-\<your-environment-name>\-Notifications
The following steps create a subscription in AWS SNS to receive automatic notifications:
-
Log into your AWS Account, and navigate to the AWS Simple Notifications Service Console
-
Select Topics in the left-hand navigation bar
-
Locate the SCPreview Notifications topic created by the CloudFormation, and click it to navigate to the details view for the Topic
-
Under Subscriptions at the bottom, click Create Subscription
-
In the resulting Create Subscription view, for the Protocol, select either Email or SMS as needed
-
Enter your Email Address or Phone Number to be notified
-
Click Create Subscription at the bottom to complete the subscription
Note: if you requested Email notification above, you will be sent a subscription confirmation email, that needs to be confirmed before you will be notified of events.
The following are the error situations that currently cause an SNS notification to be sent via the above topic:
- During initial Intake File pickup and segmentation (each intake file is automatically segmented into 5000 record chunks during the load). If there is an error during this initial step, a notification is sent.
Loading Lambda: Campaign - [Campaign Name] failed segmenting...
- During intake processing of each file segment into the Campaign DynamoDB table. If an error occurs during any of these steps, a notification is sent.
Processing Lambda: Campaign - [Campaign Name] file segment [segment number] failed to process...
- During normal campaign batcher processing (occurs regularly throughout the day to continuously feed campaign data into the Symbee Connect Skill Queues). If your Intake file format includes the optional special SkillQueue column (to have tasks routed into multiple different skill queues) and it finds a record referencing a Skill Queue that doesn't exist, a notification is sent.
Batch Lambda: Campaign - [Campaign Name] queue is not defined...