Extensions
Overview
Symbee Connect Voicemail, Direct Dialing, and Extensions are optional features you can use with your Symbee Connect enabled Amazon Connect instance and implement the following functionality:
Assign Extension Numbers to Users:
Configure a unique numeric Extension number associated with each required Symbee Connect user:
- Supports creating an Inbound Contact Flow that offers the option “If you know your party’s Extension, dial it now”, allowing callers to enter a numeric extension number using touch-tones to route the call.
- A utility Lambda is then provided to ease creating this Contact Flow, allowing User lookup for a given Extension number returning the Amazon Connect User Login ID to direct queue to.
Run CloudFormations
If this is the first Symbee Connect CloudFormation you have run, you will need to run the Integrations CloudFormation first. For step by step instructions click here.
Download Voicemail and Direct Dialing CloudFormation
- Log into the Symbee Connect Administration Portal.
- If you have more than one Environment configured within your Company in Symbee Connect, make sure you have the appropriate one selected. This can be found on the Navigation bar to the left of the Function menu.
- Click on Function and then Feature Integrations (CloudFormations).
- Click and download the Voicemail and Direct Dialing CloudFormation script.
- You will be prompted with a Save As dialog screen. Save the VoiceMailAndDirectDialCloudFormation.yaml file locally to your PC for use in the following steps.
Run Voicemail and Direct Dialing CloudFormation
If you want to install and configure Voicemail follow the Voicemail Step By Step Guide. If you have already setup Voicemail, then skip to Creating Dial By Extension Contact Flow below.
If this is the first Symbee Connect CloudFormation you have run, you will need to run the Integrations CloudFormation first. For step by step instructions and further information about CloudFormations click here.
-
Log Into your AWS Management Console.
-
Make sure you are in the correct AWS region for where you want to deploy (top right of the Navigation bar) – the same region as your Amazon Connect instance.
-
Navigate to the CloudFormation console (under Management and Governance, on the Services menu)
-
From the CloudFormations console, select Stacks in the left-hand navigation bar, and select Create Stack (with new resources (standard)).
-
You will be presented the Create Stack view for creating/deploying a new CloudFormation script (known as a stack):
- Under the Prepare Template section, select Template is Ready
- Under Specify Template, select Upload a template file
- Under Upload a template file, click Choose File
- In the resulting file selector, find and upload the file you saved above.
- Click Next at the bottom
-
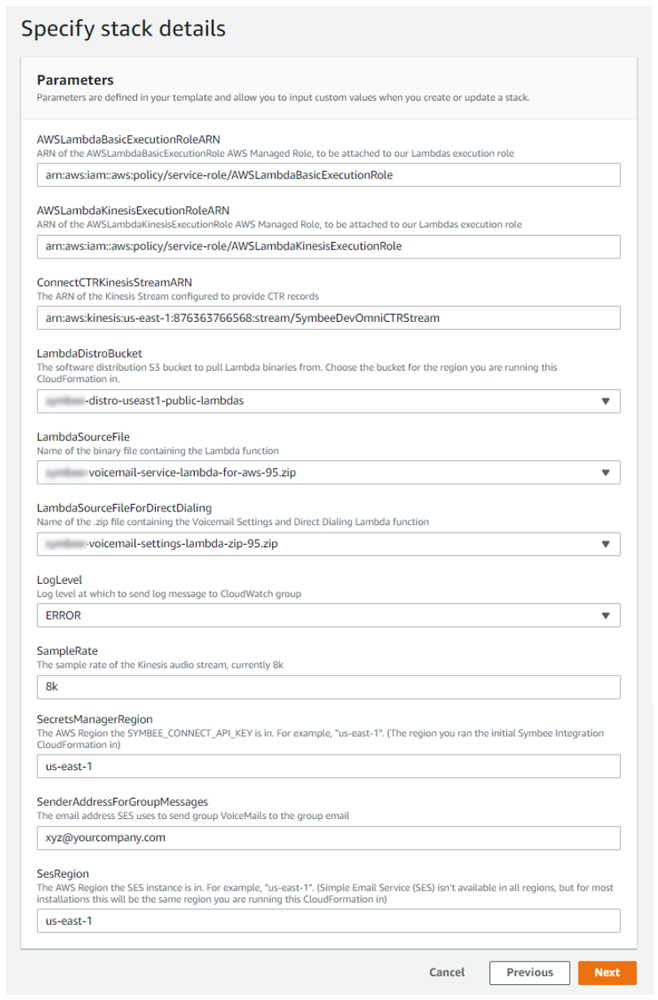
In the Specify Stack Details screen, complete the fields as follows:
-
Stack Name: Enter a name appropriately. We suggest using your Symbee Connect Environment (e.g. dev, prod, etc.) in the name for better organization, in case you have CloudFormations for multiple Symbee Connect Environments being deployed into the same AWS Account.
For example: companyalias-environment-voicemailanddialing -
AWSLambdaBasicExecutionRoleARN and AWSLambdaKinesisExecutionRoleARN: use the provided default value
-
AWSLambdaKinesisExecutionRoleARN: use the provided default value
-
ConnectCTRKinesisStreamARN: Only required if using Voicemail. Provide the ARN of the Kinesis Stream your Amazon Connect Instance is configured to send CTR events to (refer to section 2.1 of this document)
-
ExistingVMBucket: Leave this blank for new installs and updates
-
LambdaDistroBucket: This is the Symbee Connect Lambda S3 bucket where the Voicemail and Direct Dialing Lambdas will be uploaded from. Select the bucket name from the drop-down that matches the AWS region you are running the CloudFormation in
-
LambdaSourceFile: Select from the dropdown, there will be only 1 value to pick from
-
LambdaSourceFileForDirectDialing: Select from the dropdown, there will be only 1 value to pick from
-
SecretsManagerRegion: Enter the name of the AWS region where the initial Symbee Connect Integration CloudFormation was run in.
Examples: us-east-1, us-west-2, eu-central-1, etc. -
SenderAddressForGroupMessages: Only required if using Group Voicemail. Enter a valid Email Address whitelisted within your AWS SES Service, that will be used as the “From:” address for queue-based voicemail that is sent out via Emails
-
SesRegion: Only required if using Group Voicemail. Enter the name of the AWS Region to use SES in. For example, "us-east-1". (Simple Email Service (SES) isn't available in all regions, but for most installations this will be the same region you are running this CloudFormation in)
-
-
Click Next.
-
On the next Configure stack options screen, accept all the defaults, and click Next.
-
On the next Review testing screen, scroll to the bottom Capabilities section, check the "I acknowledge that AWS CloudFormation might create IAM resources with custom names." check box and finally click Create Stack.
Configuring Lambda for use in Amazon Connect Contact Flows
The following steps declare this utility Lambda function for use in your Contact Flows:
- Log Into your AWS Management Console.
- Make sure you are in the correct AWS region for your Amazon Connect instance (top right of the Navigation bar)
- From the Services menu, navigate to Amazon Connect, and select the Amazon Connect instance associated with the Symbee Connect Environment you used in previous steps.
- From your Amazon Connect instance Summary page, use the left navigation bar and select Contact Flows configuration.
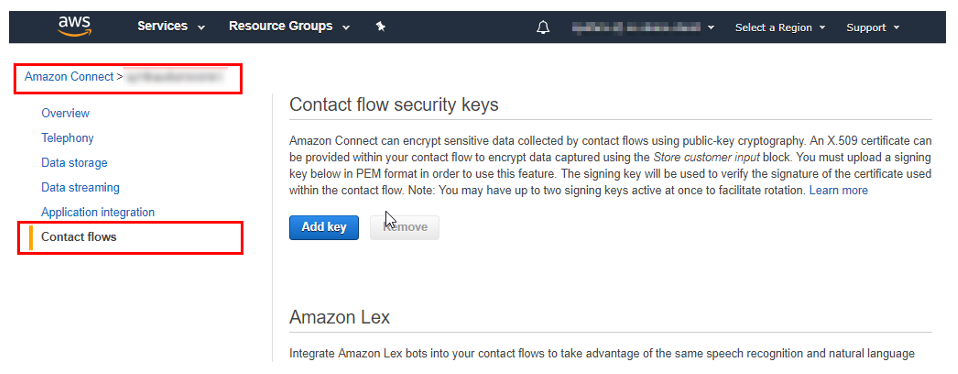
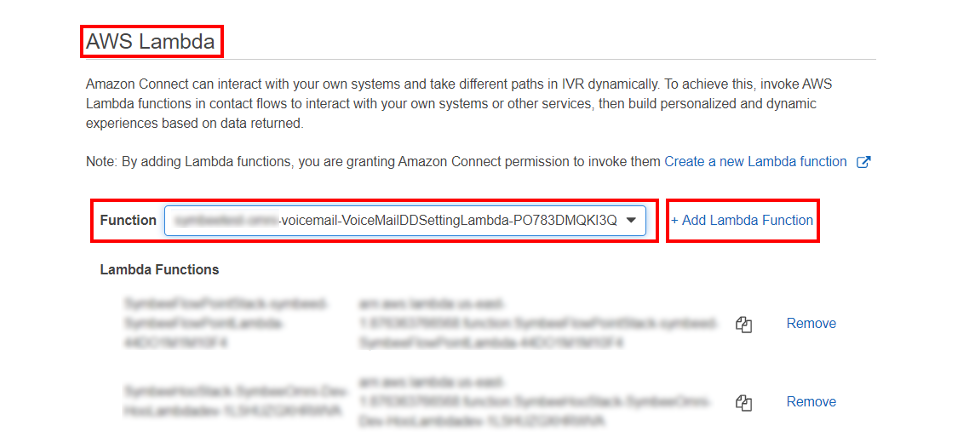
- Scroll down on the Contact Flows configuration page above, to the section headed AWS Lambda where you configure which Lambda functions are available to Contact Flows in your Amazon Connect instance.
- Select the VoicemailDDSetting Lambda that was installed during above step and click the + Add Lambda Function to the right. This allows the utility lambda to be available for use in your Contact Flows.
Creating Dial By Extension Contact Flow
Similar to where you can associate Direct Dial Phone Numbers to users to assist building direct dial Contact Flows, you can also optionally assign a numeric Extension to a user to support a Contact Flow that offers the caller an option of “If you know your party’s extension, you can enter it now…”, and allows a call to be direct queued to the agent associated with an Extension number entered via touch tones.
Configuring User Extension Numbers
- Log into your Symbee Connect Administration Portal.
- From the main Functions menu, go to User Administration.
- From the Users list screen, choose the user you want to add extension to and click Modify.
- Go to the Voicemail Channel section and select Dialing.
- Set the Extension Number to a unique numeric value assigned to the user.

Configuring Bulk Extensions
- Log into your Symbee Connect Administration Portal.
- From the main Functions menu, go to User Administration.
- Select Bulk Maintain User Settings.
- The User List will appear, set the Users Extension Numbers to a unique numeric value.

- Once completed, click the Apply Changes button.
Note: If you happen to accidently assign two users with the same number it will error and highlight which the users has the duplicate.
Look up Users by Extension in Contact Flow
-
Log Into your AWS Management Console.
-
Make sure you are in the correct AWS region for your Amazon Connect instance (top right of the Navigation bar)
-
From the Services menu, navigate to Amazon Connect, and select the Amazon Connect instance associated with the Symbee Connect Environment you used in previous steps.
-
In your Contact Flow, use a Store Customer Input block to prompt the user to enter the Extension of the party they wish to reach
-
In the flow, add an AWS Lambda Call to retrieve the User Login ID for the entered Extension Number:
-
Add an Invoke AWS Lambda Function block (from the Integrate Menu)
-
Within the block, for Select a function: select the new utility Lambda added in Configuring Lambda for use in Amazon Connect Contact Flows
-
Set the following 2 Function Parameters:
1st Parameter
- Destination Key: Operation
- Select: Use Text
- Value: GetUserLoginForExtension
2nd Parameter
- Destination Key: Extension
- Select: Use Attribute
- Type: System
- Attribute: Stored customer input (this is the value the customer entered)
-
If the Extension number is configured in a Symbee Connect User Profile, the above Lambda call will return two values – a Result value of SUCCESS, and UserLoginID containing the found user. Other Result values returned can be NOTFOUND and FAIL
-
Next in the flow, add a branch node to branch if a good Extension mapping was found:
- Add a Check Contact Attributes block (from the Branch Menu)
- For the Attribute to check, set Type to: External, and the Attribute name of Result
- Click Add another Condition, and set to Equals a value of SUCCESS
-
Next in the flow, add a node to store the mapped User Login ID of the found user for the extension
- Add a Set Contact Attributes block (from the Set Menu)
- For the Attribute to save, set: Use Attribute
- Destination Key: TargetAgentId (this can be whatever you want, but using this name here also sets you up for Agent Voicemail flow usage later if you need to – refer section to section 6)
- Type: External
- Attribute: UserLoginID (the name of the output value from the Lambda call above)
Your TargetAgentId contact attribute created in above can then be used later in the flow to set the working queue for queuing directly to an agent, and to set up Agent based Voicemail.
Your Contact Flow nodes will look something like this:
