Do Not Call Lists
The Symbee Connect Do Not Call List (DNC) functionality provides a means for you to associate and upload lists of phone numbers (Do Not Call Lists) to your Symbee Connect Company Environment and then enable the DNC feature at a user profile level so all attempts to make outbound calls by users are first checked against your configured DNC Lists. Refer to Do Not Call Lists Administration for further details.
Installing the Do Not Call CloudFormation
If this is the first Symbee Connect CloudFormation you have run, you will need to run the Integrations CloudFormation first. For step by step instructions and further information about CloudFormations click here.
Download the Do Not Call CloudFormation
- Log into the Symbee Connect Administration Portal.
- If you have more than one Environment configured within your Company in Symbee Connect, make sure you have the appropriate one selected. This can be found on the Navigation bar to the left of the Function menu.
- Then click on the main Function menu in the top navigation bar, and click on Feature Integrations (CloudFormations) in the Company Environment Configuration section.
- From the Feature Integrations (AWS CloudFormations) page, scroll down and locate the Do Not Call CloudFormation, and click the download link to download and save the CloudFormation script.
- You will be prompted with a Save As dialog screen. Save the Symbee ConnectDncCloudFormation.yaml file locally to your PC for use in the following steps.
Run the Do Not Call CloudFormation in your AWS Account
- Log Into your AWS Management Console.
- Make sure you are in the correct AWS region for where you want to deploy (top right of the Navigation bar) – the same region as your Amazon Connect instance.
- Navigate to the CloudFormation console (under Management and Governance, on the Services menu).
- From the CloudFormations console, select Stacks in the left-hand navigation bar, and select Create Stack (with new resources (standard)).
- You will be presented the “Create Stack” view for creating/deploying a new CloudFormation script (known as a stack):
- Under the Prepare Template section, select Template is Ready
- Under Specify Template, select Upload a template file
- Under Upload a template file, click Choose File
- In the resulting file selector, find and upload the file you saved from above.
- Click Next at the bottom
- In the Specify Stack Details screen, complete the fields as follows:
- Stack Name: Enter a name appropriately. We suggest using your Symbee Connect Environment (e.g. dev, prod, etc.) in the name for better organization, in case you have CloudFormations for multiple Symbee Connect Environments being deployed into the same AWS Account.
For example: companyalias-environment-donotcall - LambdaDistroBucket: This is the Symbee Connect Lambdas S3 bucket where the Do Not Call Lambda will be uploaded from. Select the bucket name from the drop-down that matches the AWS region you are running the CloudFormation in.
- LambdaSourceFile: Select from the dropdown, there will be only 1 value to pick from.
- Stack Name: Enter a name appropriately. We suggest using your Symbee Connect Environment (e.g. dev, prod, etc.) in the name for better organization, in case you have CloudFormations for multiple Symbee Connect Environments being deployed into the same AWS Account.
- Click Next.
- On the next Configure stack options screen, accept all the defaults, and click Next.
- On the next Review testing screen, scroll to the bottom Capabilities section, check the “I acknowledge that AWS CloudFormation might create IAM resources with custom names.” Checkbox, and finally click Create Stack.
Do Not Call Configuration
-
Log into the Symbee Connect Administration Portal.
-
If you have more than one Environment configured within your Company in Symbee Connect, make sure you have the appropriate one selected. This can be found on the Navigation bar to the left of the Function menu.
-
Then click on the main Function menu in the top navigation bar, and click on Symbee Connect Integration in the Company Environment Configuration section.
-
Scroll down to the Do Not Call lists configuration section.
-
Set the AWS Do Not Call Resources Region to the same AWS region you deployed the Symbee Connect Do Not Call CloudFormation template into above.
-
Set the Two character country code field value based on the country you are in.
Notes:
- Phone Numbers are declared in your DNC list in E.164 format (that is, they include the international country code on the front). For Example: +15557382130
- If a user attempts an outbound call to a phone number without the ‘+ country code’ on the front, the E.164 Country Code of the Country configured in this setting will be used with the phone number when checking against your DNC lists.
- Refer to https://en.wikipedia.org/wiki/List_of_ISO_3166_country_codes for a list of the two character country codes
- Set the AWS Do Not Call Resources Region to the same AWS region you deployed the Symbee Connect Do Not Call CloudFormation template into.
-
Scroll to the top and click Save.
Create and Populate your first Do Not Call List
Create a New Do Not Call List
-
Log into the Symbee Connect Administration Portal.
-
If you have more than one Environment configured within your Company in Symbee Connect, make sure you have the appropriate one selected. This can be found on the Navigation bar to the left of the Function menu.
-
Then click on the main Function menu in the top navigation bar, and click on Do Not Call Lists in the Contact Center Configuration section.
-
Click on Add New List.
-
Fill in the form:
-
Name: Provide a descriptive name for your list, this is how you will identify it.
-
Description: Provide a short description
-
Strictly enforced?
Available Values:
True: If a number is in this list no one can make a call out to the number
False: Managers will be able to override the Do Not Call values in this list to make calls even if a number is in this list.
-
Expiration Period: Leave empty (set to zero) if entries in this list should not expire, otherwise set to the number of days after which entries added to the list will become inactive and automatically removed from the list.
-
Default List
Available Values:
True: If Users are configured to add new numbers to a list, this list will be used for all new numbers added by Users
False: All other lists
There can only be one default.
-
Address Type:
Available Values:
Phone
-
-
Click Add.
-
When the list is created it will show up in the Do Not Call List table with a status of Ready.
Populate your new Do Not Call List
Note: Phone numbers can be added to a DNC lists in three ways - see here for further details. You only need to perform the steps below if you want to populate your DNC list using a flat file.
When populating a DNC list from a file, files contain the list of phone numbers, each phone number on a separate line with no header line in the file. Each line must begin with the phone number. Each line may contain additional information in comma separated (CSV) format, but only the phone number (first column) will be loaded - any remaining columns in the file will be ignored.
- Open a new Excel Workbook.
- Change the default cell format from General to Text. This will solve a problem where General cells do not show the + sign at the beginning of E.164 formatted numbers.
- Enter the numbers to include in Column A, each number on its own row.
- Once all the numbers have been entered, open the Save As menu.
- Provide a name for the new Do Not Call List file.
- From the file type dropdown, choose CSV UTF-8 (Comma delimited) (.csv)*.
- Click Save.
Upload the Do Not Call List file
-
Go back to the Do Not Call Lists page in the Symbee Connect Administration Portal.
-
Click the List Name of the list to populate. This will display the Manage Do Not Call List page.
-
Click Reload List From File.
-
On the Reload Do Not Call List dialog, click Choose File and select your new Do Not Call List CSV file created above, and click the Reload List from file confirmation button.
-
You will be returned to the Do Not Call Lists screen. After the list has loaded, the List Status will be updated to Ready.
Note: Depending on the size of the list this process can take several minutes.
-
Once the list has been populated, the contents can be viewed on the Manage Do Not Call List page.
Configure Users to use Do Not Call Lists
- Log into the Symbee Connect Administration Portal.
- If you have more than one Environment configured within your Company in Symbee Connect, make sure you have the appropriate one selected. This can be found on the Navigation bar to the left of the Function menu.
- Then click on the main Function menu in the top navigation bar, and click on User Administration in the User Configuration section.
- From the Users list screen, choose the user you want to configure and click Modify.
- Go to Voice Channel and then click on Do Not Call Settings.
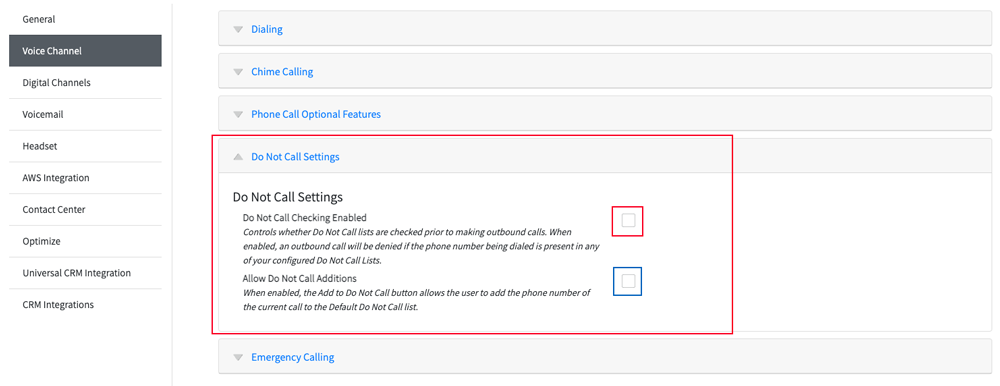
- For the setting Do Not Call Checking Enabled, click the checkbox (red above). This forces all outbound calls made by the user to first be validated against your Do Not Call Lists.
- If you also want to allow users the option to add the phone number of the currently connected caller they are speaking with to the Default Do Not Call list, you can click on the checkbox next to All Do Not Call Additions (blue above). This will add a “+ DNC” button to the user’s interface that is only visible when they are actively on a phone call, or during wrap of a phone call.
- Save the User profile by clicking Save at the top of the profile.
Do Not Call Settings can be configured for many Users at once using User Templates and the Apply User Template feature of Symbee Connect Administration.
For more information see the User Administration section of the Administration Guide.