Administration Portal SSO Setup Guides
The following documentation provides instructions for configuring Single Sign-on (SSO) for your Symbee Connect Administration portal with some of the commonly used SAML-compliant Identity Providers (corporate directories).
For general reference documentation of Administration Portal SSO, also refer to: Administration User Single Sign-On (SSO).
Configure Admin SSO with Microsoft Azure Active Directory
Follow these steps to allow your Symbee Connect administrators to gain access to the Symbee Connect Admin Portal using their authenticated session with your corporate Microsoft Office 365 Azure Active Directory.
Step 1 - Log into Azure AD, declare a New Enterprise App, and assign to required users
-
Log into Azure Active Directory
-
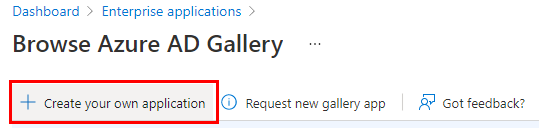
Within the Enterprise Applications section, at the top of the view, select the + Create your own Application option to add a new Application, as there won’t be one listed in the App Integrations Gallery for this.
-
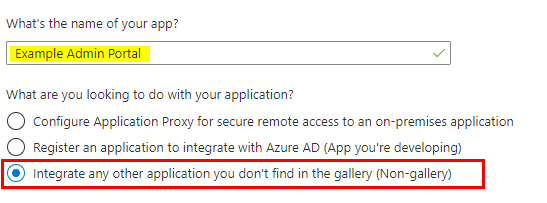
Give your application a name – for example: Symbee Connect Admin Portal, and select the Integrate any other application you don’t find in the gallery… option
-
After the Enterprise Application is created, assign it to your required users
Step 2 - Configure SAML SSO settings for your new Enterprise App within Azure
Note: At the same time as below, also log into the Symbee Connect Administration Portal as a full Company Administrator in another tab, and navigate to the Single Sign On configuration page (under the Company dropdown menu, Security Settings / Single Sign-On) as you need the values from this page to populate in the steps below.
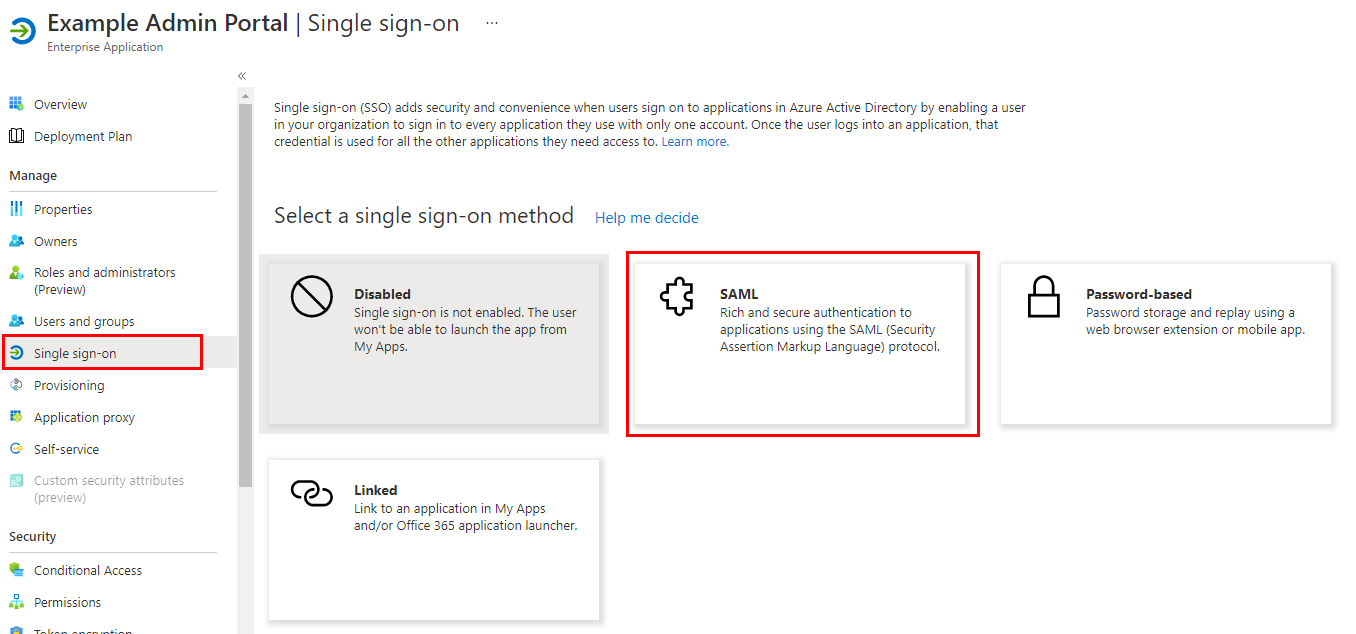
- In Azure AD, select the newly created Enterprise Application, and select Single Sign-on in the left navigation bar, and select the SAML method on the right
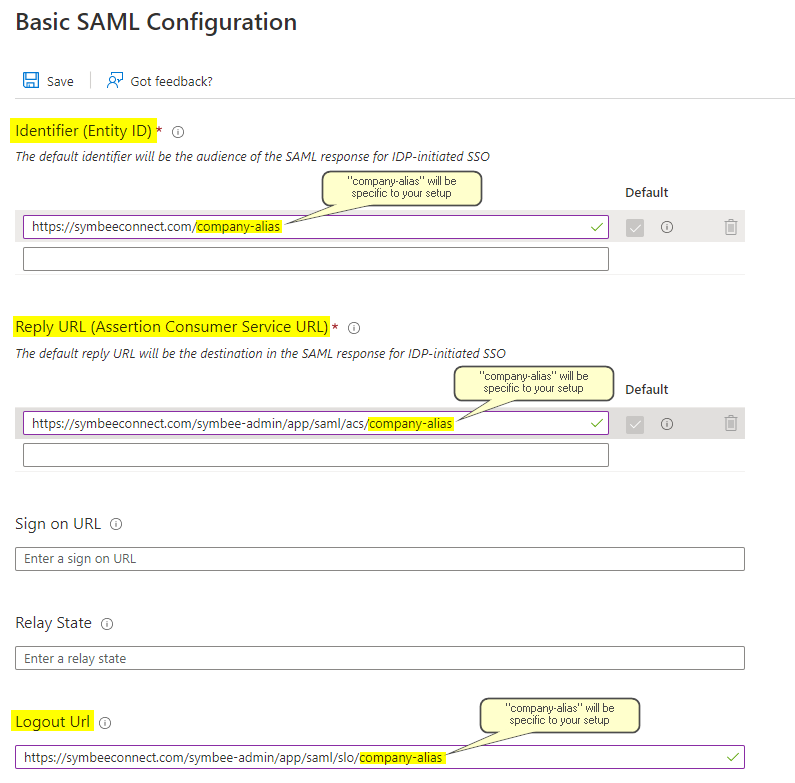
- Under the main Setup Single Sign-on with SAML configuration page, select Edit on Step 1 (Basic SAML Configuration)

- Copy the Service Provider SAML Audience Entity ID value (a URL) from the Symbee Connect SSO page to the Identifier (Entity ID) field in the Azure Enterprise App
- Copy the Service Provider Assertion Consumer Service (ACS) URL value from the Symbee Connect SSO page to the Reply URL (Assertion Consumer Service URL) field in the Azure Enterprise App
- Leave the Sign On URL, and Relay State fields in the Azure Enterprise App blank (not needed)
- Copy the Service Provider Single Logout (SLO) URL value from the Symbee Connect SSO page to the Logout URL field in the Azure Enterprise App
- Save your updates. See below for reference as an example:
Step 3 - Complete the SAML SSO configuration within Symbee Connect
Note: At the same time as below, within Azure AD, remain in the SAML-based Sign-on page of your newly configured Enterprise App, as you need the values from this page to populate in the steps below.
- In the Security Settings / Single Sign-On screen under the Company dropdown menu in your Symbee Connect Administration Portal…
- Provide a description for your Single Single-On configuration for your internal notes in the Identity Provider Description field provided
- Copy the value from your Enterprise App SAML “4” section named Azure AD Identifier into the Identity Provider Entity Identifier field provided in the Symbee Connect SSO screen
- Copy the value from your Enterprise App SAML “4” section named Login URL into the Identity Provider Single Sign-On Request URL field provided in the Symbee Connect SSO screen
- Copy the value from your Enterprise App SAML “4” section named Logout URL into the Identity Provider Single Logout Response URL field provided in the Symbee Connect SSO screen
For reference – these fields from your Azure Enterprise App SAML configuration screen: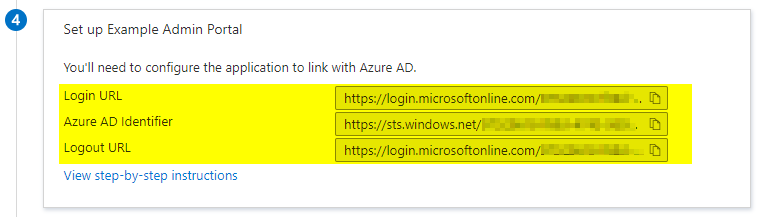
- Copy the value from your Enterprise App SAML “3” section named App Federation Metadata URL into the Identity Provider Metadata URL (if available) field provided in the Symbee Connect SSO screen
For reference – this field from your Azure Enterprise App SAML configuration screen: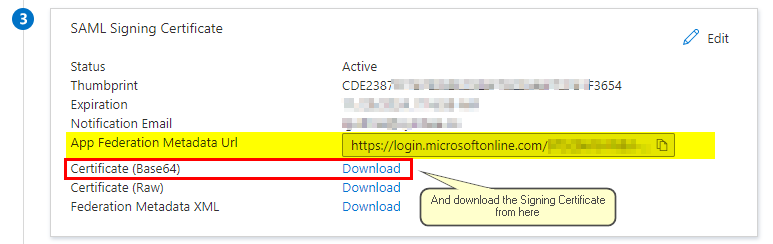
- Download the Signing Certificate using the Certificate (Base64) Download link from your Enterprise App SAML “3” section (see above for reference). Save this file locally, then open in a text editor, and copy the contents of the file into the Identity Provider Signing Certificate field provided at the bottom of your Symbee Connect SSO screen.
The completed section of your Symbee Connect SSO screen should look similar to the below: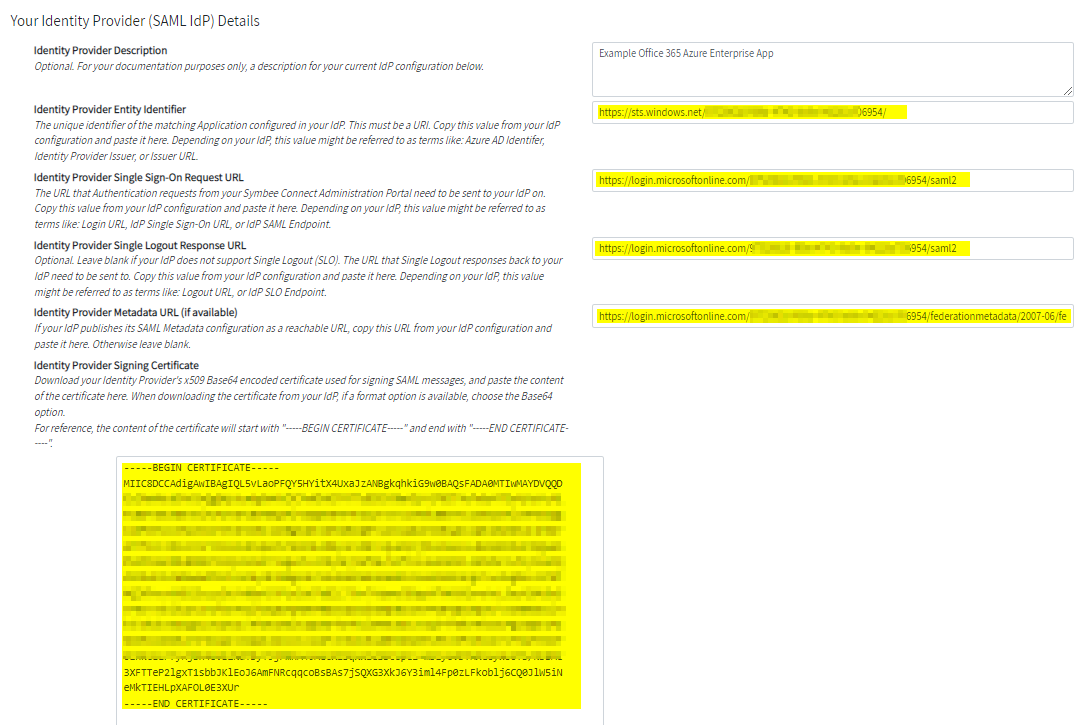
- Save the updates.
Step 4 - Enable Single Sign-On within Symbee Connect, and test
- After saving your updates above, while still in the Single Sign-On screen in your PODUCT_NAME Administration Portal, check the Single Sign-On Enabled checkbox to enable the single sign-on functionality.
- Optionally you can also check the Single Sign-On Login Required (password-based access disabled) checkbox to block users from signing on with a password, forcing them to only sign in using SSO.
- Log out of the Symbee Connect Administration Portal, and from the Login page, test your Single Sign-On settings using the Or login with your corporate Single Sign On section of the Login window.
Configuring Admin SSO with Microsoft ADFS
Review these notes if setting up SSO with your Symbee Connect Administration Portal using Microsoft Active Directory Federation Services (ADFS) as your SAML Identity Provider (IdP).
In Microsoft ADFS:
-
Add / Configure a new Relying Party Trust to represent you Symbee Admin Portal. Notes:
- Select Claims aware, and Enter data about the relying party manually
- Provide a display name, such as: SymbeeAdminPortal
- Under Configure Certificate, do not set an encryption certificate, click Next
- Under Configure URL, check the check-box: Enable support for the SAML 2.0 WebSSO protocol
- For the Relying party SAML 2.0 SSO service URL, copy the Service Provider Assertion Consumer Service (ACS) URL value from your Symbee Connect SSO page, and paste it into this field in ADFS.
- Under Configure Identifiers, copy the Service Provider SAML Audience Entity ID value from your Symbee Connect SSO page, and add the value as a new Replying party trust identifier
-
Once the new Relying Party Trust is created, add a new Claim rule in the Claim Issuance Policy. Notes:
- For the Claim rule template, choose: Send LDAP Attributes as Claims
- Set the Claim Rule name to something like: "Set SAML NameID" (this rule name can be anything you want)
- Map the user's Email Address in your directory, to the Outgoing Claim of: Name ID
- Note: You don't have to use Email Address here, but whichever value you send as the Name ID here, there must be an Administration User configured within your Symbee Connect Administration Portal with its UserId set to the same value you send here in this Name ID rule.
-
Finally, export the Signing Certificate from your ADFS console (this cert needs to be added to the configuration in your Symbee Connect SSO page). Notes:
- Go to ADFS => Service => Certificates
- Select the Token-signing certificate
- Export the certificate contents as: Base-64 encoded X.509 (.CER)
In your Symbee Connect Admin Portal Single Sign-On settings:
For reference, in the Symbee Connect Administration Portal, to get to the Single Sign-On settings screen: Log in, and from the Company menu (very left of the top navigation bar - it will be named with your Symbee Connect Company Alias), select Security Settings from the menu, and then Single Sign-On from the left navigation bar.
-
In the Identity Provider Entity Identifier field, set the value for this field to the entityID value that your ADFS uses within its SAML Requests. Notes:
-
This value is usually:
http://<Your-ADFS-domain>/adfs/services/trust -
One way to confirm this value is to download your ADFS metadata.xml file, and inspect the very first line of the XML file, which starts with:
<EntityDescriptor ID="xxxxxxxx-xxxx-xxxx-xxxx-xxxxxxxxxxxx" entityID="zzzzzzzzz">The entityID is an attribute in this first line (the 'zzzzzzzzz' value depicted above).
-
-
In the Identity Provider Single Sign-On Request URL field, provide the ADFS URL that SAML Authentication requests should be sent to the ADFS Relying Party Trust on. It should look something like:
https://<Your-ADFS-domain>/adfs/ls/IdpInitiatedSignOn.aspx?RPID=<URL-encoded-value-of-Relying-Party-Identifier> -
In the Identity Provider Signing Certificate field, open the .cer file for the Signing Certificate you exported from ADFS in the steps from the previous section in a text editor, and copy/paste the contents of the cert file into this field.
Enable Single Sign-On within Symbee Connect, and test
- After saving your updates above, while still in the Single Sign-On screen in your PODUCT_NAME Administration Portal, check the Single Sign-On Enabled checkbox to enable the single sign-on functionality.
- Optionally you can also check the Single Sign-On Login Required (password-based access disabled) checkbox to block users from signing on with a password, forcing them to only sign in using SSO.
- Log out of the Symbee Connect Administration Portal, and from the Login page, test your Single Sign-On settings using the Or login with your corporate Single Sign On section of the Login window.