Flow Controls Set Up and Usage
Overview
Symbee Connect Flow Controls are a set of generic tools you can use in your Amazon Connect Contact Flows to dynamically change your flow behavior without having to continuously make and test contact flow updates. For a more detailed description, see here.
This guide provides the configuration steps to enable the use of Symbee Connect Flow Controls in your AWS account and Symbee Connect instance.
Run CloudFormation
If this is the first Symbee Connect CloudFormation you have run, you will need to run the Integrations CloudFormation first. For step by step instructions and further information about CloudFormations click here.
Download and Install Flow Control Points CloudFormation
-
Log into the Symbee Connect Administration Portal.
-
If you have more than one Environment configured within your Company in Symbee Connect, on the top Navigation bar, ensure you select the appropriate Environment you wish to configure for Flow Control Points before downloading any CloudFormation script.
-
Then click on the main Function menu in the top navigation bar, and click on Feature Integrations (CloudFormations) in the Company Environment Configuration section.
-
From the Feature Integrations (AWS CloudFormations) page, scroll down and locate the Flow Controls CloudFormation and click the download link to download.
-
You will be prompted with a Save As dialog screen.
-
Save the FlowPointLambdaCloudFormation.yaml file locally to your PC for use in the following steps.
-
Log Into your AWS Management Console.
-
Make sure you are in the correct AWS region for where you want to deploy (this can be found on the top right of the Navigation bar).
-
Click on Services at the top, and under Management and Governance, choose CloudFormation.
-
From the CloudFormations console, select Stacks in the left-hand navigation bar, and select Create Stack (with new resources (standard)).
-
You will be presented the Create Stack view for creating/deploying a new CloudFormation script (known as a stack):
- Under the Prepare Template section, select Template is Ready
- Under Specify Template, select Upload a template file
- Under Upload a template file, click Choose File
- In the resulting file selector, find and upload the file you saved from Step 6 above.
- Click Next at the bottom
-
On the next Specify stack details page
- Give your stack an appropriate name - for example: symbee- yourenvironment -flowcontrols or similar
- Leave the AWSLambdaBasicExecutionRoleARN parameter at its default
- For LambdaDistroBucket, select the the same region you are deploying your CloudFormation in
- For LambdaSourceFile - select the versions zip file from the drop-down (there should only by 1 to pick from)
- Set the SecretsManagerRegion to the name of the same AWS region you deployed the first Symbee Connect Integration CloudFormation into - that is the Secrets Manager region where your Symbee Connect API Key was automatically created
- Click on Next
-
On the Configure Stack options, keep all the default, and click Next at the bottom
-
On the Review page, scroll to the bottom, check the blue "I acknowledge that AWS CloudFormation might create IAM resources" check box, and click the Create Stack at the bottom to complete
Configuring New Flow Control Points
The following steps configure a first example Flow Control Point within your Symbee Connect instance. This is then used in the next section within your Amazon Connect Contact Flow. In addition to this example stepping through Flow Control Points, you can also use create and configure Flow Control Tables. See here for a description of Flow Control Tables.
- Log into the Symbee Connect Administration Portal.
- If you have more than one Environment configured within your Company in Symbee Connect, make sure you have the appropriate one selected. This can be found on the Navigation bar to the left of the Function menu.
- Select Flow Controls from the main Function menu in the top navigation bar under Contact Center Configuration.
- Select Flow Control Points on the left-hand navigation bar
- Firstly, click the green (1) Manage Authorization PIN button on the right, and set a new Authorization PIN and save the value. This value can be changed at any time in future. This value can be accessed from a Manager type Contact Flow to check against a caller’s entry to determine whether to allow the caller to update a Flow Control from a phone call.
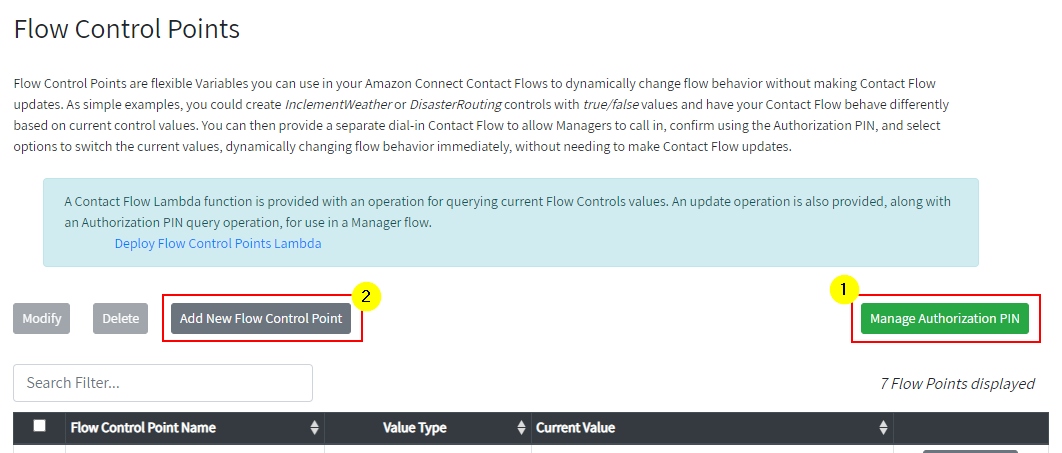
- Now, on the same screen, click the Add New Flow Control Point (2 above) to create your first Flow Control Point:
- Set the Flow Control Name to: ExampleSwitch
- Set the Value Type to: Picklist
- Under Predefined Values: add 2 options - ON and OFF
- Save
- With the new Flow Point now created, click its Update Value button to set the value to OFF
- Below should be the result. Create more Flow Points as needed.

Using Flow Control Points in your Amazon Connect Contact Flow
When you ran the Flow Points CloudFormation, it deployed a Lambda function in your AWS account to use in your Contact Flows. The Flow Control Lambda deployed can be used to access both Flow Control Points and Flow Control Table data from your Contact Flows.
When you followed the steps above in Configuring New Flow Control Points, an initial Flow Control Point was created that can be queried.
Register the Flow Control Lambda for use with Amazon Connect
Allow your Amazon Connect Instance to use the Flow Controls Lambda:
- Log Into your AWS Management Console.
- Make sure you are in the correct AWS region for your Amazon Connect instance (top right of the Navigation bar).
- From the Services menu, navigate to Amazon Connect, and select the Amazon Connect instance associated with the Symbee Connect Environment you used in the above steps.
- From your Amazon Connect instance Summary page, use the left navigation bar and select Contact Flows configuration.
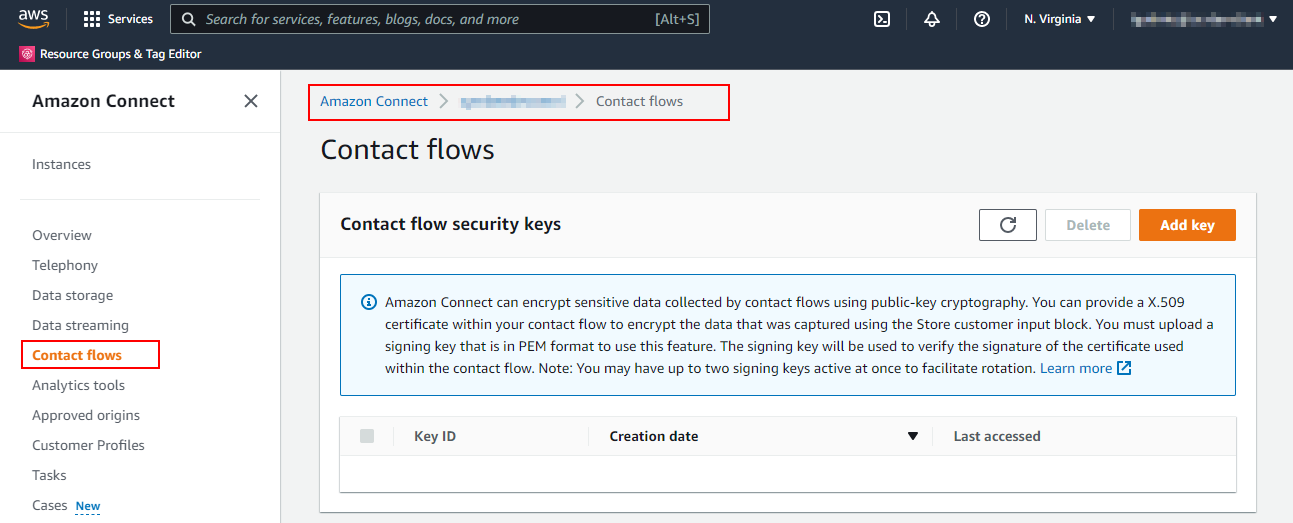
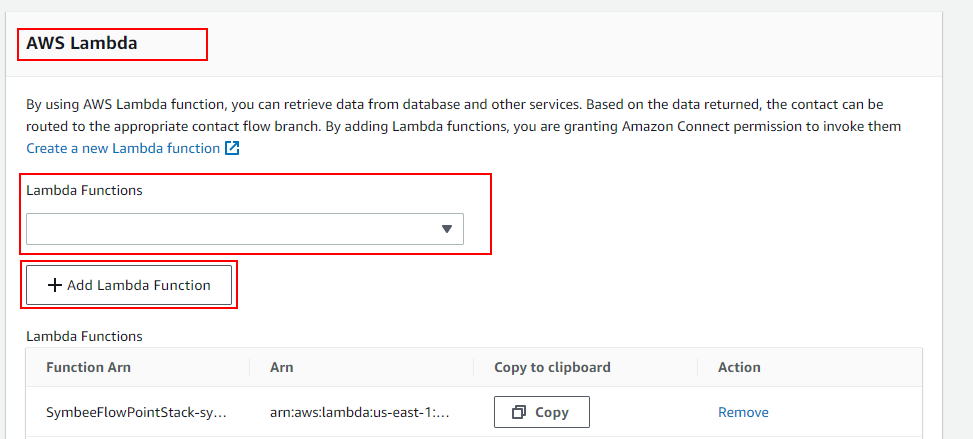
- Scroll down on the Contact Flows configuration page, to the section headed AWS Lambda where you configure which Lambda functions are available to Contact Flows in your Connect instance.
- In the Lambda Functions dropdown box, select the Symbee Connect FlowPointLambda that was installed above and click the + Add Lambda Function underneath. This allows the Flow Control lambda to be available for use in your Contact Flows:
Flow Control Lambda Inputs and Outputs
The following sections show Example usage of the Flow Control Lambda in your contact flow.
The Flow Control Lambda has a primary input Parameter named Operation indicating the type of request. The Operation parameter can be set to one of the following values:
| Parameter | Description |
|---|---|
| GetFlowPoint | Retrieves the current value of a configured Flow Control |
| GetFlowPoints | Retrieves the current values of multiple configured Flow Controls in a single request |
| SetFlowPoint | Updates the current value of a Flow Control (for management flows) |
| ValidateFlowPointAuthPin | Also for management flows, checks a given value against the configured Flow Control Authorization PIN |
| GetFlowTableRow | Retrieves a row from a Flow Control Table for the given key values, and returns all the table row attribute (column) values |
| GetFlowTableRows | Retrieves possibly multiple rows from a Flow Control Table that has multiple keys. For a given partial key match, it returns all table rows (and each row's attribute (column) values) that match the provided key values. At least 1 key value must be provided. This operation returns a JSON object rather than a String/String map - for details see below. The JSON object contains the matching rows returned as an array. For example, if a table has 3 keys, and you provide the value of only the first key (or first and second key), all rows that have the specified values for their first key (or first and second keys) will be returned (as an array or rows). |
| GetFlowTableRowsForConnect | Exactly the same usage as the GetFlowTableRows operation above, except the returned JSON object contains the matching rows returned as inline row objects rather than encompassed as an array - for details see below. (Provided for when you want to use the result and iterate 100% within an Amazon Connect Contact Flow without the use of another custom Lambda to process the result - Amazon Connect Contact Flow JSON-Path notation doesn't support JSON array access notation). |
Operation: GetFlowPoint
Requires one additional input parameter:
| Parameter | Description |
|---|---|
| FlowPointName | The name of the Flow Control value to retrieve |
Returns the following response attributes:
| Parameter | Description |
|---|---|
| IsSuccessful | true indicates the Flow Control name was valid, and its result returned false indicates either an invalid Flow Control name, or a retrieval failure |
| ErrorCode | Only present if IsSuccessful = false. Indicates the failure status code |
| FlowPointName | If IsSuccessful = true, the name of the Flow Control returned |
| FlowPointValue | If IsSuccessful = true, the value of the requested Flow Control |
Operation: GetFlowPoints
Requires one additional input parameter:
| Parameter | Description |
|---|---|
| FlowPointNames | A pipe-delimited list of the names of the Flow Control values to retrieve. For example: ExampleSwitch1|ExampleSwitch2|ExampleSwitch3 |
Returns the following response attributes:
| Parameter | Description |
|---|---|
| IsSuccessful | true indicates the Flow Control names were valid, and results were returned false indicates either invalid Flow Control names, or a retrieval failure |
| ErrorCode | Only present if IsSuccessful = false. Indicates the failure status code |
Additionally, if IsSuccessful = true, each requested Flow Control named in the FlowPointNames input parameter is returned as an attribute named with the Flow Control name, and its value being the currently configured Flow Control value.
For example:
ExampleSwitch1 With the value being that currently configured for ExampleSwitch1
ExampleSwitch2 With the value being that currently configured for ExampleSwitch2
ExampleSwitch3 With the value being that currently configured for ExampleSwitch3
Operation: SetFlowPoint
Requires two additional input parameters:
| Parameter | Description |
|---|---|
| FlowPointName | The name of the Flow Control value to update |
| FlowPointValue | The new value to update the Flow Control to |
Returns the following response attribute:
| Parameter | Description |
|---|---|
| IsUpdated | true indicates the Flow Control was successfully updated false indicates the update request failed |
Operation: ValidateFlowPointAuthPin
Requires one additional input parameter:
| Parameter | Description |
|---|---|
| FlowPointValue | The value (presumably entered by the caller) to check for a match against the configured Authorization PIN value |
Returns the following response attribute:
| Parameter | Description |
|---|---|
| IsAuthenticated | true indicates a match false indicates no match |
Operation: GetFlowTableRow
Requires two (and up to four) additional input parameters:
| Parameter | Description |
|---|---|
| FlowPointTableName | The name of the Flow Control Table to retrieve row data from |
| FlowPointValue1 | The value of the first Flow Table Key |
| FlowPointValue2 | (Optional, required if the specified Flow Table has 2 or 3 configured keys). The value of the second Flow Table Key. |
| FlowPointValue3 | (Optional, required if the specified Flow Table has 3 configured keys). The value of the third Flow Table Key. |
Returns the following response attributes:
| Parameter | Description |
|---|---|
| IsSuccessful | true indicates the Flow Control Table name was valid false indicates an invalid Flow Control Table name, or a retrieval failure |
| RowCount | Only present if IsSuccessful = true. Indicates the number of rows returned (will be 0 or 1). |
| Flow Table Attribute Name | If IsSuccessful = true, the value of the first Flow Control Table attribute configured for the row matching the keys provided as input parameters |
| ... | Per above, the name and value of every additional Flow Control Table attribute configured for the row matching the keys is returned in the one request. |
Operation: GetFlowTableRows
Requires two (and up to four) additional input parameters:
| Parameter | Description |
|---|---|
| FlowPointTableName | The name of the Flow Control Table to retrieve row data from |
| FlowPointValue1 | The value of the first Flow Table Key. |
| FlowPointValue2 | (Optional). If the specified Flow Table has 2 or 3 configured keys, optionally provide the value of the second Flow Table Key. |
| FlowPointValue3 | (Optional). If the specified Flow Table has 3 configured keys, optionally provide the value of the third Flow Table Key. |
Returns a JSON object response.
The example response below is for a request of an example Flow Table named "Products", providing a first key value of "Personal":
{
  "responseStatus": "SUCCESS",
  "errorString": "",
  "tableName": "Products",
  "rowsFound": 2,
  "tableRows": [
    {
      "tableName": "Products",
      "keyValue1": "Personal",
      "keyValue2": "PINS00021",
      "keyValue3": "",
      "attributes": {
        "ProductName": "Personal Home Insurance Single",
        "Description": "Personal single-family dwelling insurance policy."
      }
    },
    {
      "tableName": "Products",
      "keyValue1": "Personal",
      "keyValue2": "PINS00028",
      "keyValue3": "",
      "attributes": {
        "ProductName": "Personal Home Insurance Condo",
        "Description": "Personal condominium insurance policy."
      }
    }
  ]
}
Operation: GetFlowTableRowsForConnect
Requires two (and up to four) additional input parameters (the same as GetFlowTableRows above):
| Parameter | Description |
|---|---|
| FlowPointTableName | The name of the Flow Control Table to retrieve row data from |
| FlowPointValue1 | The value of the first Flow Table Key. |
| FlowPointValue2 | (Optional). If the specified Flow Table has 2 or 3 configured keys, optionally provide the value of the second Flow Table Key. |
| FlowPointValue3 | (Optional). If the specified Flow Table has 3 configured keys, optionally provide the value of the third Flow Table Key. |
Returns a JSON object response.
The example response below is for the same request example provided for the GetFlowTableRows operation further above (requesting a Flow Table named "Products", providing a first key value of "Personal"), to show the difference in JSON response object structure between the two operations (GetFlowTableRows versus GetFlowTableRowsForConnect):
{
  "responseStatus": "SUCCESS",
  "errorString": "",
  "tableName": "Products",
  "rowsFound": 2,
  "tableRow1": {
    "tableName": "Products",
    "keyValue1": "Personal",
    "keyValue2": "PINS00021",
    "keyValue3": "",
    "attributes": {
      "ProductName": "Personal Home Insurance Single",
      "Description": "Personal single-family dwelling insurance policy."
    }
  },
  "tableRow2": {
    "tableName": "Products",
    "keyValue1": "Personal",
    "keyValue2": "PINS00028",
    "keyValue3": "",
    "attributes": {
      "ProductName": "Personal Home Insurance Condo",
      "Description": "Personal condominium insurance policy."
    }
  }
}
Querying a Flow Control in your Amazon Connect Contact Flow
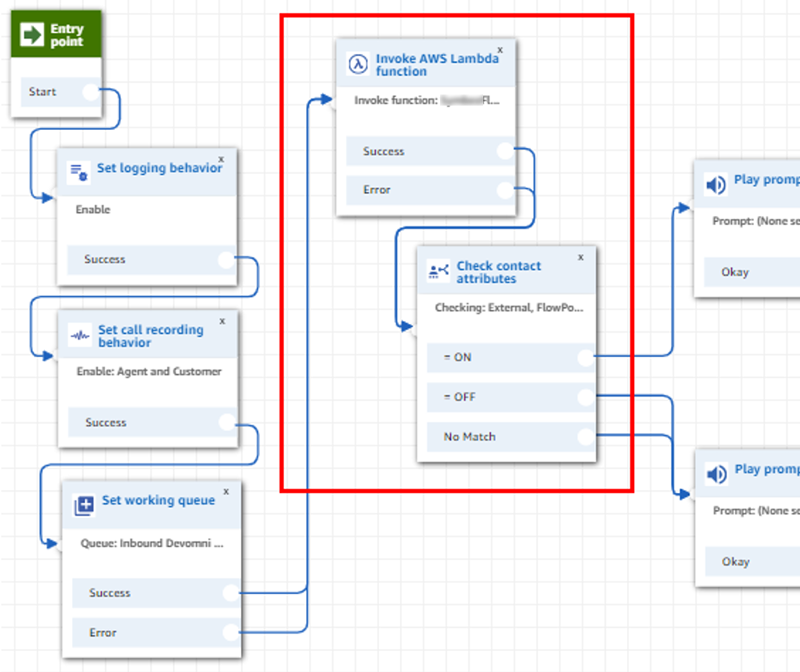
The below shows an example Contact Flow usage that queries a Flow Control Point, and branches based on the current value retrieved. Similarly, the Contact Flow also looks like below if requesting a Flow Control Table row:
-
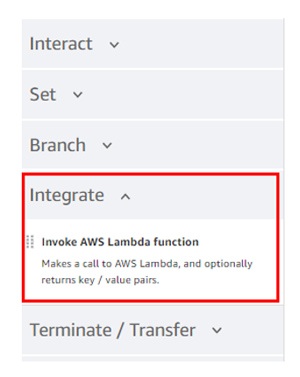
Drag an Invoke AWS Lambda Function node onto your flow from the Integrate section of the left-hand Contact Flow actions palettes:
-
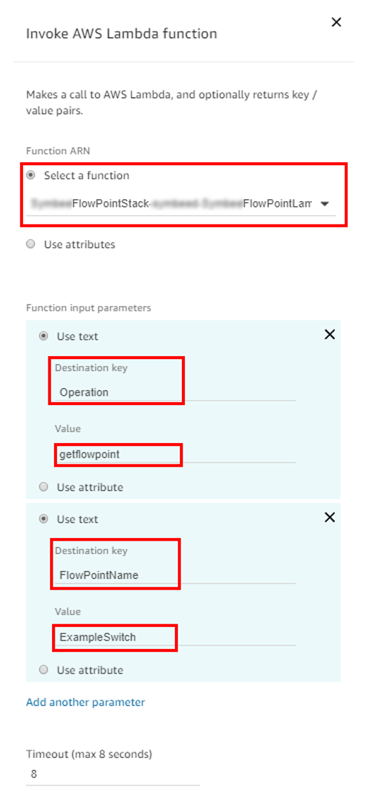
Configure the details of the Invoke AWS Lambda Function node as follows:
-
In the Function ARN drop-down, select the Flow Control Lambda deployed in this step, and enabled for use in your flow when you completed Register the Flow Control Lambda
-
Add a Function Input Parameter, setting Use Text with a Destination Key of Operation and a Value of getflowpoint
-
Add a second Input Parameter, setting Use Text with a Destination Key of FlowPointName and a value of the name of your configured Flow Control that you want to retrieve the current value of
-
Set the Timeout to 8 seconds (conservative – the majority of requests will complete sub-second)
-
-
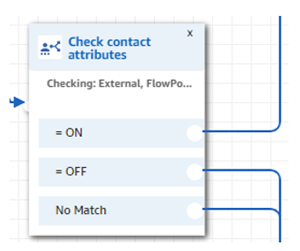
Drag a Check Contact Attributes node onto your flow from the Set section of the left-hand Contact Flow actions palette, and wire it into the flow after the Invoke AWS Lambda node created above.
-
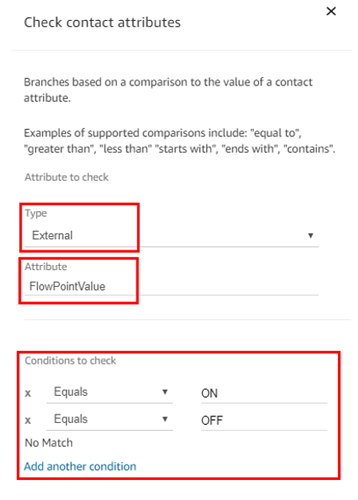
In the Check Contact Attributes node settings:
- Set Type to External (i.e. you want to check an attribute returned from the last Lambda function).
- Set Attribute to check, to FlowPointValue.
- Under the conditions to check, populate conditions appropriate to the values you are using in your configured Flow Control.
-
Then finally wire up Check Contact Attributes output points to take the appropriate paths in you Contact Flow.
Depending on the type of value you are loading into your Flow Control (e.g. possibly a string of message text to play with Amazon Polly), you might replace steps 3 and 4 above instead with things like:
-
a Set Contact Attribute node to save the FlowPointValue for later use in the Contact Flow.
-
a Play Prompt node that directly references $.External.FlowPointValue in its text to play.
Updating Flow Control values in a Manager Contact Flow
The Flow Control Lambda also provides the validateflowpointauthpin and setflowpoint (see Flow Control Lambda Inputs and Outputs for details) to allow you to build a separate administration type Contact Flow to allow a Manager or Supervisor to call into a different Phone Number than your customers, and select options to result in a change to Flow Control values.
In summary, to set this up, you would usually Claim a new Phone Number within your Amazon Connect Instance that is not published to customers, and only known internally to Managers and Supervisors. Then point this phone number to a separate dedicated Contact Flow. This separate Manager Contact Flow allows the caller to enter the Flow Control Authorization PIN, checks it using validateflowpointauthpin, offers menus for the caller to select appropriate changes, and then uses setflowpoint to update the appropriate Flow Control value accordingly.
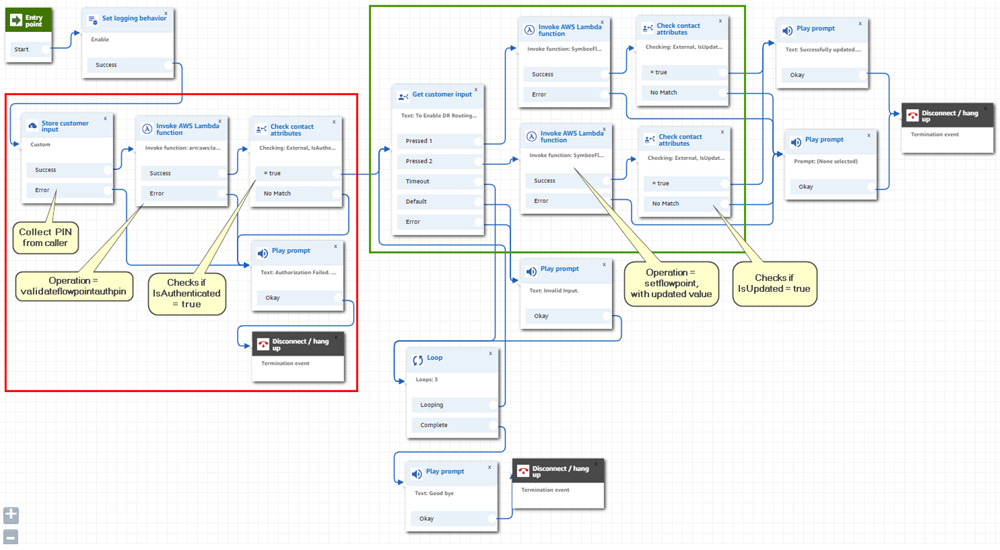
An example Manager type Contact Flow is show below:
-
The nodes outlined in the red box are collecting an Authorization PIN from the caller, and use the validateflowpointauthpin operation of the Flow Control Lambda to check for a good PIN value
-
The nodes outlined in the green box offer a menu to the caller request what Flow Point of Flow Value to set, and use the setflowpoint operation of the Flow Control Lambda to update the Flow Control to the new value
- Create a new Contact Flow and build it out as required, similar (as appropriate) to the flow depicted above.
- Optional: Claim a new Phone Number within Amazon Connect and set it to route calls to your new flow.
- At the beginning of the flow (see nodes within red box above) use the Store Customer Input node (from the Interact section of the left-hand actions palette) to prompt and collect an Authorization code from the caller
-
Then use an Invoke AWS Lambda Function node (from the Integrate section of actions palette) and use the Flow Control Lambda again:
- Add a Function Input Parameter, setting Use Text with a Destination Key of Operation and a Value of validateflowpointauthpin.
-
Add a second Input Parameter:
- set Use Attribute with a Destination Key of FlowPointValue
- set Type to System
- set Attribute to Stored customer input (the caller input value received from Step 3 above)
-
Set the Timeout to 8 seconds (conservative – the majority of requests will complete sub-second)

-
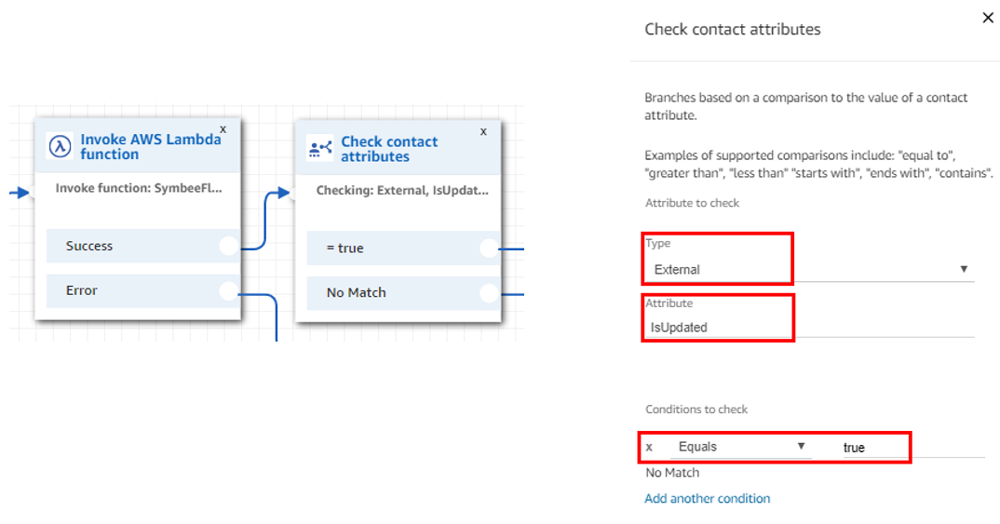
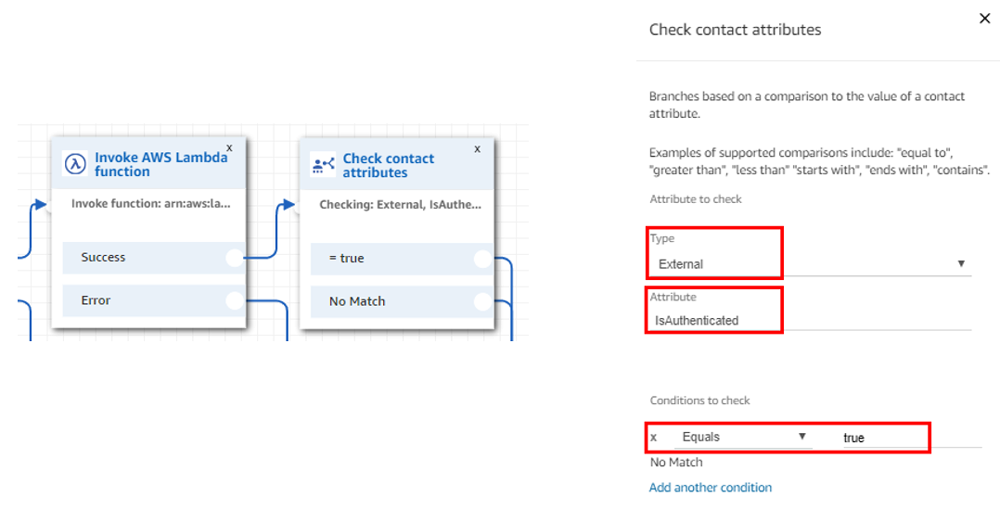
After the validateflowpointauthpin Invoke Lambda function node above, use the Check Contact Attributes node (from the Branch section of the left-hand actions palette) to verify whether the customers input PIN matched the configured Flow Control Authorization PIN:
- Set the Attribute Type to check to External (meaning an output value from a Lambda)
- Set the Attribute to check to IsAuthenticated
- Add a condition, testing if IsAuthenticated has a value Equals true
-
After you have authorized the caller, use Get Customer Input nodes (from the Interact section of the left-hand actions palette) to offer appropriate options to update flow control values.
Based on the caller response, branch to flows that perform appropriate setflowpoint Flow Control Lambda calls (see next step) to update Flow Controls to the new values. -
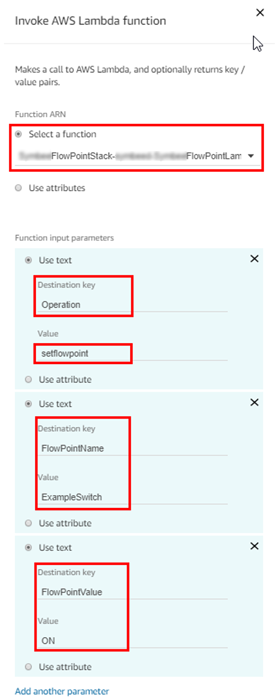
For each flow control you want to update, use an Invoke AWS Lambda Function node to call the Flow Control Lambda again:
- Add a Function Input Parameter, setting Use Text with a Destination Key of Operation and a Value of setflowpoint.
- Add a second Input Parameter, setting Use Text with a Destination Key of FlowPointName and a value of the name of your configured flow control that you want to update.
- Add a third Input Parameter
- always set the Destination Key of FlowPointValue.
- what type (Use Text, or Use Attribute) will depend on what type of value you plan on holding in your Flow Control. For example, if it is an OFF/ON type value, select Use Text and hard-code the new value based on the flow path you are in as a result of the caller input (see example below).
- Set the Timeout to 8 seconds (conservative – the majority of requests will complete sub-second).
-
After each setflowpoint Invoke Lambda function node, use the Check Contact Attributes node again to verify whether the update was successful:
- Set the Attribute Type to check to External (meaning an output value from a Lambda)
- Set the Attribute to check to IsUpdated
- Add a condition, testing if IsUpdated has a value Equals true