Initial Amazon QuickSight Account Setup
Amazon QuickSight is used is as the default visualization BI tool for the Symbee Connect Business Intelligence solution. See Symbee Connect Business Intelligence Introduction for further details.
Enrolment into Amazon QuickSight in the AWS account where you are running your Contact Center Amazon Connect and Symbee Connect resources is a pre-requisite for initial setup of the Symbee Connect Business Intelligence solution. To return to the Initial Setup section, click here.
The following provides a quick step-by-step. For further details about Amazon QuickSight setup or administration, you can always refer to the official Amazon QuickSight User Guide here.
For first-time use of Amazon QuickSight in your AWS Account
-
Sign into your AWS Console, and make sure you select the appropriate region (in the top right) where your Contact Center resources are deployed.
-
In the Service Search bar at the top of the page, search for QuickSight, and select the QuickSight service to enter the Amazon QuickSight console.
- Note: if you have previously used Amazon QuickSight in the same AWS account in a different region, this step may switch your region with the Amazon QuickSight console back to that region.
- To check what region you are in within the Amazon QuickSight console, click on the little user icon in the very top right, and in the resulting dropdown menu, check the region. if not the correct region, change your region using the selector.
-
The first time you enter Amazon QuickSight in an AWS Account, you will be prompted with a Sign up for QuickSight button. Click it.
-
In the next Create your QuickSight account screen, choose from either: Enterprise, or Enterprise + Q. Then click Continue.
-
You are then prompted for Get Paginated Report add-on. Click No, Maybe Later.
- If you click Yes you will be billed immediately, at a monthly rate. You can always enable this later if needed.
-
In the next screen, first select your preferred Authentication method :
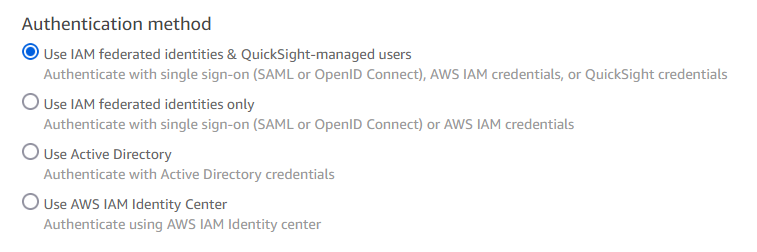
Notes:
- Caution: If you select Use Active Directory, there's no going back
- Either of the first two options (Use IAM federated identities & QuickSight-managed users, and Use IAM federated identities only) allow you to set up user sign-in using an external IdP (for example, Microsoft Office 365 Azure, OKTA, etc.). The first of these two is the most flexible.
- Alternatively the Use AWS IAM Identity Center option is available if you are already using this.
-
Next, on the QuickSight Region section, select the primary AWS Region where you Contact Center and PRODUCT Resources reside.
-
Next, for QuickSight account name, choose a globally unique string identifier that represents your company.
- Your account name can only contain characters (A–Z and a–z), digits (0–9), and hyphens (-).
- Your users will need to know and type this value when signing into Amazon QuickSight each time.
-
Next, for Notification email address, this is required. Provide an appropriate email address.
-
Next, under the QuickSight access to AWS services :
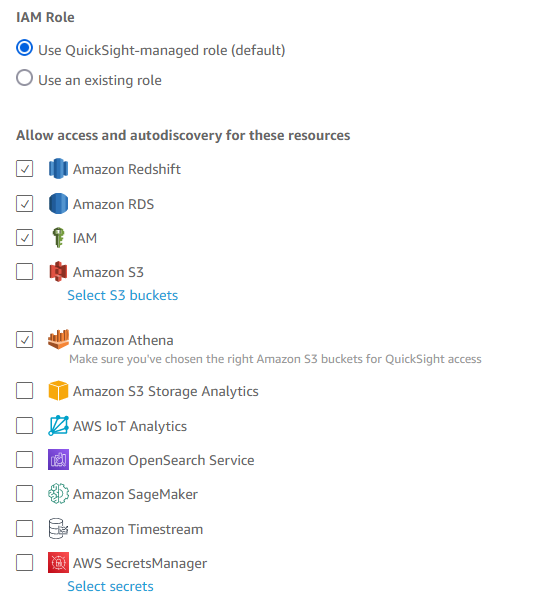
- Under IAM Role, leave the default Use QuickSight-managed role
- Under Allow access and autodiscovery for these resources, you can leave the defaults. Notes:
- At minimum you will need IAM and Athena
- You will eventually need Amazon S3 Access also, however when selecting this it will ask which S3 Buckets you require access to, but the Symbee Connect Business Intelligence buckets don't exist as yet (until you run the CloudFormation stack). So leave S3 Access unchecked initially.
- You can modify and add to these settings later.
-
Click Finish at the bottom.
Wait a minute or so for initial setup to complete.