ServiceNow CRM Configuration
When Symbee Connect is integrated with ServiceNow, the Symbee Connect ServiceNow Fusion provides the following functionality:
- Allows the Symbee Connect Agent UI to be embedded within the ServiceNow UI (using Openframe).
- Perform automated screen pops for incoming interactions.
- Perform automated screen pops for outgoing interactions.
- Supports click-to-call.
Prerequisites
Prior to following these steps, this document assumes the following pre-requisites have already been completed:
- Your Amazon Connect instance has already been set up with the appropriate phone numbers, contact flows, routing profiles and call queues.
- Your Symbee Connect instance has been set up and configured with your Amazon Connect instance details.
Whitelisting ServiceNow Domain in Amazon Connect
Before you can embed the Symbee Connect within ServiceNow, you will need to add your ServiceNow domain to the whitelist of trusted domains in your Amazon Connect Instance.
Please refer to the reference guide on how to Whitelist a URL in Amazon Connect.
Configuration Settings for Embedding into ServiceNow
ServiceNow provides the OpenFrame plugin to allow third-party applications to be embedded within the ServiceNow web-based UI. This section details installing/enabling the OpenFrame plugin in your ServiceNow instance and configuring the embedded Symbee Connect UI within.
Installing ServiceNow OpenFrame Plugin
- Login to you ServiceNow instance as Administrator.
- Using the Filter Navigator on the top left side, search for Plugins.
- Select Plugins from the left-hand navigation bar and under All Applications on the right, use the search box at the top to search Openframe plugin.
- With the Openframe located, click on the Install button.
- The Activate Plugin dialog box will appear. Click Activate to install the Openframe Plugin. This may take a few minutes to run.
Configuring Openframe Plugin
-
Once the Openframe Plugin is installed, use the Filter Navigator search field in the top of the left navigation bar, to find the OpenFrame Configurations view.
-
Click on the New button at the top to create a new OpenFrame Configuration definition.
-
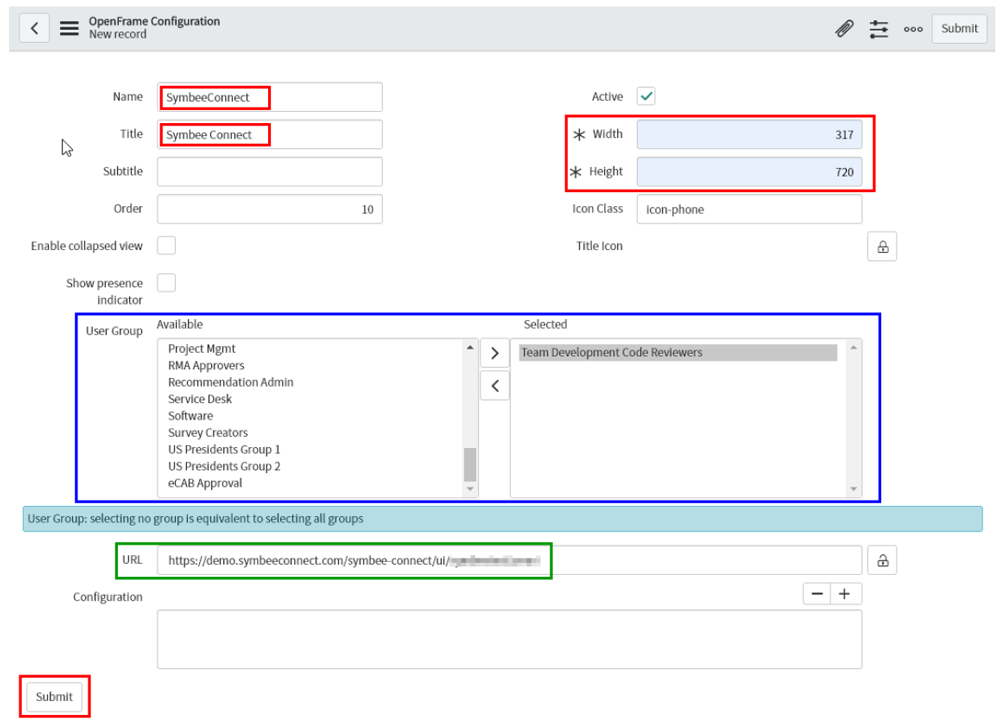
Complete the resulting form as follows:
-
Name: Symbee Connect
-
Title: Symbee Connect
-
Order: 10
-
Active: checked
-
Width: 317 **Also refer to the following section regarding setting the default Symbee Connect size to 90%
-
Height: 720 **Also refer to the following section regarding setting the default Symbee Connect size to 90%
-
User Group Section (see blue highlighted):
Assign the Symbee Connect OpenFrame to required User Roles that will be using Symbee Connect -
URL (see green highlighted):
Click the padlock on the right to unlock the field
Set the URL to your Symbee Connect User URL provided in the main home of the Symbee Connect Administration Portal after login
-
-
Click the Submit button at the bottom of the form to save the new OpenFrame definition.
-
If you refresh your browser (and your user’s role is one of the roles assigned above) you should now see a new phone icon in your top navigation bar to the right of your user name.
-
Clicking the phone should now bring up the embedded Symbee Connect UI.
Whitelist URL to be Trusted for Openframe API in ServiceNow
Similar to the first step where you whitelisted the ServiceNow domain in Amazon Connect, you now need to whitelist the Symbee Connect URL in ServiceNow.
- Use the Filter Navigator search field in the top of the left navigation bar in ServiceNow to enter sys_properties.list and press enter. This will bring up the ServiceNow System Properties view.
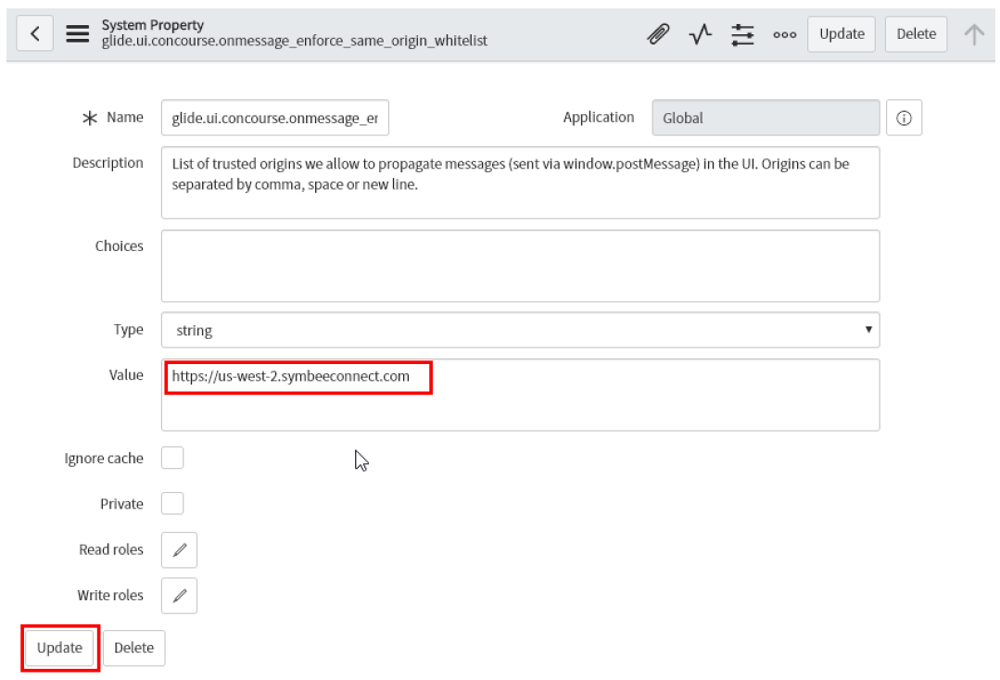
- Use the Search field at the top of the middle section to locate the property named glide.ui.concourse.onmessage_enforce_same_origin_whitelist.
- With the glide.ui.concourse.onmessage_enforce_same_origin_whitelist located, click to edit its value.

- In the resulting maintain form, set the value to include your Symbee Connect domain. This is the front part of the same URL you pasted into the URL of the OpenFrame definition above.
Changing UI Default Size when Embedding
When embedding the Symbee Connect UI within any CRM, you may want to reduce the default size (for example, to 90%) so it takes up less screen real-estate. The size is configured in Symbee Connect Administration to two places:
- The Pre-Logged In default size – the default size of the UI prior to an agent logging in (where there individual user profile hasn’t been loaded yet). This is configured on your Company Environment profile within Symbee Connect Administration.
- The Post-Logged In default size – set on each users profile (or the User Template).
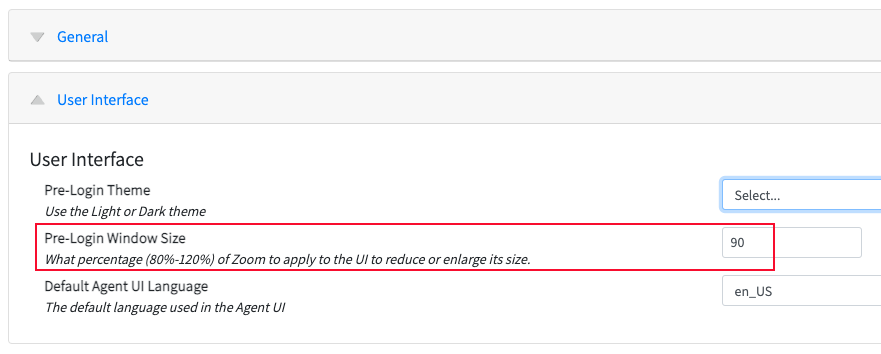
Reducing Pre-Logged In Sizing
-
Log into the Symbee Connect Administration Portal.
-
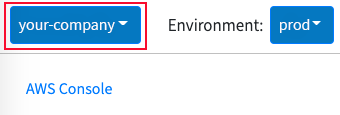
If you have more than one Environment configured within your Company in Symbee Connect, make sure you have the appropriate one selected. This can be found on the Navigation bar to the left of the Function menu.
-
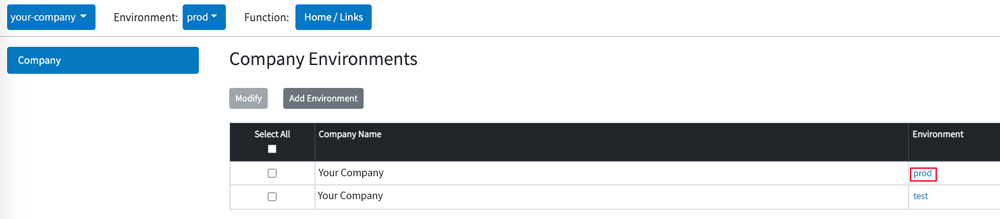
Then click on the Company Environments menu in the top navigation bar on the far left.
-
Click on the Environment you are configuring for use with ServiceNow or check the select box and then click on Modify.
-
On the resulting Maintain Profiles screen, click on User Interface.
-
change the Pre-Login Window Size to 90 (90 percent), and Save your changes.
Reducing Post-Logged In Sizing
- Log into the Symbee Connect Administration Portal.
- If you have more than one Environment configured within your Company in Symbee Connect, make sure you have the appropriate one selected. This can be found on the Navigation bar to the left of the Function menu.
- Then click on the main Function menu in the top navigation bar, and click on User Administration in the User Configuration section.
- Select User Templates on the left navigation bar. If you haven't already created a ServiceNow Users template, click Add Template to create a new one. For more information about adding User Templates, refer to the Quick Start Guide.
- Once you have a ServiceNow Users template, click on your ServiceNow Users template to Modify.
- Click on User Interface under the General section.
- Change the Window Size to 90 and click Save.
- Select User Profiles from the left navigation bar.
- Check all the users you would like to apply the new ServiceNow template to and click Apply Profile button.
- Select the ServiceNow template from the dropdown menu and then click on the Apply Template button.
Configuring Screen Pop
Obtain ServiceNow User and Password for use with ServiceNow API
Within ServiceNow, select a user that has the appropriate access to the tables you will be auto-popping, that has a known password that will not change. Or create a new user specifically intended for API access. See example below.
Note down the User ID and Password – these need to be configured within your Symbee Connect User Profile’s ServiceNow section.
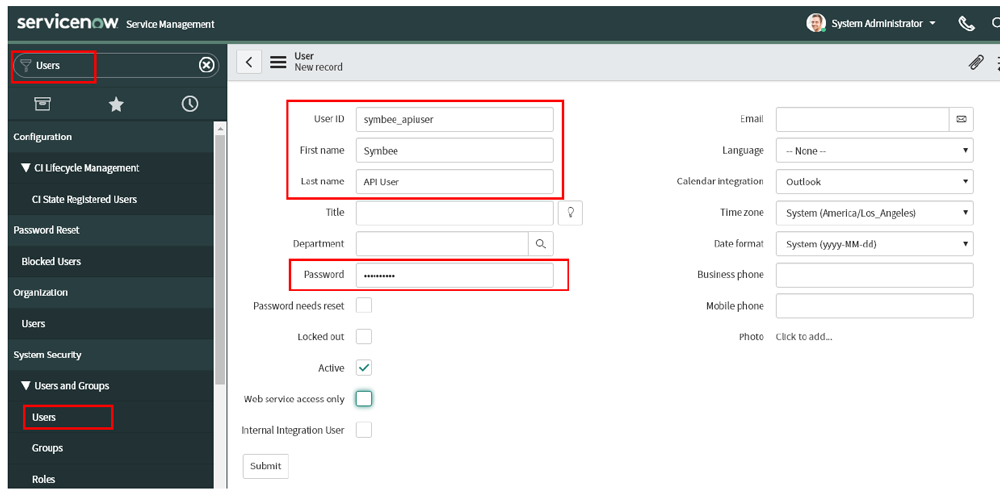
The selected (or created) user to be used for API access will at minimum require the role named web_service_admin be assigned. In addition, it will need any required roles to allow it to access the entity tables you intend to be auto-popping.
For example, if you are going to be searching and popping Incidents, the API user should also have the itil role assigned.
Configure Screen Pop Settings in Symbee Connect
-
Log into the Symbee Connect Administration Portal.
-
Then click on the main Function menu in the top navigation bar, and click on User Administration in the User Configuration section.
-
Select User Templates from the left navigation bar.
-
Select the ServiceNow Users Template and click Modify.
-
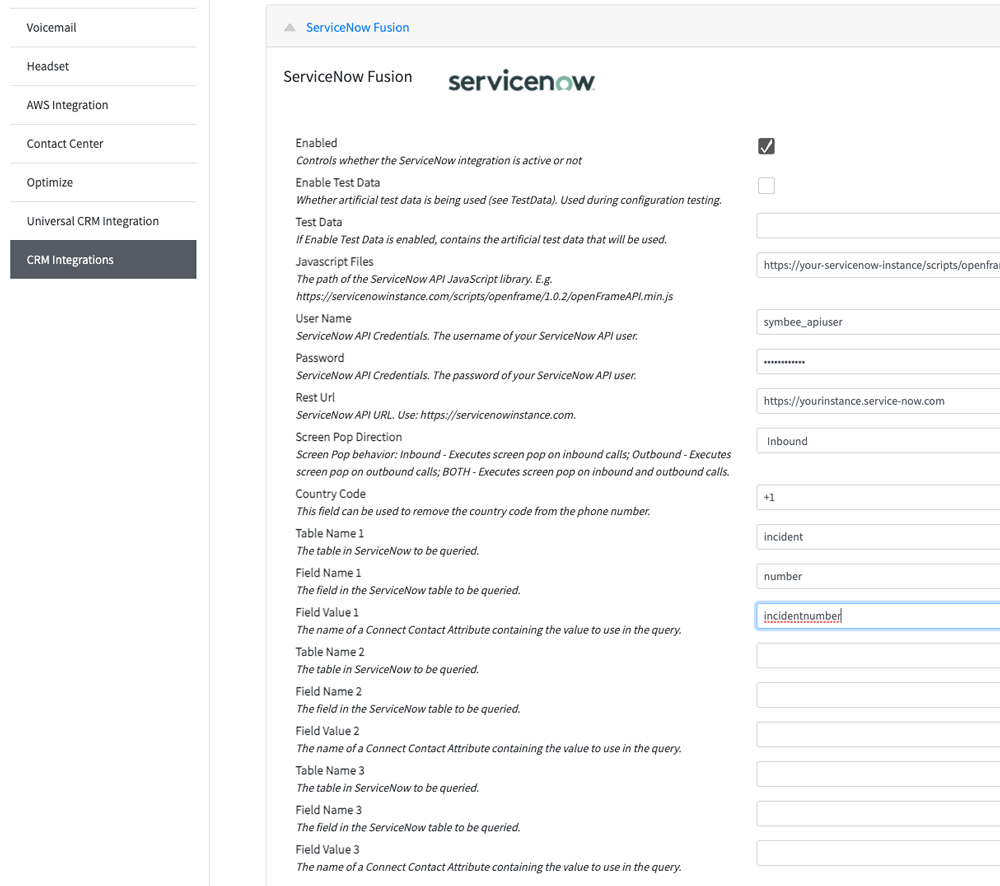
Click on CRM Integrations on the left navigation bar and then click on ServiceNow.
-
Configure with the following settings:
-
Enabled: checked
-
Javascript Files: Set to URL of the OpenFrame JS library in your instance
For example:
https://<yourservicenowinstance>/scripts/openframe/latest/openFrameAPI.min.js -
User Name: The userid of the user that will be used for ServiceNow API calls that you determined in section 5.1 above
-
Password: The password of the user that will be used for ServiceNow API calls that you determined in section 5.1 above
-
Rest URL: The base domain URL of your ServiceNow instance.
For example:
https://yourinstance.service-now.com -
Screen Pop Direction: Set based on wither you want pops to occur for inbound calls, outbound calls, or both
-
Country Code: A utility field that can be used to remove the prefix “+XX” from phone number contact attribute values easily, if you are doing lookups based on phone number values, and the phone numbers you have stored within ServiceNow do not have the full E.164 country code prefix on the front of them.
Table Name, Field Name, Field Value (1, 2, 3)
These settings control (optionally up to 3) lookup attempts and pops of ServiceNow entities on interaction arrival.
The first successful match stops any remaining configured attempts. For example if you have all 3 sets configured, and get no match from the Table 1 settings, it will progress to the lookup defined in the Table 2 settings; if you then get a good match on Table 2 settings, any lookup configured in the Table 3 settings will be ignored.- Table Name(n): The internal (not display) name of the ServiceNow table to perform the search and pop on.
- Field Name(n): Within the table defined by Table Name(n), the internal (not display) name of the column value to search.
- Field Value(n): The name of the Amazon Connect or Symbee Connect Contact Attribute that will contain the value to be searched on. This is the name of the contact attribute set in an Amazon Connect Contact Flow, or for Symbee Connect chats the name of the pre-chat survey field, or any of the standard predefined Symbee Connect interaction attributes (e.g. PhoneNumber, EmailAddress)
-