Displaying Contact Attributes to the User/Agent
Overview
The Symbee Connect Contact Attributes Fusion provides a no-code, configuration only way to easily display the values of important nominated Contact Attributes to the User/Agent UI as an incoming interaction is being delivered to the agent.
The normal use-case is to identify certain key pieces of information to display to the Agent on interaction delivery that will assist with how agents greet the customer, streamline contact handling (for both the agent and the customer), and potentially make lookup of customer details in back end systems more efficient for the agent, without getting the customer to repeat information already previously captured. A "quick copy" button displays on the hover-over of each attribute in the UI, allowing the agent to quickly copy the value into their copy/paste clipboard if needed (for example to paste into a CRM window that is not integrated).
Then populate Contact Attributes in Amazon Connect Contact Flows prior to routing the contact to the agent. How the information that gets loaded into the Contact Attributes is obtained is dependent on your customer experience, but could be information requested from the customer in the contact flow, and/or details retrieved from a back end CRM using Lambda, and/or other characteristics about the contact (like Brand based on Dialed number, Queue names, Options chosen, geolocation data, etc.).
Then, using the Contact Attributes Fusion User/Template settings, configure the names of the specific Contact Attributes you want displayed to the user upon interaction delivery.
Configuration
The following sections walk through the set up to display nominated Contact Attributes to your users.
The below steps assume you are using User Templates in the Symbee Connect Administration Portal to manage making changes to you user's configuration (by updating a Template and then re-applying that template to all your users at the same time in one action). However, if not using User Templates the settings on an individual User profile are identical to those referenced below on the User Template so you can update each User profile one at a time if you prefer (skipping the Apply Template step).
Update User Contact Attributes Fusion Configuration
-
Log into the Symbee Connect Administration Portal.
-
Click on the main Function menu in the top navigation bar, and click on User Administration in the User Configuration section of the menu.
-
Within the User Administration module, select User Templates from the left navigation bar (or to configure individual users, select Contact Center Users from the left navigation bar).
-
On the resulting User Templates listing screen (or Contact Center Users listing screen if configuring individual users), select the User Template (or User) you want to configure from the list and click the Modify action button above the list.
-
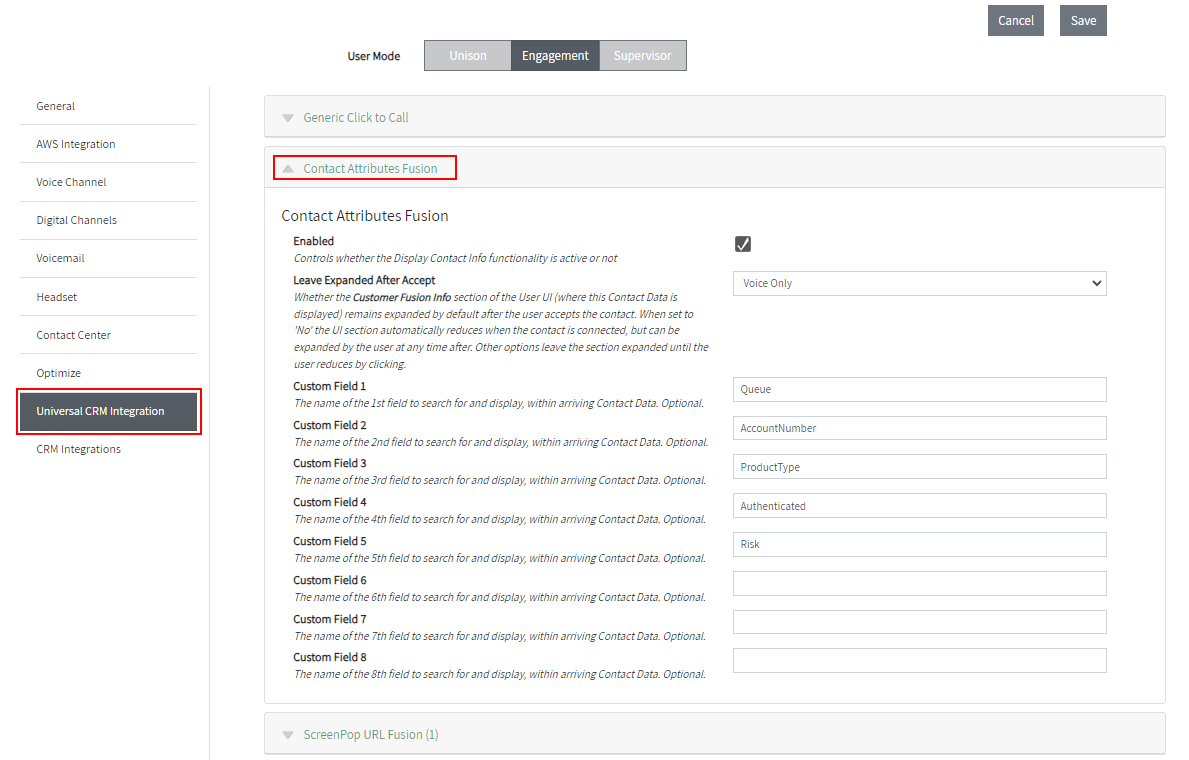
In the resulting Maintain screen, click on the Universal CRM Integration group on the left navigation bar and then click on Contact Attributes Fusion on the right to expand the section.
-
Configure the settings as follows:
- Enabled: Controls whether the display of Contact Attributes functionality is enabled for the user. Make sure this is checked.
- Leave Expanded After Accept: Controls whether the Customer Fusion Info section of the PRODUCT Name User/Agent UI (where Contact Attributes are displayed) remains expanded after the user accepts the interaction, or whether it minimizes upon accept. The following options are available: No, Voice Only, All Except Chat, and All. When set to No (the default) the UI section automatically reduces once the interaction is connected, but can be expanded by the user at any time after. The other options leave the section expanded until the user reduces by manually clicking, depending on the type of Interaction delivered.
- Custom Field 1 through 8: Nominate up to 8 Contact Attributes to be displayed to the user/agent. Set these values to the exact name (case-sensitive) of the respective Contact Attribute created in Contact Flows.
-
Click Save.
Applying a User Template to User Profile
Still within the Symbee Connect Administration Portal:
- Click on the main Function menu in the top navigation bar, and select User Administration in the User Configuration section.
- Click on Contact Center Users from the left navigation bar.
- Select the check box next to the user (or users) you would like to apply the template to and click the (Re)Apply Profile button.
- In the Apply (or Re-apply) User Template dialog window, choose which template you would like to apply, then click Apply Template.
Validation of Contact Attributes Display
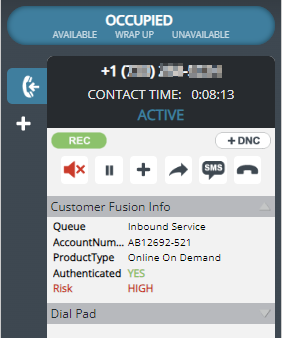
To validate the functionality of the configured Contact Attributes Fusion, place inbound test calls that populate the nominated Contact Attributes in Amazon Connect Contact Flows prior to queuing the call to an Agent. Confirm the nominated Contact Attributes are displayed in the Custom Fusion Info section of the Symbee Connect User/Agent UI (see below as an example) when the inbound call is delivered to the Agent.
Highlighting specific Attributes in the User/Agent UI
Additional functionality is available to optionally highlight the display of key nominated Contact Attributes in the User/Agent UI, as follows.
Highlighting of specific Contact Attribute values is controlled with the optional presence of a special Contact Attribute named “sc_hilight_attributes”. The presence of this Contact Attribute is optional, and if not present the attributes nominated for display are all presented in a uniform black-on-white manner in the Customer Fusion Info section of the UI.
If present (expected to be set in Contact Flows prior to the contact being delivered to the Agent), the value of the sc_hilight_attributes Contact Attribute controls the highlighting behavior (which attributes get highlighted, and the type of highlight). This means highlighting can be controlled on an individual contact-by-contact basis based on contact/customer related conditions.
The format of the string value for sc_hilight_attributes is essentially a pipe-delimited (|) list of the Contact Attribute name’s values you want highlighted.
For each Attribute listed you can also optionally additionally control (comma separated) the following:
- What type of highlight you want:
- NEGATIVE - will highlight in red.
- NEUTRAL - will highlight in blue. This is the default highlighting type if you don’t specify otherwise.
- POSITIVE - will highlight in green.
- How to highlight:
- LABEL - highlights the Attribute Name/label only.
- VALUE - highlights the Attribute Value only. This is the default if you don’t specify otherwise.
- BOTH - highlights both the Label and Value.
Example 'sc_hilight_attributes' values:
Example 1
Value: Balance|Authenticated|Risk
Would highlight the Balance, Authenticated, and Risk attribute values only, with NEUTRAL highlighting (blue).
Example 2
Value: Balance,NEGATIVE|Authenticated,POSITIVE,BOTH|Risk
Would highlight the Balance attribute (value only) in red, the Authenticated attribute (both label and value) in green, and the Risk attribute (value only) in blue.
Example 3
Value: Brand,NEUTRAL,LABEL|Risk
Would highlight the Brand attribute (label only) in blue, and the Risk attribute (value only) in blue.
Example 4
Value: ALL,NEGATIVE
Providing the attribute name of 'ALL' indicates you want to highlight all nominated/displayed Contact Attributes (rather than listing each one individually). The type (NEGATIVE, NEUTRAL or POSITIVE) and what to highlight (LABEL, VALUE or BOTH) can still optionally be used with the 'ALL' option if needed.
The above example would highlight all attributes displayed (values only) in red.